The best water filter bottle yet – The Water To Go, portable drinking water bottle.
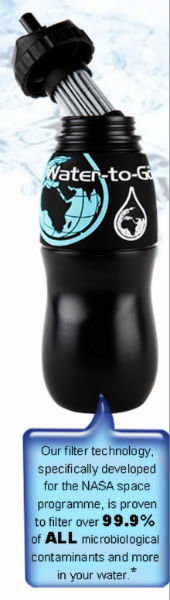
Keeping things simple is what makes this Water To Go filter bottle system so good – in fact it could even be the best water filter bottle yet.
 Most of us know the technology that goes into the modern water filter – it’s been adopted by many water filtration companies and keeps on improving.
The old fashioned activated charcoal style of filter is now thought of as real ‘old school’ and rarely used.
The technology behind the Water To Go filter bottle has been designed and developed specifically for the NASA space program.
It is constructed by utilizing the latest ‘Nano Technology’ – the filter is manufactured using a non-woven medium that is termed as a ‘charged layer membrane’.
Nano Alumina, carbon and other filtration elements come together to give this new patented filtration system.
One of the key things that I think make this possibly the best water filter bottle available at the moment is the fact that is has been very highly tested – independently tested against the international standards, by specialists and reaches the standards in the USA, Europe and also in India.
In a nutshell, the Water To Go Filter Bottle will eliminate over 99.9% of the contaminants found in harmful, grubby water – no mean feat!
Specially for our readers, here at UKpreppersGuide:
we have been able to secure a special 20% discount on any Water To Go filter bottles and the refill packs.
You Will Not Buy Cheaper
* read on to see how you can claim this great offer
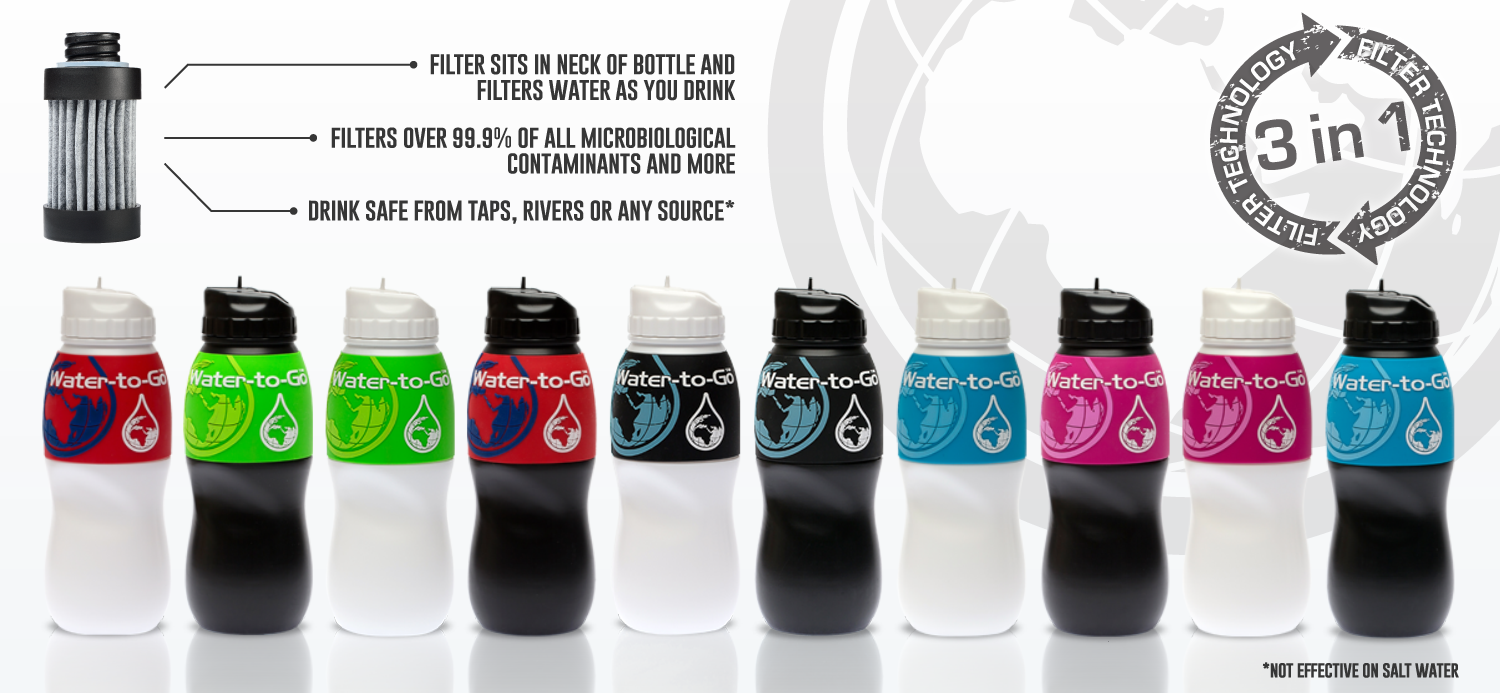
Water To Go specification – the filter will remove:
Metals & Chemicals
- Chlorine, Fluoride
- Chromium, Mercury, Nickel, Copper, Iron
- Lead, Gold, Silver
- Aluminium
- Volatile Organic Compounds including Formaldehyde*
* In certain areas of the world natural Arsenic occurs, WTG filters cannot filter Arsenic to 99.9%.
Virus
- Norwalk, Hepatitis A, Tota Virus, Adenoviruses, Enteroviruses,Reoviruses
Bacteria
- Coliform, E.Coli, Cholera, Typhus
- Dysentery, Botulism, Polio, Virus Botulism
- Vibrio Disease, Campylobacteriosis
- Leptospirosis – Well’s Desease
- Legionella (Legionnaires Disease and Pontiac Fever)
Oocysts- Protazoa
- Giardia lamblia
Parasites and waterborne pathogens
This list is abridged but includes some of the most recognizable and common problems.
- Fasciolopsiasis Taeniasis – Tapeworm
- Echinococcosis Ascariasis
- Coenurosis Schistosomiasis
- Cryptospondium Tryonosoma (sleeping sickness)
- Threadworm Guinea Worm
- Hookworm Roundworm
- Pinworm Onchiocerca
- Fasciola Hepatica/Liver fluke
Don’t believe me..?
Take a look at my short review video to see the full test
Use just about any water source (except seawater) to fill the ‘Water To Go’ bottle and you’re good to go..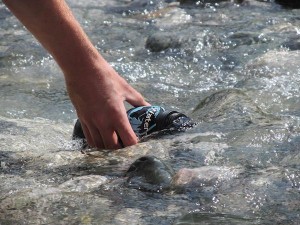
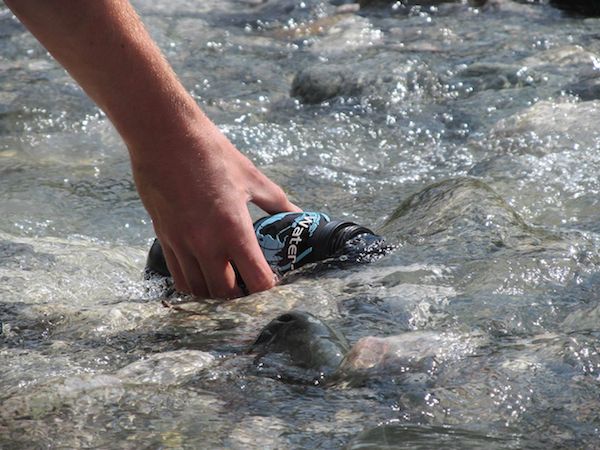
It’s that simple – keep the drinking spout and lid away from the ‘contaminate’ water and make sure its clean and dry and re-screw back onto the full bottle.
From almost any water source you now have pure, clean, great tasting, SAFE water every time!
Just do the maths:
How will you know when the filter needs replacing?
There are two ways: -
- Make your first order *using the UPREP20 discount code.
- Register with Water-to-Go *this is important.
- The staff at Water-To-Go will then send an email to remind you after three months.
- When you re-order new filters, don’t forget your 20% discount code for more savings
* Buy your Water To Go filter bottle direct from the manufacturers by clicking on the discount code:
Then you simply add the code at checkout shown here – 
– just click the code and use our special 20% discount code: UKPREP20

In conclusion:
**Since writing this report:
the Water To Go bottle has undergone a complete upgrade and revamp.
There has been some big changes and all for the better I think.
It would seem the folks at Water To Go never stop testing their product and the latest bottles look, feel and work even better than the standard black bottles.
Just use the normal 20% discount link [UKPREP] to have a look at the new style and don’t forget your special UK Preppers Guide discount code when you buy.
Happy Prepping Folks…
-
There are several different methods for starting a fire in the wild – but with the absence of a naked flame, what is the best fire starter for bushcraft and survival.
 There has always been a few tried and tested fire starting methods that have
  been passed down through the ages – most will result in a burning ember, sufficient to be added to some dry tinder to achieve a flame.
The main object has always been to produce that hot burning ember as quickly as possible, and also using as little effort as possible – once you have it, you then a means to ignite your fuel, namely dry tinder and from there you have the basis of a fire.
This ‘friction method’ has been an old favourite amongst bushcrafters and producing fire this way is very rewarding – but, unfortunately, it can also be quite tiring and time consuming. As well as taking a lot of practice to perfect.
Many bushcraft and survival experts will use a ‘firesteel / ferro rod’ as their preferred method but that method has its drawbacks – namely, you are producing sparks only, and hoping to get your tinder to ignite.
What is the best method for producing a hot ember both quickly and reliably, every time?

Fortunately we have moved on and modern methods have made it a lot easier and quicker to get that hot ember.
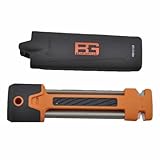
I have been researching this area of fire starting and have found, what I consider, the best fire starter for bushcraft and survival in one easy bit of survival kit.
It’s made by Bushcraft Essential of Germany and is capable of producing a burning hot ember in a matter of seconds with almost zero effort.
This type of equipment is known as a fire piston, and this particular one has just become available on the market.
The BE Fire Piston will save you time and guarantee easy firelighting each time.
Here’s some specifications of the BE Fire Piston:
- Precision CNC machined
- High grade aluminium alloy

- high quality nitrile rubber piston gaskets
- Weight: 160 grams
- Length: 125 mm
- Diameter: 23 mm
- waterproof (IPX8) capsule for tinder storage
- Internal ferrocerium rod
What makes this such a good method of starting a fire?
This is a precision engineered bit of kit, something you would expect from the German engineers Bushcraft Essential – theres a lot of thought gone into this and it shows. The ease at which it is capable of producing a hot ember is quite amazing..
In order to show how good the fire piston actually is, I have done a review video:
Conclusions:
Well as you can see in the video, it does exactly what you’d want it to do – no messing, no fuss, it was easy to load and easy to use, with no fuss.
The best bit – it took under 1 minute to give me a hot ember ready for fire making.
I really like this bit of survival kit and it definitely gets a 10/10 from me.

.
If you liked this article - Please Share ItWhat is the best all round camping and hiking hammock for preppers?

Setting up a tent has always presented problems when theres uneven or rough ground – no matter how good you clear the area, there will always be a lump or a stone left below, just waiting to aggravate you all night.
Then there’s the problem of wet ground or snowfall – the very last thing you want to be sleeping on.!
Well, there’s really only one answer when you want to overcome all these problems…. Just use a hammock.
Gone are the days of the old canvas, saggy bottomed, cramped and uncomfortable hammocks. They really are a thing of the past.
Modern hammock systems make this form of sleeping an absolute pleasure, and, without doubt, one of the leaders in hammock design world is the LAWSON – BLUE RIDGE CAMPING HAMMOCK .
But theres more to this bit of outdoor kit than meets the eye..!
 click image to enlarge
Not only is it a superbly comfortable hammock. It can double up as a bivvy tent, giving you the best of both worlds.
The hammock can be used in the traditional way and set up between any two solid objects or, used as a bivvy on the ground with the normal guide rope set up giving support.
Along with the built-in mosquito net and a detachable, fully fitted rain cover, you have every angle covered when out away from civilisation.
 I have chosen the Lawson Blue Ridge Hammock system as my best all round camping and hiking hammock for several reasons and here’s the specifications –
- Lightweight, weighing in at 4.25lbs ( 1928 grams ) – that’s less than 2 bags of sugar..!!!
- Compact – supplied stuff sack measures only 22″ x 6″
- Integrated double coil nylon zipper bug net with tent poles – all seams are sealed making it a bug free zone.
- Fully enclosed waterproof rain tarp – this can be used with or without.
- Internal mesh storage pockets and O-ring ceiling fixing
- Nylon waterproof lower border – will protect you against water blowing up under the tarp.
- Aluminium alloy grade archpoles for canopy spreader
The whole unit measures 90″ x 36″ when setup and will take a massive 250lbs weight limit – The sleeping area measures ??? x ????, so, realistically it will take anyone up to 6′ 3″ and weighing 18 stone – as a ‘British Standard Englishman’ of 5′ 8″ and weighing 13 stone, I found it very spacious inside. (as you can see here )
Background information.
The Lawson Blue Ridge Hammock is an American based company that manufacturer this hammock and distribute world wide, in fact, it is the only hammock they manufacture and they have been doing so since 1997 – that sort of longevity gives me great confidence in a company. The founder and owner, Wes Johnson is an outdoor addict and has dedicated his time to designing a genuine replacement for the tent.
Again, another reason I am saying this is one of the best hammock systems out there today – they are not some ‘here today, gone tomorrow’ company. In fact they even offer a money back guarantee on their hammocks should you not be 100% satisfied – just another tick in the box that gives me confidence in their gear…..
As a prepper or any outdoorsman for that matter, I choose my equipment carefully. Value for money plays a big part in the kit I own and certain kit needs to be high quality – fortunately with modern materials and modern manufacturing techniques this hammock system definitely comes into the great value for money area.
I actually think it offers one of the best outdoor sleeping systems on the market today.
As with all my other reviews, it is far easier to actually test out a product and see how it performs out in the woods – so this is my full video review and testing of the Best All Round Camping and Hiking Hammock, the Lawson Blue Ridge Hammock.
My Conclusions:
I really cannot fault this bit of kit..!
It works exactly as you want it to. The quality is superb, but best of all is the amount of room inside.
Changing from a conventional ‘saggy’ hammock to the Lawson Blue Ridge Camping Hammock is like trading in your scooter for a Rolls Royce.
I definitely think this is the best all round camping and hiking hammock for prepping, as well as for campers and hikers that’s available to us today.
If you liked this article - Please Share It
Testing and review of the Grilliput Fire Bowl and Folding Barbecue Grill.

There are many times when you’re out hiking or camping and you can have an open fire or barbecue but it needs to be contained and controlled.
Well, if you want to cook on an open fire, BBQ style, you definitely don’t want to be carrying around a ‘normal’ BBQ grill – it’s far too heavy and bulky for sure – weight is always an issue and choosing what to put in your rucksack or even your bug out bag, will restrict the type of gear you carry.
So what is the alternative?
I stumbled on this great bit of kit a while back and finally got a chance to try it out and review the Grilliput Fire Bowl and Folding Barbecue Grill.
This is my review:
The unit is sold in two separate parts:

Each part is designed to fold down into a very compact and lightweight unit, taking up minimal space within your rucksack – in fact, it’s easy to find space for the Grilliput within most rucksacks – you can set up the fire bowl in seconds, the grill will take you a little longer as everything is neatly ‘hidden’ within one of the tubular side supports and you assemble it all together to form the main grill.
That being said, you can be set up and be ready to barbecue within five minute – giving a safe, controlled and confined fire bowl to ensure you keep everything contained in one place.
Now, you can buy each item separately, and even use them separately if you want, but they are designed to work and fit together – I found this the best way.
When I opened my Grilliput firebowl and Folding Barbecue Grill the first thing that strikes you is the fact that it’s all stainless steel and a very good finish, making it nice and easy to clean up after use – all the grill components come apart, which is good as they can all be wiped down and cleaned very easily as well – there’s also a ‘cleaning groove’ on one of the grill sides which makes it easy to pull the grilling bars through and scrape off any excess meat etc. that has spilled and stuck to the grill bars.
The main fire bowl is quite a lot more fiddly to clean though, and I found the best way to clean it was straight after use, wiping down with a cloth [especially if any cooking fat or meat has dropped into it] and then just soaking for a little while before drying off.
The disassembly was as quick as putting it all together and, for those in a hurry, you’re off on your way in no time.
With this type of equipment the only way to really see how it performs is to see it in action
- so this is my video review below -
Performance wise – well, it does exactly what is says on the tin..!
As you can see in the video, the fire bowl is an excellent way to contain your fire in one compact area, maintaining fuel and heat at the same time – with a really clever way to fold it down to a compact little unit after use and the grill works well, but best of all, folds down into one easy to carry tube.
Conclusions:
Can’t really fault this neat bit of kit – if you’re after something to give that real outdoors BBQ cooking feeling, thats easy to carry in your rucksack and hassle free, then this is the bit of kit for you.

|
.
If you liked this article - Please Share ItBushbox Ultralight Outdoor Pocket Stove Test and Review

One of the key factors when hiking and on the move is the weight of your survival gear – even an EDC bag can get a bit heavy when you try to cover all your survival needs.
Well, in this review I am covering one of the very lightest, fully functioning survival stoves you can get today.
The Bushbox Ultralight Outdoor Pocket Stove from Bushcraft Essentials in Germany have produced a cooking stove that is a mere 2 1/4 oz in weight. [61 grams] – thats almost half the weight of an iPhone..!!!
The Bushbox Ultralight folds down to an amazing 1.5 mm thick, making this a super light, super compact quality stove.
Specifications:
- Multi fuel stove
- 100% stainless spring steel 5 parts
- Carry weight 61 grams
- Carry thickness 1.5 mm
- Optional ashtray
- Optional cotton carry bag
In this review I will be covering how to assemble the UltraLight Stove in its various configurations depending on the fuel type and then firing it up and cooking up a survival meal.
Conclusions:
The only tricky bit about the Bushbox Ultralight Outdoor Pocket Stove is assembling the stove – it will take you a few attempts to get the hang of how to hold the stove whilst squeezing and manipulating the parts together.
Maybe a half dozen attempts and you’re there..!
Other than that, you’re good to go – a perfect little stove, more than capable of performing all cooking tasks from a cup of water for your coffee stop to a main meal.
Everything fits and locks together perfectly and this makes it a sturdy little unit. Disassembly is really easy once one side is ‘unclipped’ the whole unit will come apart – very nice and very easy….
Price wise I think the Ultralight offers good value for your money, currently under £30 +shipping from Amazon, you’re paying for quality and good design here, as well as a nice bit of lightweight kit.
Overall, I liked using this stove very much, it seems to be a very “user friendly” and I tend to choose carrying it with me when out for a days hiking and travelling light.
“must have” preppers gear
.
If you liked this article - Please Share ItBushbox Outdoor Pocket Micro Stove EDC Box Review
Possibly one of the smallest micro stoves in the world..!
This is my review of the Bushbox Outdoor Pocket Micro Stove EDC Box – sometimes this size of cooking stove is referred to as either a micro stove, and EDC stove or a hobo cook stove, in effect they are all pretty much the same in so much as they are small, compact cooking stoves.
Quite how well they all work varies a lot, in fact, you can even make your own hobo stove very cheaply and it will work quite well – but, as I always say, you will benifit, in the long run run, by choosing a high quality stove over a cheaper or home made one any day….
Quality of manufacture will guarantee a long working life of your stove and, as preppers, having reliable, quality gear is an essential part of our prepping plan.
Never buy cheap.
Having tested and reviewed other stoves from BushBox Essentials – the Bushbox XL Combination and the Bushbox Outdoor Pocket Stove I was eager to test out the smallest cooking stove in their range,the Outdoor Pocket Micro Stove EDC Box and below is my full review and video review:
Specifications:
- 100% stainless steel
- Multi fuel burner
- Ash Pan soil protection
- Size: 47mm x 65mm
- Only 77 grams
- Fits in pocket or wallet
This tiny survival stove is supplied with a nice, well made pouch that allows you to keep all the parts together and then kept in your pocket or even in your wallet – being so compact and light it fits nicely along with a standard survival card or the BE Survival-Card.
This is my full review and test of the Bushbox Outdoor Pocket Micro Stove EDC Box
Final thoughts:
This little stove has got to be the ultimate EDC cooking stove – it is quite amazing how good the engineering quality is and how compact it is – probably best of all is the fact that is actually works well. Being compact you must ensure it’s placed on a flat level base before trying to put a cup or pan on it and make sure the cup is balanced before letting go – use your multi tool pliers to feed the fuel in [much better than getting burnt] and, be patient, other than that, I can’t find fault with it at all..!
In use, it was much easier with the Esbit fuel tablet, which required a lot less attention than the wood fuel, and also left a lot less residue on the insides of the micro stove.
I have not spoken about price – for the quality of material and engineering the stove represents great value for money at under £17 +postage from Amazon
I keep mine in my wallet along with my BE Survival-Card, as you can see here –


click image to enlarge
Conclusions:
Pros –
- Well worth the money for the high quality of stove.
- very well engineered.
- cleans easily being all stainless steel.
- very compact, light and easy to carry.
Cons –
- be patient.
- best used on flat and level ground
“must have” preppers gear
.
If you liked this article - Please Share It
Can you really eat insects and bugs?
Yes, of course you can, alive or dead, but there’s always that risk of getting something quite nasty as a result.
In this review I want to show you a way you can try a whole selection of insects and bugs that you wouldn’t normally think of eating.
Kindly donated by BugGrub, I shall go through a good selection from simple worms to some nice juicy scorpions.!
These are my samples for this review: 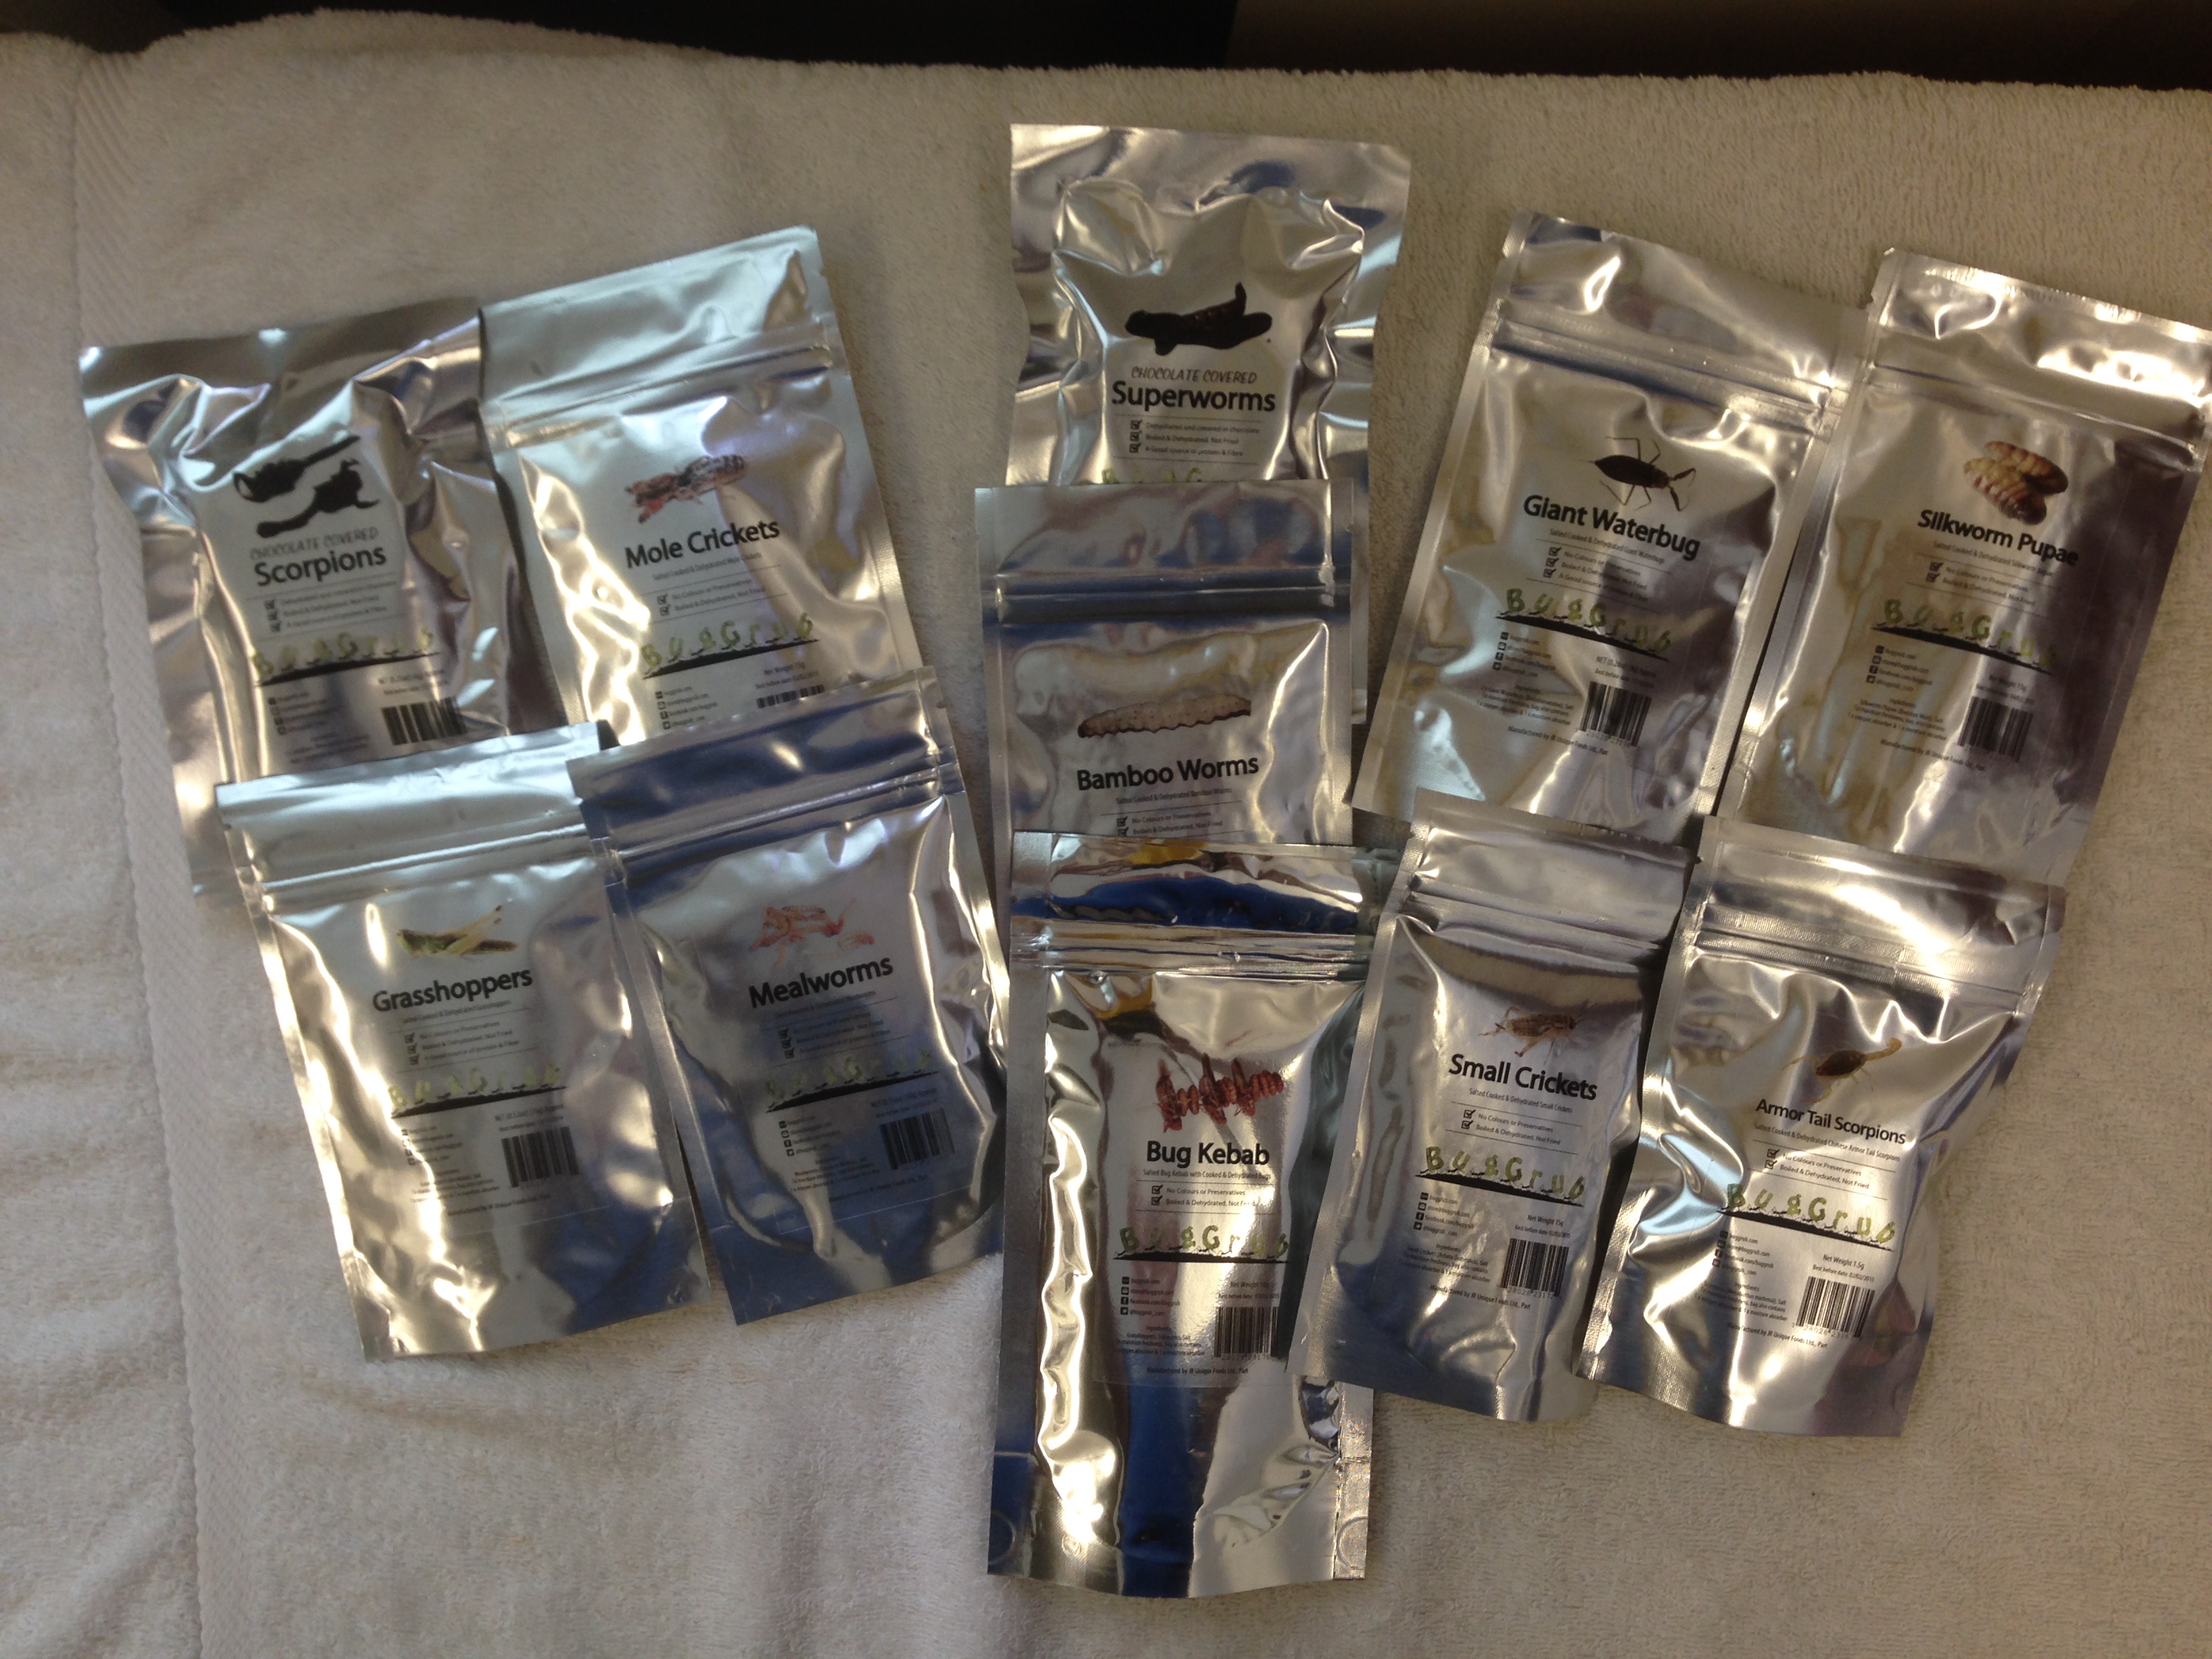
- Bamboo Worms
- Grasshoppers
- Giant Waterbug
- Superworms
- Armour Tail Scorpions
- Mealworms
- Mole Crickets
- Small Crickets
- Scorpions
- Silkworm Pupae
- Bug Kebab
click image to enlarge
When we think of insects and bugs as food, we normally think of someone like Bear Grylls, chomping away on a big fat maggot or some other crunchy critter and think “I’d like to try that”….
As well as insects being possible life savers in a survival situation, they are also surprisingly nutritious, with a simple grasshopper having some 30g protein per 100grams.
Edible insects in the UK are quite rare and finding a good selection of safe edible insects and bug food, even rarer.
So I have jumped at this opportunity to test out and review this great selection and this is my review video:
Edible insects Uk – test & review
So, as you can see, a great selection of bugs and insects, perfectly prepared and packaged, making a great high protein snack at any time.
They look good and really do taste good – especially the chocolate covered scorpion.!
My final verdict – get yourself over to BugGrub and order some, their grrrrrreat… ![]() Don’t forget to enter my FREE PRIZE DRAW for a Bushtucker Bug Fest Banquet
Don’t forget to enter my FREE PRIZE DRAW for a Bushtucker Bug Fest Banquet
1st prize – win a 7 piece bug banquet
2nd prize – win a 5 piece bug banquet
3rd prize – win a 3 piece bug banquet
find out more here – Bug Fest Competition
If you liked this article - Please Share It
How To Sharpen Knives The Easy Way
 As a prepper you will have acquired the odd survival knife or two, also a multi tool and probably a Swiss Army Knife as well – am I right.?!
When you bought them new, they came nice and sharp and ready for action – you make even of fine tuned them and touched up the blade with a fine whetstone and a stope and now they are perfect and razor sharp.
When you use your knives they will slowly become blunt and that nice fine edge will require a bit of TLC – so back to the workbench and out with the grinding stone and whetstone once again.
The problem comes when your knife becomes blunt and doesn’t perform as you want it to and you’re out in the wild – there’s no where to plug your grinder in out there!
Carrying a bulky whetstone around is not really an option either, so how can you do an emergency re-sharpen of your knives in this type of situation?
Well, it’s actually not that difficult to re-sharpen your knife and get that nice sharp blade back again, wherever you are.
Knife sharpening is a skill in itself, even when you are working at the bench in perfect conditions, but out in the field its a different matter, so knowing how to sharpen knives the easy way is an essential part of prepping and survival.
This is my favourite knife sharpening tool that I carry with my in my rucksck at all times – the Gerber Field Sharpener, and very good it is too.. From the top knife and survival manufacturers, Gerber, and also endorsed by the TV survival celebrity, Bear Grylls.
I normally try and steer away from products that have a TV celeb promoting them, but on this occasion I must say the Bear Grylls endorsed Sharpener is a very good piece of survival kit.
It is extremely compact, robust and light, making it the perfect tool for my bug out bag. It answers the question of how to sharpen knives the easy way when you need them the sharp the most – and that’s always when you’re out in the wild….

 This clever knife sharpener will not only sharpen a flat blade, but is also capable of sharpening a serrated blade knife.
There are two sizes of diamond grit rods that enables you to put a new edge on any sized serrated blade.
Big or small knife, it works, as you can see here in the photos:
I was out video reviewing some HI-Tec Hiking boots recently and needed to use my knife – however, is was not as sharp as usual and so I also videod the ‘emergency’ re-sharpen with the trusted Gerber knife sharpener – this is my review:
| Video review of the Gerber knife sharpener | ||
|
||
As you can see from my short video, this is an excellent tool to carry with you and I highly recommend you buy one for you bug out bag as part of your survival kit.
I hope you have found this review article on ‘How to Sharpen Knives the Easy Way’ helpfull.
.
If you liked this article - Please Share ItThe alternative UK Pepper Spray for Survival Defence
UK laws regarding self defence are very strict, and for any normal member of the public this can be a problem – as a prepper it presents its own problems especially if SHTF. 
The choice of weapons to defend yourself, your family and your preps is very limited and controlled by the strict UK laws and rightly so.
You cannot walk around with a 10″ machete strapped to your back, a handgun or any other weapon for that matter, even if you say it’s just for self defence.
A weapon is a weapon, as simple as that, if you carry one then the intention must be there that you would use one – resulting in varying injury levels to an attacker, even death.
So when it comes to the question of preparing and defending yourself the choice of “weapon” is not so easy.
In the UK it is very much against the law to even hold and point a knife at some, would be looter, and even worse to actually use it.
Additionally, the crime rate in the UK remains a problem – theft, break-ins and mugging are still commonplace, especially in our cities.
 So, when you add to that to the fact that we cannot legally carry a weapon to defend ourselves, we are constantly having to look for an alternative method of protection for ourselves, our children and the family.
Possibly the most effective, non lethal, weapon that would deter a would be looter is ‘pepper spray‘ –
unfortunately this is also classed as an offensive, and thus illegal, weapon.

The law is very specific, and is laid out in Section 5(1) (b) of the firearms act 1968.
This act prohibits any weapon of any description, designed or adapted for the discharge of any noxious liquid, gas or other substance.
In a nutshell the law is saying that full on pepper spray, the type the UK police use [ as seen in the photo on the right ] that contains a noxious gas is one of those items that is considered illegal to carry and illegal to use in the UK by civilians and preppers alike.
So what are the alternatives to pepper spray for members of the public…?
The only LEGAL ALTERNATIVE that the public or UK preppers have at their disposal and is the equivalent to Pepper Spray in the UK for self defence is the Mini Self Defence Spray Criminal Identifier 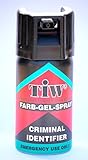
- Can be carried by any adult for personal protection
- Discreet and compact
- This is a non lethal defence spray
- Contains no chemicals or toxins
- Spray range 4 mtrs
- Highly effective, giving time to escape
The Spray Container is very discreet and measures in at only 85 x 34 mm yet packs a punch that will stop a mugger in his tracks.
If sprayed at face level it will completely disorientated the attacker – with the natural instinct for him to back off – if sprayed at the yes it also cause blurred vision, making an attack even more difficult.
Having tested this on myself, I can assure you it was not possible to do anything other than try to protect myself and my face from the spray. (see video below)
Also, the natural instinct is to try and wipe it off – this only makes thing worse.!
Can you image the panic factor you put into the attacker when he looks down at his blood red hands after you have sprayed him..!? He will have no idea what has just happened and be more scared and ready to run off, than you !
This Farb Gel remains on the attackers skin and clothing for up to 7 days – making the police very aware if a potential attack has taken place. Value for money, this is a ‘must have’ self defence method for everyone, especially at the silly price of under £10 + VAT & Delivery from Amazon.

Do you even need a method of self defence in the UK.?
In the UK statistics show that crime against adults [16 and over] has decreased. In fact crime in the UK is at an all time low and continues to fall.
From its peak in 1996 to 2013 it has steadily fallen each year.
So is everything OK then.?
Well, yes and no –
Yes, in so much as it’s good that the crime rates are falling and things are getting safer.
No, when you look at the actual figures and the amount of crime still reported.
Latest figures and statistics from the governments own information website, The Office of National Statistics, quotes that in the latest Crime Survey for England and Wales (CSEW) there is an estimated 8.5 million incidents of crime against households and resident adults (aged 16 and over).
The study is for England and Wales during the year ending June 2013. The good news is that this figure actually represents a 7% decrease compared with the previous year’s survey. But 8.5 million incidents..!!
That an awful lot if you ask me.
As a member of the public, I do not want to be one of those statistics, thank you very much…..
And again, as a UK Prepper, being prepared is what it’s all about and whenever I go out I always carry and EDC plus my survival keyring kit AND my Defence Spray – it just makes sense..
See my personal video of the Pepper Spray UK Alternative in action
The spray has been designed to meet all UK legal requirements and is totally legal to carry here – any member of the public who has concerns about safety for themselves or their family should definitely consider purchasing and carrying one of these sprays.
The good thing is the red coloured gel remains on the attacker for upto a week after, making them instantly recognizable as a potential threat again.
I like this Pepper Spray UK Alternative very much and have invested in several for my family – not only are they cheap and effective, they are also completely legal to carry.
You can buy the spray with a neat belt pouch for a couple of pounds extra – I found this very handy as it will clip onto a 2″ belt quite easily, as well as onto a ladies handbag where it it readily accessible if you need it – I then just bought the spray on its own as a backup.
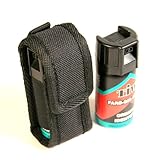
For extra value for money, the spray canisters can be bought in a twin pack, shown here.

Also see:
UK Legal Pepper Spray Alternatives for Women
Personal Attack Alarms for Women
Alternative Non Lethal Self Defence Method against an attacker
I have found out a couple of legal points regarding the Farb Gel Spray – please read before you buy:
- This spray is only legal in UK mainland and wont be shipped outside of the UK mainland
- There are some concerns as to whether it is legal to ‘use’ in Northern Ireland.- you can own the spray but you may possibly be breaking the Northern Ireland laws if you actually use it .
Generally as an Alternative UK Legal Pepper Spray for self defence this product ticks all the boxes and is something to consider for all the family, especially as it is effective and easy to use.
But, the best of all, it works AND it’s very cheap…
If you liked this article - Please Share It
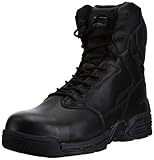
Magnum Stealth Force 8 CT CP SZ Waterproof Boots 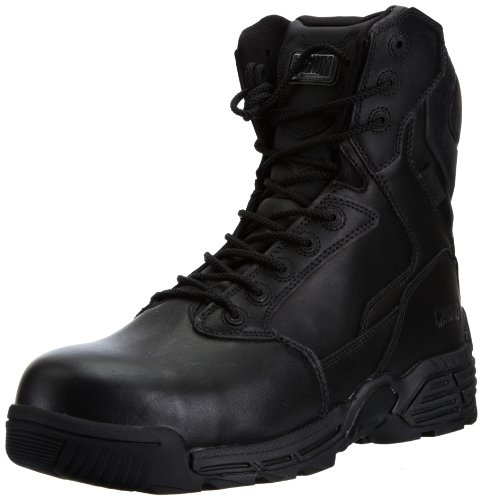
In this review I am testing a pair of Stealth Force 8 boots from Magnum. They are the side zip version of these boots and feature the cleaver YKK side zipper – Magnum also make these in a non zipped boot.
In this review I take the boots through a full test, especially testing out their waterproof qualities.
The slip on – slip off, feature is something I like about these boots, and it really does save you time and effect.
Technical Stuff
This is pretty much straight from the Magnum website – as they know how the boot is really made..!
- Available in UK size 4 – 13
- YKK circular side-zip for quick donning and doffing
- Natural Leather upper section – coated with water repellent surface enhancement
- Protective composite toecap
- Protective sole plate
- Comfortable suede ankle collar
- High traction oil resistant carbon rubber sole
- M-P.A.C.T Memory foam insole
- Scanner safe hardware
- Tested and certified to European Standard EN 20345
- Agion antibacterial treated
Non technical stuff – Just my opinion…..
 These Stealth Force 8’s side zips are, without doubt, a very stylish, good looking, tactical boot. There styling means they will look good in the field and walking down the street.
Considering they are a full on safety boot, they are very well styled, and look, every part, a tactical boot. They weigh in as one of the heavier boot that Magnum produce, however, that little bit of extra weight, and I am only talking a few grams, is hardly noticeable and they still weigh in at a mere 760 grms. – thats next to nothing.
In my video test and review they are taken through their paces, although the video action is only a few minutes, the boots were used all day.
As you will see they performed very well – I could not find any faults with the boots and they definitely live up to Magnums promises – If I had to be really picky, there are two additions I would like to see on these boots – a pull loop to help when putting on and a lace store to clip the ends of your laces – but thats just me being very picky.
Pricing and availability information for the Magnum Stealth Force 8, with Side Zip – find it here > Stealth Force 8.0
Checkout my selections from the full range of other Magnum Boots right here – Magnum Boot Range
Want to see the full technical review and the field test.? – take a look at my video and see what happens.
In conclusion -
Do they work in the field.?
As you have seen in the video – the answer is definitely a great big yes – I couldn’t fault their performance in any way. Totally waterproof, comfortable and a pleasure to wear.
Overall, a great pair of tactical ‘safety’ boots – highly recommended.
- Read the independent views on the Magnum Stealth Force Boots – and here lots more information on how they performed by the personal review from Dave the ‘boots test pilot’.
.
If you liked this article - Please Share It
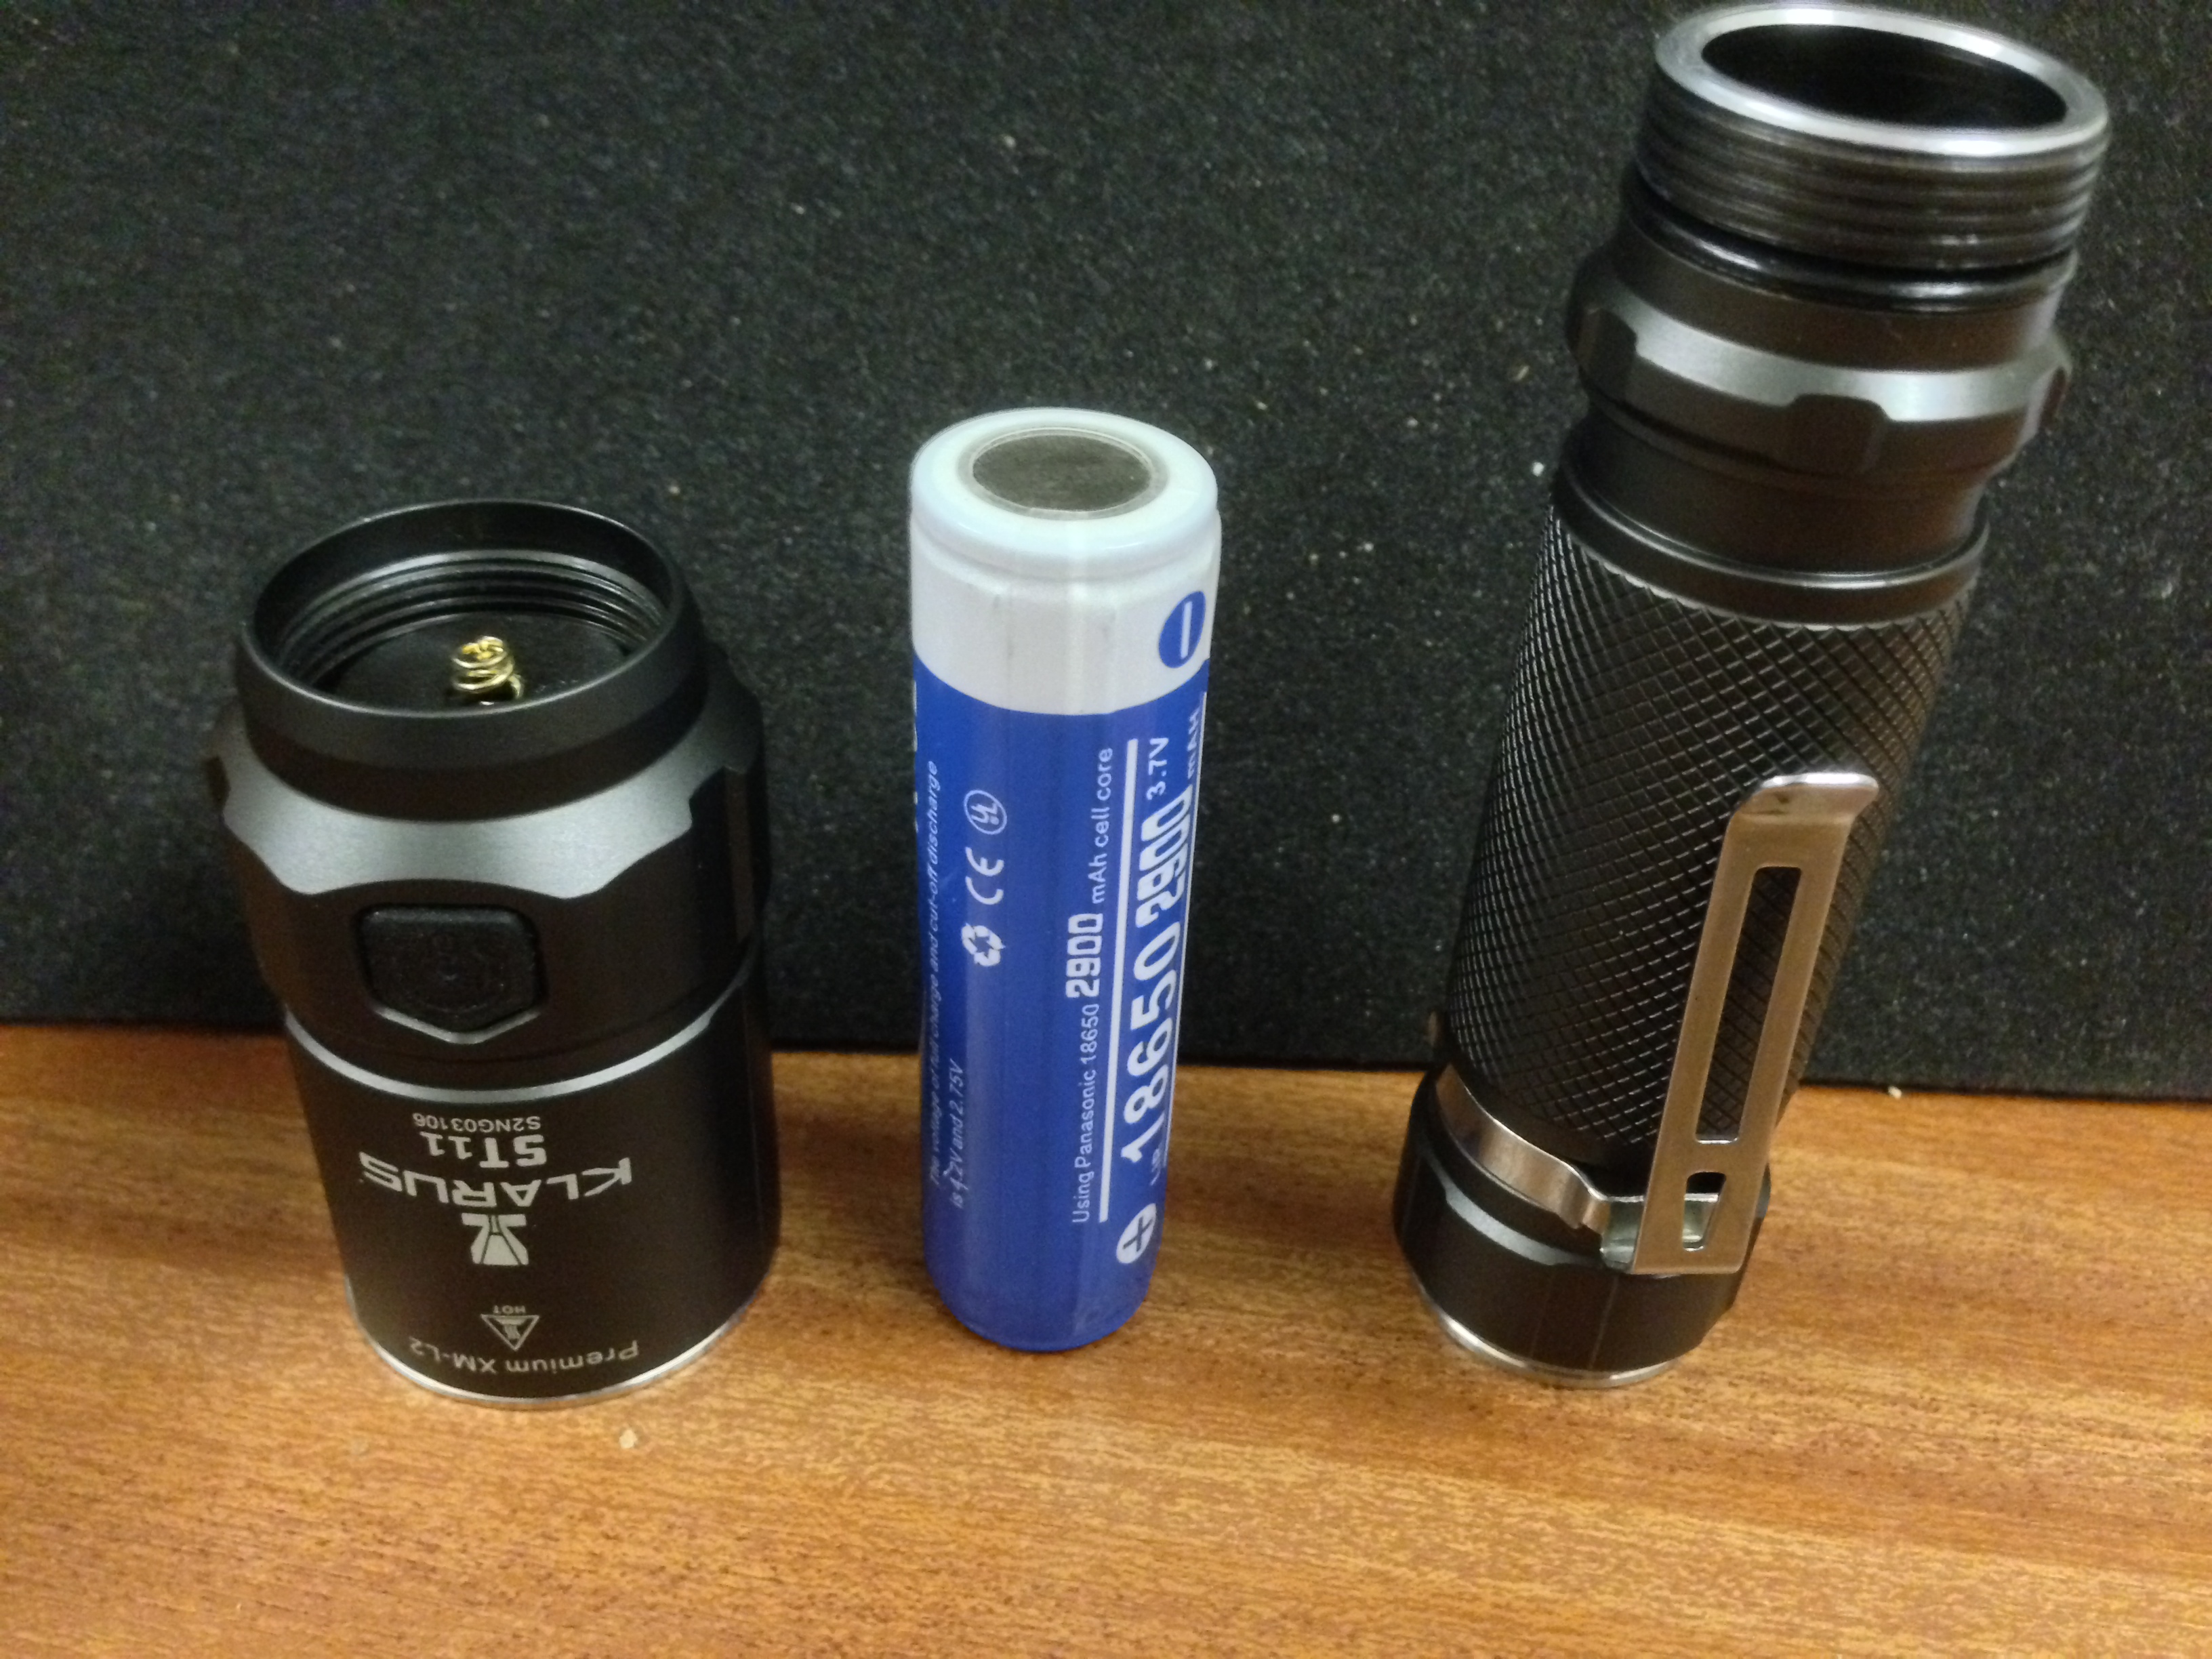
KLARUS ST11 Tactical torch – full test & video review 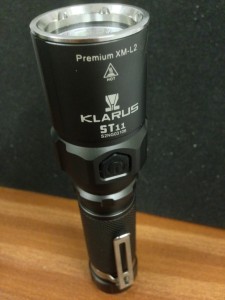

Buying a torch that’s suitable for prepping is far more in depth than just going to your local store and trying to pick up the best LED torch for your money.
In fact, it is essential to go to the more specialist manufacturers to get a true preppers torch that has all the requirements for survival and prepping use.
As with a lot of our kit, there are definite requirements that must be met in order to determine if a torch is suitable for prepping, and, in this review I’m testing one of the latest additions to the exceptional Klarus range of torches, spotlights and key-chain lights – the Klarus ST11 tactical LED torch – which has been supplied by torch specialists TactLight, who export within the UK and all over the world.
Klarus have a huge range of LED torches – and most of them are suitable for prepping in one way or another, however, I have chosen the ST11 Tactical as it is one of their latest editions to the range, and is packed with all the good features we like to see in a quality torch.
- My own general opinions:
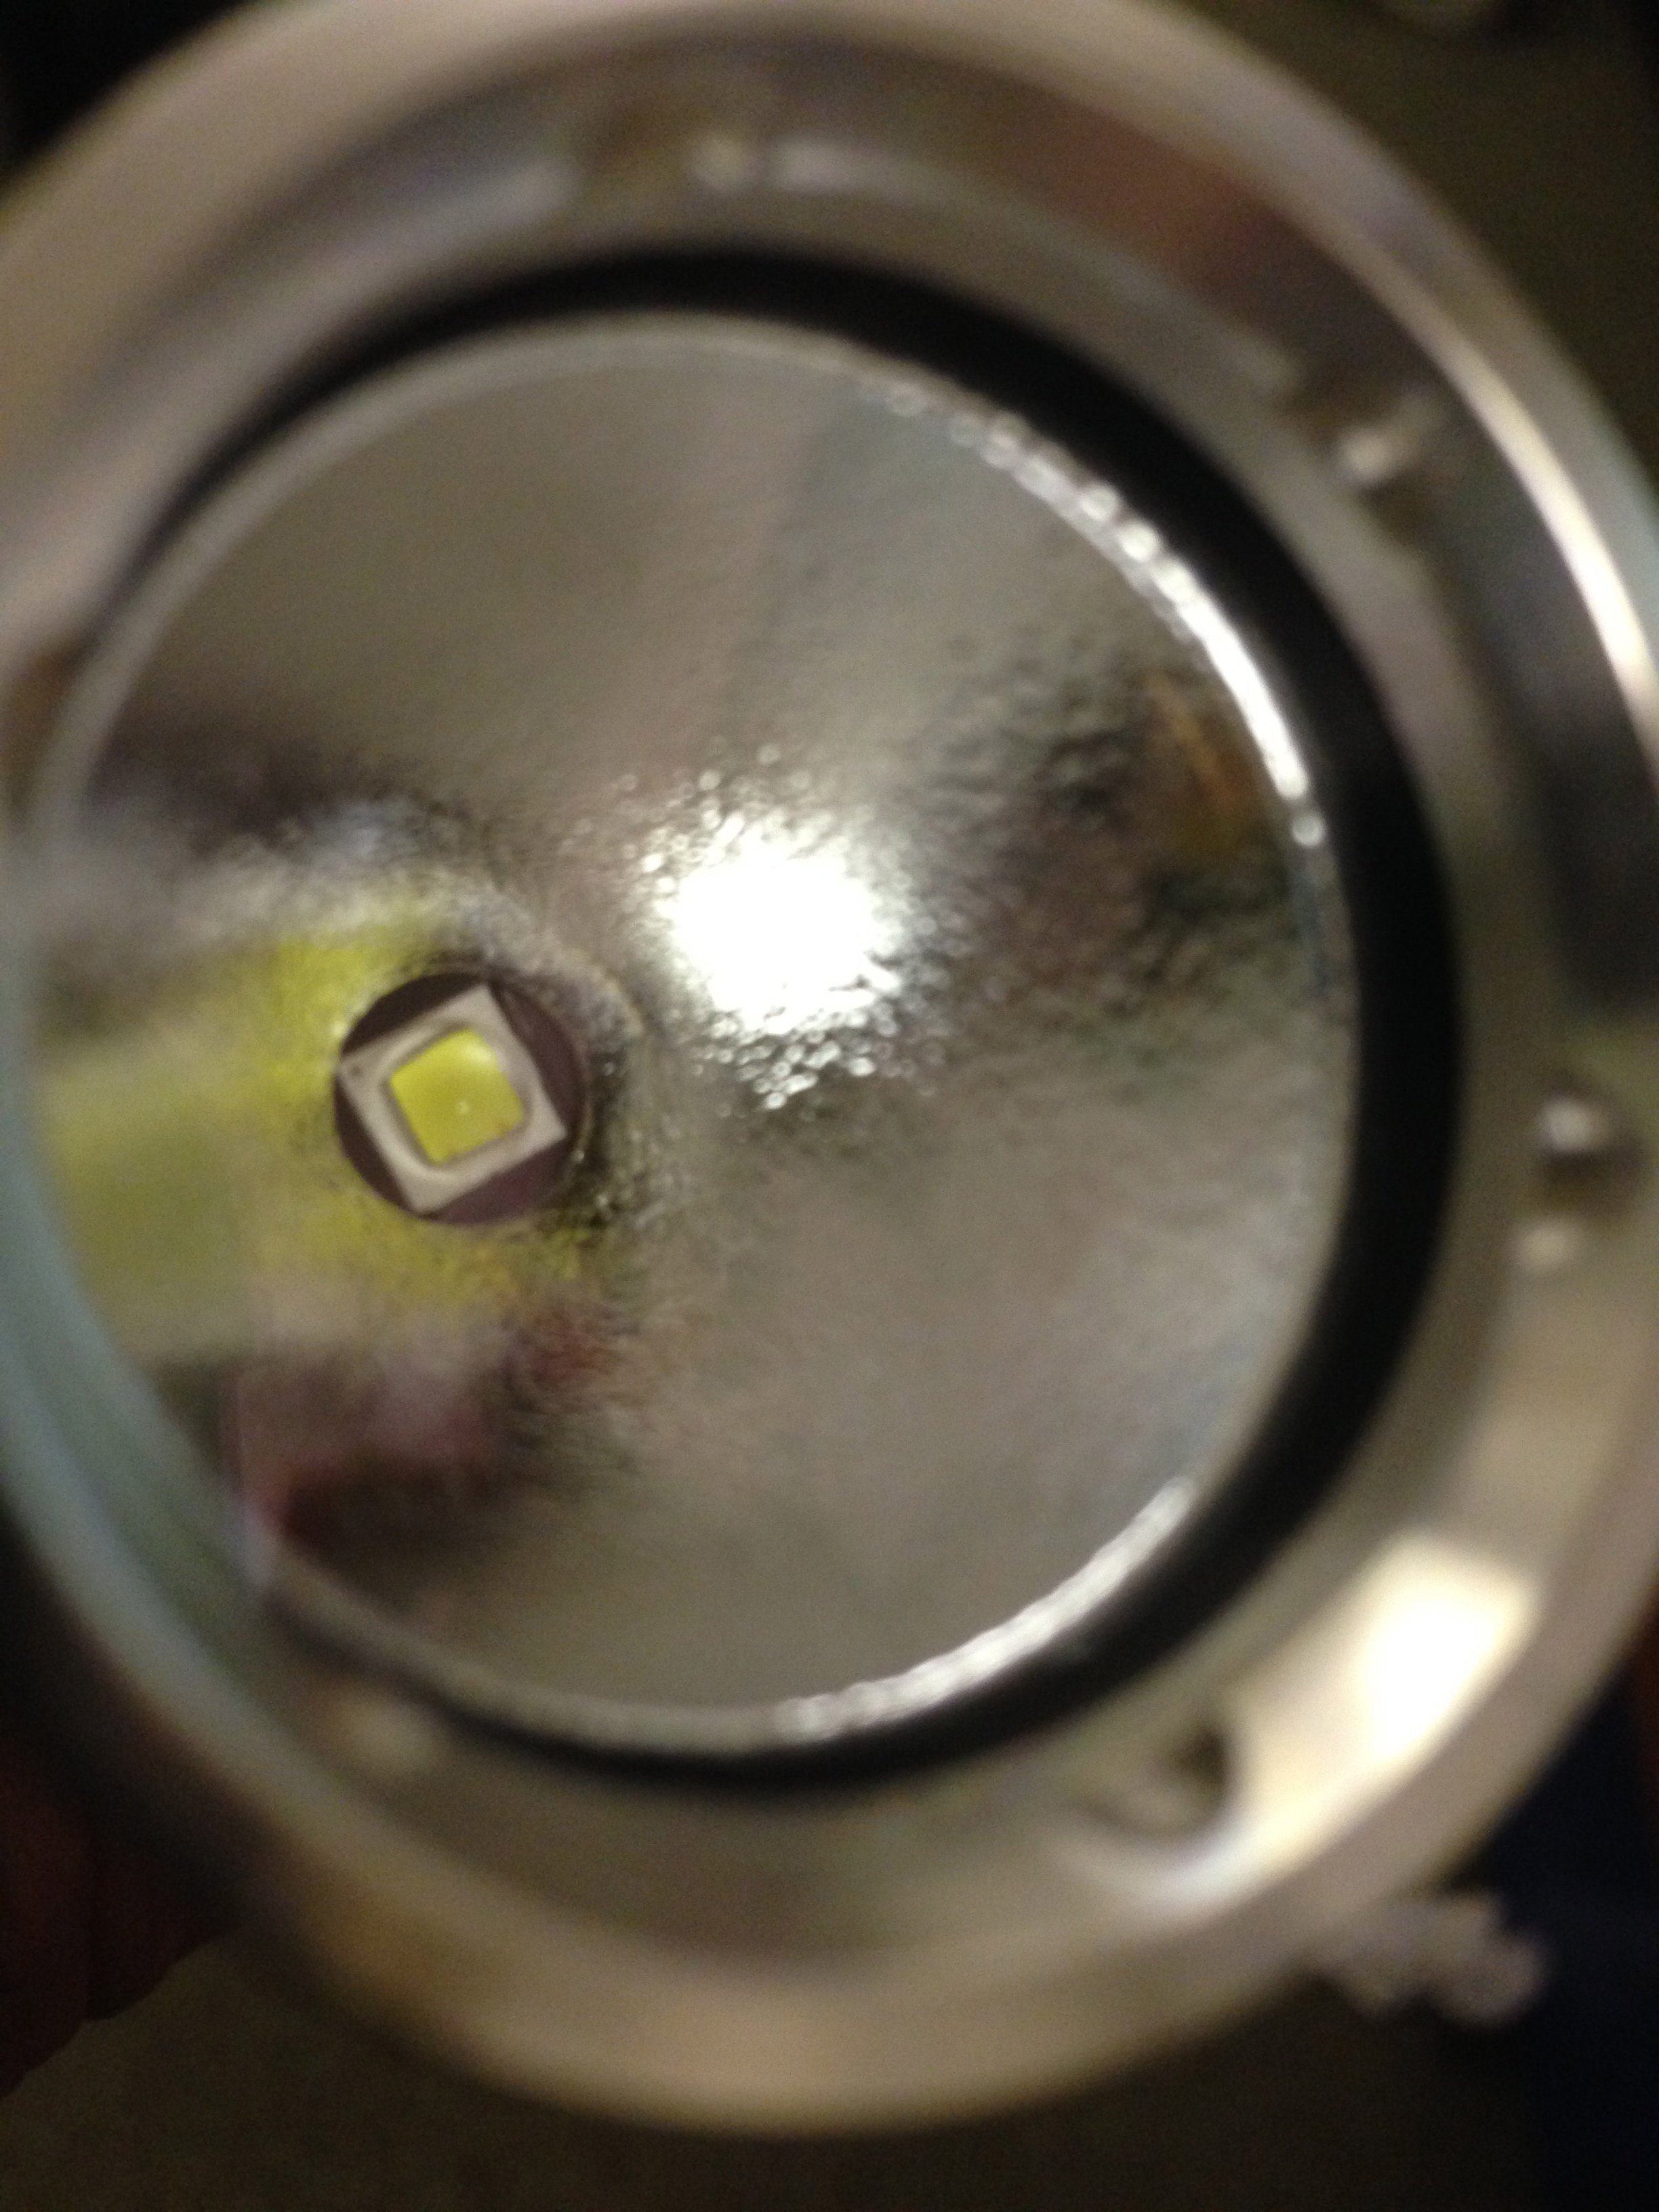
Straight out of the box, this is every bit a tactical torch.
Very stylish, which looks and feels just right in your hand. There are several light setting and other features which take a little time to get used too and master, but once I had played around with the torch it becomes common sense, and soon becomes quite logical to understand and operate.
On close inspection it’s easy to see why these torches have such a good reputation – the precision engineered body is spot on with quality machining and quality knurling on the main grip area.The front bezel and rear button guard are polished stainless steel and again, precision made to fit very nicely. 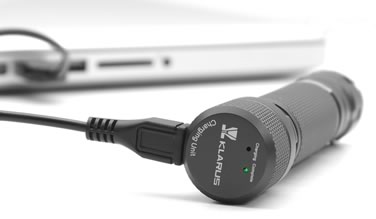
The ST11 is charged via a screw in end cap and then plugged into a USB port. I like this idea as the torch can actually be charged anywhere via a portable solar power pack or even from a wind up radio with a USB port.
I found the screw thread was, again, quality engineered and a very smooth operation when it comes to changing over to the charging cap.
- Specifications:
- LED Type: Amazingly bright CREE XM-L2 with life span of up to 50,000 hrs.
- Battery: 2x CR123A (3v) / 1x 18650 (rechargeable)
- Function: There are two switches – a tail switch and a side switch; the tail switch provides on, momentary-on and off functions and the side switch changes modes, gives fast access to the hidden strobe and SOS modes, and allows the light to be switched off in standby mode.

- This is where the ST11 excels above other dual switch flashlights. When in standby mode, the side switch provides on, momentary-on and off functions, as well as mode changes and quick access to the two flashing modes – Strobe and SOS. Strobe is very effective for personal safety at night and a memory feature means the torch can remember the last lighting mode that was used. The tail switch can be pressed again to switch the torch completely off.
- Switch: Forward clicky tail switch that is recessed to allow for tail-standing. There is also a side switch that is recessed into the body, but as easily accessible.
- Performance: Highly efficient performance due to the digitally regulated output, which maintains constant brightness.
- Protection: Reverse polarity protection circuit protects against incorrect insertion of batteries. Sealed with O-rings for excellent water resistance and improved service life. Waterproof and Dust Resistant to IPX-8.
- Dimension: 141mm (Length), 36mm (Head), 25.4mm (Body)
- Weight: 146g (without battery).

- Finish: Tough, sealed body with HA Type III anodising.
- Colour: Military grey
- Reflector: Orange peel for an even beam profile with good beam throw – 177m.
- Lens: Toughened, ultra clear glass.
So, first impressions were good – take a look at my full test and video review to see exactly how it performed:
KLARUS ST11 Tactical torch – full test & video review
video coming soon
- Conclusions on the Klarus ST11 Tactical LED Torch
l have struggled to find anything wrong with this torch – maybe the ability to add an additional coloured lens or a strike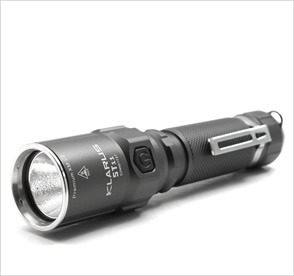 bezel might improve it a bit, but, to be honest, they’re quite low down on the list.
It looks good and is all the part a solid bit of kit, well manufactured and just works well – as far as the best LED torch goes, it’s up there with the big boys. The range of beam is more than enough for most preppers requirements and having the four power modes really makes this a versatile torch for any condition.
The strobe function is very powerful and overpowering and could even be used in a self defence situation to disorientate a, would be, attacker. Along with the SOS function this really does make the Klarus ST11 Tactical LED Torch the full package.
If you liked this article - Please Share It
Hi Tec Phoenix Waterproof Hiking Boots – full test & review

|
 |
|
 |
||
 |
I have chosen the Hi Tec Phoenix Hiking Boot for this weeks review as it is an excellent choice of boot, especially if you prefer the more modern styling for your hiking boots as compared to the military style boots in the Magnum range.
Firstly, I have to say it was a pleasure testing these boots as I always have my apprehensions about trialing “new” boots and especially as their first planned outing was a rather grueling 10K hike which consisted of part road, part muddy pathways and quite a few hills. But these boots proved they were easily up to the challenge and performed faultlessly throughout the entire day, as you will see in the video below.
Initial thoughts on the Hi Tec Phoenix:
Very much a modern styled and very a ‘good looking’ boot, which looks every part like a quality hikers boot with some good, high, front and rear protection – something I like as I tend to be a “lazy” hiker and often scrape the front of my boot and scuff them when going uphill over rough terrain.
The overall feel of the Phoenix is that of a tough hiking boot, very solid and well fitted together – I especially like the styling and comfort of the ankle collar, this worked well for me with the rear part of the collar set lower to prevent any rubbing at the back of your ankle – I prefer this style as my laces to be quite tight around that area and, in the past, have found a higher collar to be quite uncomfortable.
The grip pattern on the sole is pretty standard, so a well tried and tested favourite there then, and I had no problems with grip during the hike. In fact the sole is quite solid compared to boots I have had in the past and I found there was very little twisting of the sole of the boot when I went over rocky areas – this was very good as my feet didn’t slip about quite as much as usual.
The actual overall thickness of the sole is about 25mm with an additional 10mm of very nice cushioning, so my foot was already up off the cold, wet floor right from the start.
I have always been a fan of the particular lacing method that has been incorporated on many hiking boots, and it’s good to see the Phoenix using it, as I have wide feet I like to keep the lower lace quite loose and the upper part much tighter around my ankle – this method gets a big thumbs up from me..!
Price wise, from size 7 to size 13, you’re going to be paying around £60 all in [inc VAT & delivery] Now for my way of thinking I would say that’s very good value for money considering these are up there at the top of the range for hiking boots.
more information on these boots, visit Hi Tec here – Hi-Tec Men’s Phoenix Hiking Boot
Click here for the full Hi Tec Hiking boots range.
Technical specification of the HI Tec Phoenix Hiking Boots
- Rubber MDT durable ‘hiking’ outsole.
- Waterproof bootie construction to ensure you keep your feet dry
- Rustproof and gilly lacing system
- Collar is soft padded to give added comfort
- Ortholite sockliner gives you added cushioning plus, anti-odour and anti-microbial properties
Conclusions.
All in all the Phoenix proved to be a very capable hiking boot, as you saw in the video, it was quite a difficult walk with lots of different terrain to give these boots a good test.
They kept my feet nice and dry throughout the hike and were very comfortable, especially as it was their first time out.
A lot of thought has gone into making these boots perform to high standards and for most of the time I didn’t really know I had them on..!
They were very comfortable and a pleasure to go hiking in.
Without doubt, I highly recommend the Hi-Tec Phoenix as a serious hiking boot and will definitely be including them in my survival equipment as a permanent addition.
- Click here for the full Hi Tec Hiking boots range.
If you liked this article - Please Share It
Bahco Laplander Folding Saw – testing and review 

In this review I will be testing the Bahco Laplander – a well designed lightweight folding saw.
It is made in Sweden and, of course, uses a good quality steel with a super sharp edge and from many of the other write-ups I have seen, is considered to be right up there at the top of the class for folding saws.
First impressions of the Bahco Laplander Folding Saw are its
weight – at only 6.4oz you barely know you have it in your hands – I like this a lot as I find having to fight with a heavy saw just doubles the effort.
The cut and design of the teeth literally double the cutting stroke each pass, as the teeth will cut using both the pushing and pulling stroke, combined with a very aggressive tooth design it made cutting timber a very easy job, requiring very little effort.
 In the closed position the Bahco measures 9 inches and when full open is 16 inches, with the actual cutting blade measuring 8 inches – which I found to be a very nice, comfortable size. [7 tpi]
The actual cutting teeth are super sharp and as they face both ways so you have to be very careful when cleaning the blade off – you cannot simply run your hand down the blade like a normal saw to clear it. All the teeth are hardened and coated to help reduce friction and prevent corrosion – so another nice touch.
I quite like the feel of the handle – it’s like a rubbery plastic called ‘Stanoprene’ over a solid plastic frame which give a nice feel and lots of traction- even with wet hands I found it quite hard to slip off.
With such a sharp blade Bahco have added a safety lock to ensure it can’t be accidentally opened and keeps the blade tucked away nicely – good idea I think…
As you will see in my video review, the Bahco makes cutting timber into nice, usable pieces a very easy job – in fact, I think this saw is a lot faster than most other methods and gives you a cleaner cut.
Bahco Laplander Field Test Video Review
- Conclusions:
This saw has got to be up there as one of the best folding saws in its class and performed every task I asked of it with minimum effort, every time.
The Laplander is now a permanent part of my bug out kit and will certainly be coming with me on every camp trip and, to be honest, it is only really restricted by the length of the blade.
For more in information, reviews and prices please click here for the Bahco Laplander Folding Saw
Happy Prepping Folks
If you liked this article - Please Share It
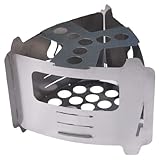
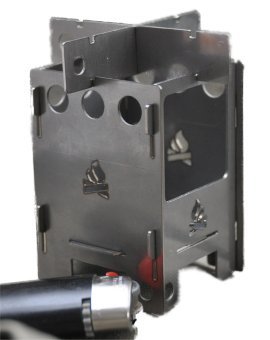
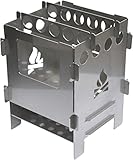
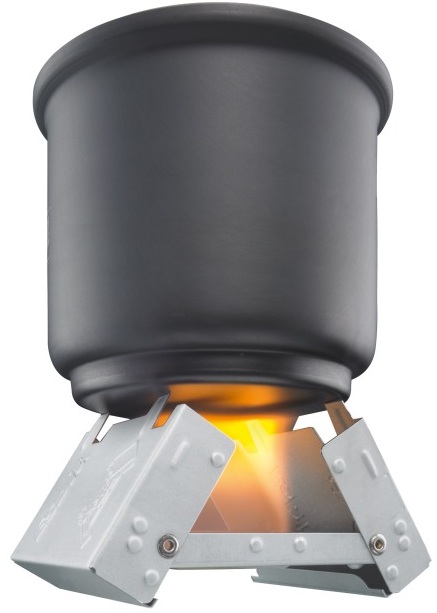
Bushbox XL Survival Stove Review 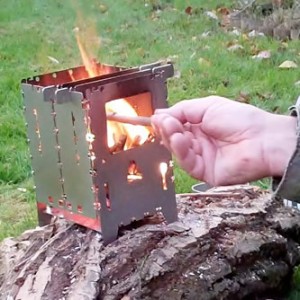

stove tested: Bushbox XL with Combination Kit
The Bushbox XL [extra large] is the bigger brother of the Hobo Stove, also made by the Bushbox Company based in Germany.
The XL version I am reviewing here has a radically new design which makes this stove very compact and extremely easy to set up, fold down and carry.
In fact, the XL is possibly one of the easiest to assemble survival stoves that I have ever known – it goes from folded down to being ready for use in seconds.
Folded down and inside its carrying case I measured the overall dimensions to be only:
210mm x 95mm x 20mm thick MAX. – Weighing only 800 grams
This was an comfortably acceptable size and weight to carry considering the finished, usable size of the stove.
*The standard XL comes as the stove with the two trivet stands as you can see in the picture above and is packed in a fitted cotton pouch.
The basic Bushbox XL is very reasonably priced at under £75 inc VAT and delivery –
The Bushbox XL reviewed here had the additional accessories that make up the Combination Kit and these are a Heavy Duty Outdoor Carry Bag and a Universal Grate, shown below. This is priced at under £87 inc VAT and delivery -
The outdoor carry bag is very well made and fits the stove plus the universal grate perfectly – the carry bag also has a sewn in ‘D’ ring which, again, is very well fitted and would need a lot of pulling about to work loose – this is a good feature as it means everything can be easily attached to your rucksack leaving valuable space inside.

this is my test & video review of the
BuxhBox XL Outdoor Survival Stove with Combination Kit
As you can see in my video, the Bushbox XL had a good field test and certainly worked 100% on a rather cold and chilly day ( the water in the cup was certainly well below 10 deg C ) but there was absolutely no problem starting and maintaining a good amount of heat – the opening where you can feed the twigs into makes everything so easy and maintaining the fire was simple. 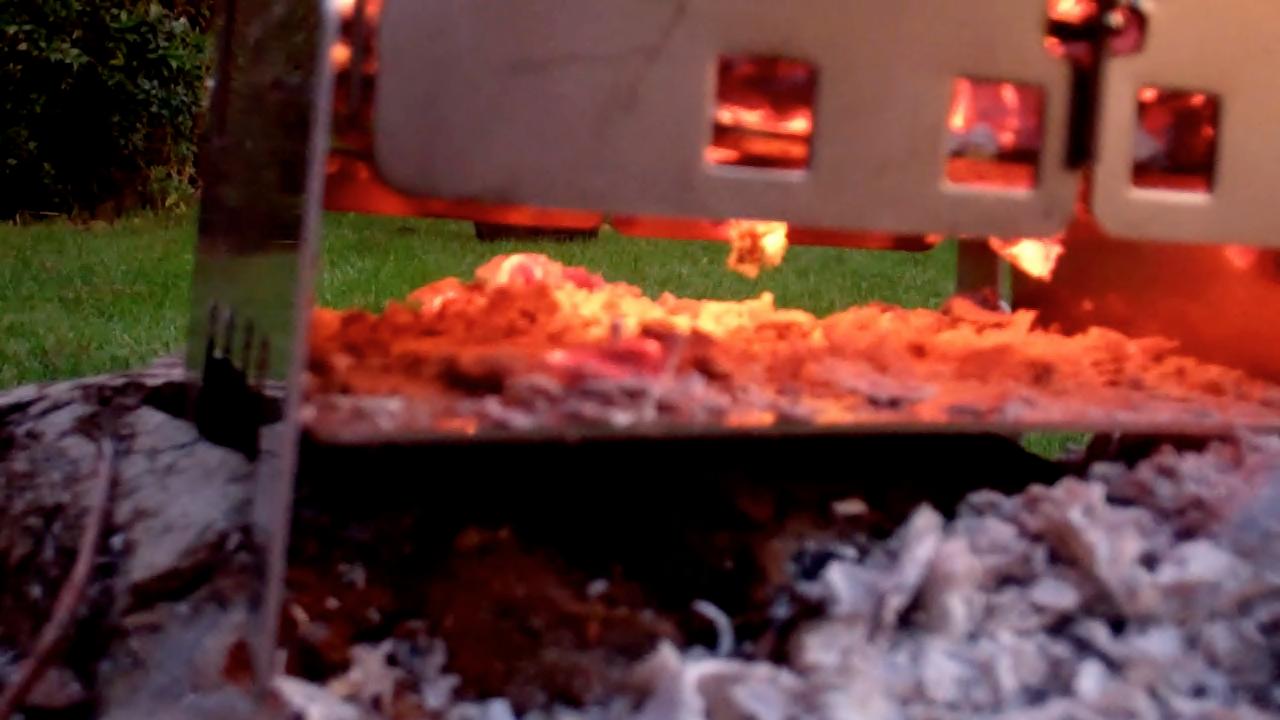
One point to note – keep the ash pan ( bottom tray ) clear of any debri or fallen ash, I just used a longer twig to brush it out – if it builds up you loose air flow through to the fire grate ( I had to clear the ash a couple of times ) by keeping it clear there was none of this huffing and puffing at the fire that you normally get with some wood fires..!
So, a final verdict on the BushBoxXL – can’t be anything other than excellent.
The design is very good, it’s compact and easy to store, works exactly like it’s supposed to do, kept a nice tidy fire going for as long as I wanted and folded away simply and easily at the end of the day.
I would definitely advise any hiker, camper or Prepper to get one of these as a serious addition to your survival kit.
- What wasn’t included in the video was the fact that once the water boiled I removed the cup and stocked up the stove with some more larger twigs and made myself a lovely camp fire which burned for ages and gave off some nice heat – just to finish off the day nicely…..
Happy prepping folks..
If you liked this article - Please Share It
Lifesaver Water Filter Bottle – full review
bottle tested: Lifesaver 4000 UF
 There are a few choices when it comes to filtering water in a survival situation and as preppers we all like to keep things nice and simple – for that reason I am testing the Lifesaver 4000 UF ( Ultra Filtration ) Water Filter Bottle from the Lifesaver company here in the UK.
I have never been much of a fan of fiddling about boiling up dirty water and adding various tablets and chemicals to try to make dirty water into clean drinking water – yes I know it is still a choice and it’s something we should all have a knowledge of, but for me keeping things simple with minimum hassle have always been a survival priority.
Carrying bottles full of drinking water is a definite strain on yourself and your resources, after all you can only carry so much at any time – so from a sheer practical point of view it makes sense to filter your drinking water as you go rather than try and carry or horde it.

The way I look at it is that I would rather have a stream delivering unlimited amounts of water, even if it is dirty, grubby and undrinkable water than have to keep trying to find and to keep carrying thousands of bottles.
In fact any water source will do – it gives you a relatively unlimited supply to draw your water from and will certainly make your life much easier.
In a survival or bug out situation it’s just one less thing to worry about.
When I received my Lifesaver bottle I read the instructions fully ( something I advise you to do fully and make sure you carry out the setting up and flushing procedures correctly ) I also gave it the once over and, having read various reviews, also checked the bottom O ring seal to ensure it was in place and seated firmly – apparently this can come adrift and cause it to leak at the bottom – however, mine was perfectly fine and seated in the pump end cap.
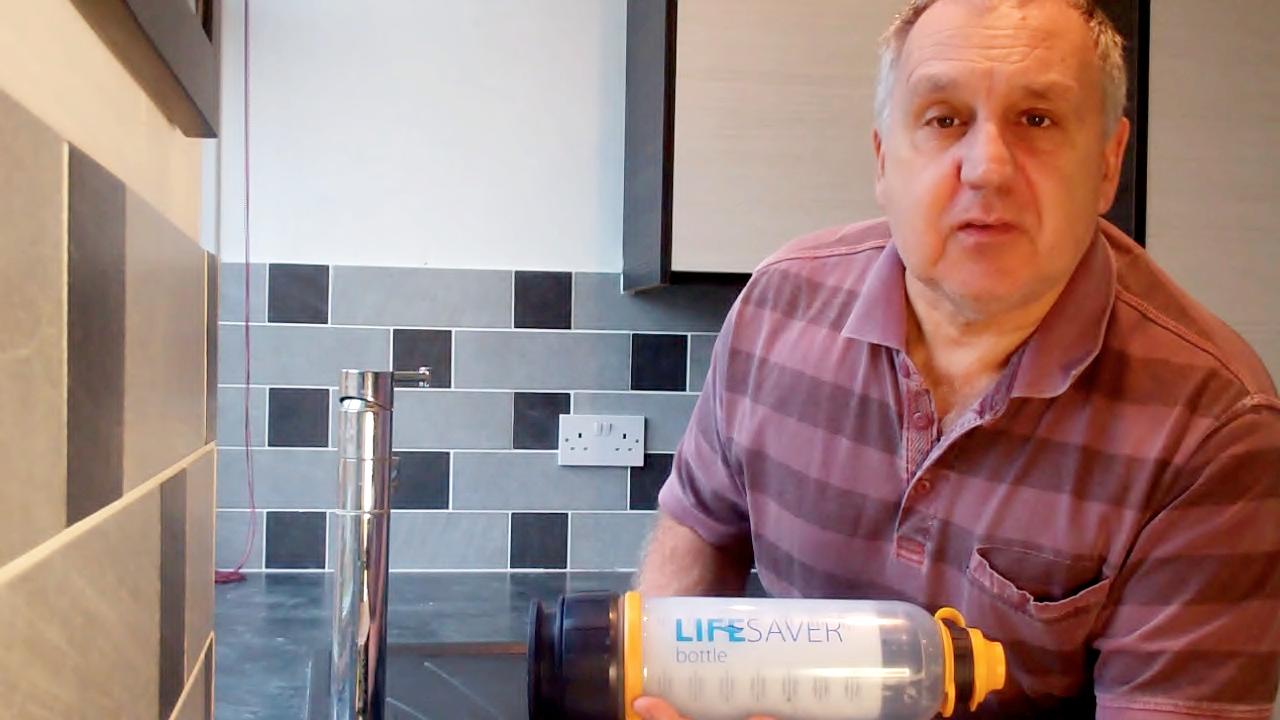
The filter bottle itself is about the same size as a standard 1.5 litre bottle and it fits nicely in the side pocket of my bug out bag – having set the lifesaver up I then set out for a field test – my full review from kitchen to smelly, grubby water test is in the video below:

Information & Specifications:
The principle of the LifeSaver is quite simply really – You fill the bottle up from a water source [any water source will do *except salt water* mine was a nice grubby stream as you will see] and then the ‘dirty’ water goes through a course pre filter which catches odd debris like leaves etc.
When the main bottle is filled up [ the bottle holds 750 ml ] Replace the end cap and after a few pumps to pressurize the bottle you can release the drinking nozzle and the “dirty” water passes through the main cartridge and then through an activated carbon filter to give you clean, sterile drinking water.
Very clean, sterile drinking water actually – the cartridge has minute pores which can filter down to 15 nano metres – this will stop parasites, viruses, bacteria, fungi and waterborne pathogens and the activated carbon filter takes out the bad tastes, instantly…!
You can see this and more in the video below – I found the final result quite amazing..
Lifesaver Systems Limited 4000 UF Bottle
The 4000 litre model costs under £125 inc VAT & delivery:

The LifeSaver 4000 UF delivers 4000 litres of clean, sterile drinking water and when the filter has dispensed the 4000 litres it will automatically shut down – the filter itself is given a two year shelf life from the initial activation process which I simply done at my kitchen sink.
When the filter gets to the end of its 4000 litres of usable life you simply remove the old filter and replace it with a new cartridge – new cartridge costs under £95 inc VAT & delivery – Lifesaver Systems Limited 4000 UF Cartridge,
This effectively gives you a complete new water filter and 4000 litres of sterile drinking water all over again.
Calculations & Costs based on 1 persons water requirements per day of 5 litres:
With the 4000 UF filter you will get 5 litres/day for TWO YEARS
*there is also a 6000 litre bottle available which give added value for money – prices below:
With the 6000 UF filter you will get 5 litres/day for THREE YEARS
The average price for a 4000 UF cartridge is £95 inc VAT & delivery – so that is equal to an amazing 2.4 pence per litre...!
The 6000 UF cartridge costs around £110 inc VAT & delivery which makes and even better saving of just 1.8 pence per litre…!
So this really is a huge saving when stocking up a water cache and trying to store bottled water at a bug out location.
* the Activated Carbon Filter will last for 250 litres – these are dead simple to change over when needed and with that in mind it’s worth investing in some spare filters along with the bottle – fortunately they are cheap and come in packs of 4 for under £20 inc VAT & delivery – Replacement Carbon Inserts (Four-Pack)
To match the 4000 litres capacity of the filter cartridge you would need 16 activated carbon filters.

Along with a couple of replacement cartridges I have also invested in a some of the course ‘pre filters’ to ensure I have all the main filters as ‘spares’ for as and when I require them. Just a sensible precaution I think – the pre filters cost £12 for a pack of two – Lifesaver Systems Limited Pre Filter Discs (Pack of 2) – there is no real lifespan for these pre filters as they can easily be removed on thoroughly washed out and refitted, but I just wanted to know I had spares if needed.
LifeSaver 4000 UF water filter bottle full review and field test:
Final thoughts:
The LifeSaver 4000 UF water filter bottle gets a big 10/10 from me – I didn’t find a single thing that I could give a bad mark to.
It did exactly what it said it would and has now proved to be a permanent addition to my survival kit
My advice to any anyone preparing for a survival situation, whether that’s out camping, hiking or prepping – is to make sure you add one of these to your survival kit as soon as you possibly can.

If you liked this article - Please Share It
Magnum Original SIde Zip Tactical Boots Review 

In this survival kit review I am testing a pair of Original Side Zip boots from Magnum. The side zips are part of Magnum’s “Force” range and very much a tactical boot.
In the review I take these boots for a nice 10k hike across fields and through forest with very uneven and muddy ground as well as about 1k along stone paths.
I have been wanting to test out these Magnum boots for a while now, especially to see how their featured zip action works with the slip on – slip off, feature.
Technical Stuff
This is pretty much straight from Magnum themselves – as they know how the boot is really made..!
- Available in UK size 4 – 13
- YKK circular side-zip for quick donning and doffing
- Ballistic Nylon and Natural Leather upper section
- Comfortable suede ankle collar
- High traction oil resistant carbon rubber sole
- EVA wedge for additional underfoot comfort
- Steel shank for torsional rigidity
- Removable contoured insole
- Tested and certified to European Standard EN 20347
- SRA slip resistant
- Cambrelle® linings – offering abrasion resistance that adapt to foot motion
Non technical stuff – Just my opinion…..

These side zips are one good looking pair of boots and very well styled – They look as good in the field as they do walking down the street.
They are extremely well styled, but the most striking part of these boots is their weight – modern technology has allowed Magnum to produce a boot that is not only very tough and durable but is feather light as well.
Throughout my 10k walk with these boots on, never once did they feel heavy or cumbersome – in fact, I found the complete opposite, as it was just like walking in my slippers…!
The Magnum Original Side Zip Boot is only available as an online offer and can be found at this link – Online offer
Checkout my selections from the full range of other Magnum Boots right here – Magnum Boot Range
So, ‘do they work in the field’.? – take a look at this video and see what happens.
In conclusion – Do they work in the field.?
A resounding yes they do. This boot is just a part of their Magnum Essential Equipment and the side zips are one of many quality Magnum boots to choose from – I think I’m off now to check out their full Boot Range.
Happy prepping folks…..
If you liked this article - Please Share It
Bushbox Hobo Pocket Stove Review 
Manufactured in Germany and made of 100% stainless steel, this survival stove is definitely one of the most compact units I have seen.
In this review I will cover the assembly and dismantle of the Bushbox Hobo Outdoor Pocket Stove
as well as finding out “Does It Work In The Field‘.?
Specifications:
- Weight – 260 grams
- Width – 80mm
- Depth – 80mm
- Height – 115mm
- Folded size – 90mm x 115mm
- Fuel – trangia, gel fuel, esbit tablet or wood twigs
- Carry case – cotton pouch
- Materials – stainless steel [1.4301]
 |
 |
 |
||
The assembly of the Bushbox Hobo Stove is very easy as seen here
‘Does it work in the field’ – full field test review
Does it work in the field.?
Without doubt this little Hobo stove works well and especially worked well under the conditions I put it through – the air was cold and damp, the water was cold, around 5 deg C, the cup was cold as well – I think with a little bit more practice I can get that boil time down to quite a bit less.
So it’s the old saying, practice makes perfect and I will certainly be using this stove again and again and maybe even put another video review as my ‘ boil time test’ record gets better……
So, in conclusion, the Hobo Stove certainly gets my vote as a very compact , versatile and effective survival stove and is an ideal bit of kit to carry in an EDC or Bug Out Bag.
I like the idea of being able to use any fuel type very much, but most of all the Hobo performed excellently with twigs that were just laying around the forest floor.
My only possible dislike is the cotton pouch, as I don’t see this lasting too long – so I am on the lookout for a small plastic container that gives a snug fit for the components to slide into.
Overall, the Bushbox Hobo Stove performed very well and is now a permanent addition to my survival equipment and at under £30 inc VAT and delivery I think it is very good value for money – for more information with customer reviews and prices please click this link to the BushBox Outdoor Pocket Stove.
Happy Prepping Folks…
[notice]
Just a quick note folks:

My full test and video review of the BushBox XL will be going online this weekend 15th Dec 2013 – so check back and see how the Hobo stoves Big Brother really performs out in the field…
Bushbox XL combination stove review
[/notice]
If you liked this article - Please Share It
Esbit Pocket Survival Stove Review 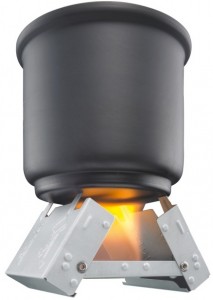
If you are one of those preppers wishing to travel light and compact, there are a few choices of cooking stoves available to you on the market today.
But for sheer simplicity and ease of cooking I think the Esbit Pocket Stove ranks among the top.
I wanted to see exactly how well this bit of German engineering would actually perform out in the field and could it be classed as a real survival stove.
Firstly, the Esbit will fit comfortably into the leg map pocket of your cargo trousers as it measures only 130x95x35mm and weighs 360grams when fully loaded with a pack of the solid fuel tablets.

I found the idea of carrying the fuel tablets inside the stove is a good one as it keeps everything nice and compact and in one place due to the two sides folding down to keep everything locked together. Of course it would also, easily fit into an unused space within your rucksack as well.
Now, the Esbit is very much designed for the solid fuel tablets. In fact I did not even attempt to try with any other fuel as, during my field test, it performed more than adequately with the tablets only.
The unit tested was the Standard Esbit Pocket Stove with the 12x14g tablet pack – I found this offers very good value for money and can be bought for under £15 inc VAT & Delivery.
Click here for a direct link to the Esbit Pocket Mini Folding Stove with 12x14g Tablets.
You can also buy extra packs of the Esbit Solid Fuel Tablets for under £9 inc VAT & Delivery
*note:
In the video my test was using the Esbit for the 1st time – now I’m sure I can better the boil time by quite a lot as it was a very cold damp day, with very cold water and a cold cup – even putting a lid on the cup would of speeded things up a lot.
So I shall be practicing a few more times with this and will do a follow up video to see how fast I can get the water to boil on one fuel tablet – “watch this space”…….
“Does it work in the field”?
This stove performed very well and done exactly what it said it would. It will definitely be a new addition to my hiking rucksack, especially when out in the open and I don’t have any natural fuel source around me [eg: twigs etc]
A definite value for money little cooking stove that will save you time and effort when you need a quick brew.
So, in conclusion, I recommend the Esbit Pocket Stove to anyone prepping, hiking or as your light weight cooking stove when just out walking and fancy a brew… .
- Click here for a direct link to the Esbit Pocket Mini Folding Stove with 12x14g Tablets.
![]()
If you liked this article - Please Share It