Survival & Bushcraft Schools in the UK
Prepping is all about survival – although there is a lot of information on the internet, there’s nothing that beats actually ‘doing it’ for real.
Learning your bushcraft and survival skills from a good survival school is something well worth considering - there are lots of different areas where you need specific skills, not just how to build a shelter, but ‘real’ survival skills that will keep you alive.
Most UK survival schools include natural medicine and foraging for foods as well as identifying the good from the bad, as well as 100′s of uses for natures materials to help you survive in the wild.
If bugging out is a big part of your disaster survival plan then I highly recommend enrolling on as many, varied survival courses as you can afford.
Even the relatively simple tasks like skinning and preparing an animal for food is something that must be practiced – most UK survival schools go into this is in detail, making sure you gain the knowledge and bushcraft skills needed to keep you alive.
The list below is for survival and bushcraft schools around the UK.
| Bear Grylls Survival Academy: beargryllssurvivalacademy.com Location: UK |
 |
|||
|
|
||||
| Woodsmoke – Bushcraft & Wilderness Survival: woodsmoke.uk.com Location: UK – Lake District. |
 |
|||
|
|
||||
| Woodland Ways – Bushcraft & Survival Courses: woodland-ways.co.uk Location: UK – Oxfordshire, Derbyshire, Leicestershire, and Lincolnshire |
 |
|||
|
|
||||
| The Coastal Survival School: coastalsurvival.com Location: UK |
 |
|||
|
|
||||
| Wild Man Wild Food: wildmanwildfood.com Foraging courses – how to identify, gather and cook wild plants. Location: UK – Canterbury, Kent. |
 |
|||
|
|
||||
| Woodlore – School of Wilderness Bushcraft: raymears.com Location: UK – East Sussex |
 |
|||
|
|
||||
| The Trueways Survival School: survival-school.org Location: UK |
 |
|||
|
|
||||
| Wildwood Bushcraft: wildwoodbushcraft.com Location: UK – Sussex |
 |
|||
|
|
||||
| Forest Knights: forestknights.co.uk Location: UK – Sussex |
 |
|||
|
|
||||
| Bushcraft Expeditions: bushcraftexpeditions.com Location: UK – Beaminster, Dorset |
 |
|||
|
|
||||
| Hands on Bushcraft: handsonbushcraft.co.uk Location: UK – Wiltshire |
 |
|||
|
|
||||
| WILD-LIVE: wild-live.org Location: Ireland & U.K |
|
|||
|
|
||||
If you book a course with any of the schools above, don’t forget to mention you found them on the UK Preppers Guide website.
*if you know of any other good UK based survival schools, please let me know and I will add them to the list.
My Email
Happy prepping folks….
.
If you liked this article - Please Share It
How to remove a tick on a human when in out in the wild
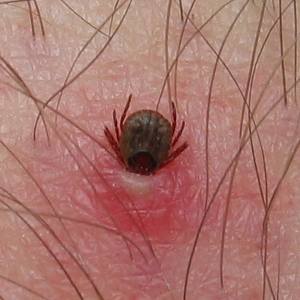
Just about anyone who goes out into the wild – whether you’re a hiker, camping or a prepper doing some bug out practice, will have a very good chance of making friends with a tick.!
The first signs of these nasty little buggers will be an itch, straight away you should be able to feel if a tck has then attached itself to your body.
Bear in mind that a tick can start out very small, under 1/2mm is quite common, so a good visual inspection is recommended in order to identify the tick.
What to do if you find a tick.
DO NOT -
- First of all – don’t panic – it is not going to gnaw your arm off…!
- Do not try and dig it out with your fingernail or a knife or club it to death – you will just make things worse.
- Avoid all the wives tails and remedies for removing the tick such as:
- Do not paint anything on the tick or skin
- Do not smother in vaseline.
- Do not cover in nail varnish
- Do not apply heat or a flame
The reason for not doing any of the above actions are simple – they just don’t work. In fact some will make the situation worse and will quite easily cause additional infection and even some serious diseases.
Types of ticks.
There are some 20 different species of tick that inhabit the UK mainland -
- Generally found in areas of woodland – in particular you will find them amongst deciduous and mixed woodland areas, in the rough upland and moorland pastures, in heathland and grasslands. But can also be found urban/suburban park areas and gardens.
Diseases attributed to ticks on humans.
There a quite a few diseases related to “tick bites” – if treated early they are minor, however, the main disease transmitted by ticks on humans are:
- Lyme disease
- tick-borne encephalitis
- rickettsiosis
- anaplasmosis
- tick-fever
Symptoms of a tick born disease.
The main symptoms of a tick-borne infection are generally:
- fever
- joint pains
- tiredness
- flu-like symptoms
- paralysis
- headaches
*in all cases – you must consult a doctor as soon as you can and receive the appropriate treatment.
Why a tick can lead to infection on a human.
Ticks are host to all sorts of diseases and can be considered second only to mosquitoes, in terms of the number of pathogens vectored.
All ticks require blood in order for them to survive and reproduce.
They will embed themselves [specifically, their head section] into their host and most commonly around areas where the skin is thin – (the back of the knee, the armpit, the groin).
They will insert their rostrums in the skin and then secrete various substances through their saliva glands which then allows the tick to anchor itself solidly into your skin and to suck your blood.
How to remove a Tick in Humans.
It is extremely important to remove the whole tick as soon as possible – especially the head section – if any part of the head is left behind it can very easily cause infection.
DO NOT USE TWEEZERS.
Any attempt to squeeze the tick will result in regurgitation VIA THE TICKS MOUTH THAT IS INBEDDED IN YOU SKIN and the danger of pathogens entering your bloodstream.
THE TICK MUST BE REMOVE WHOLE.
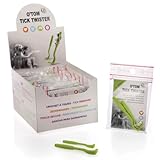
Tools available to remove a tick.
There are a couple of very good and cheap tools available that make removing a tick safe and easy – I personally recommend O’TOM TICK TWISTER as my number 1 tick remover tool.
This video shows how easy it is with this tool.
This Tick Twister is a silly price at under £4 inc VAT & delivery for two twisters and is very light and compact – so ideal for hiking, camping and prepping supplies.
Just another good thing to carry in your rucksack…

For my free PDF download Tick Awareness & Lymes Disease fact sheet please tick logo below 
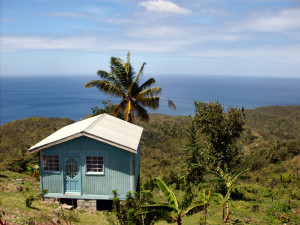
Some People prepare their Bug Out Locations close to their home or they try to make their house a fortress.
Others prefer places where hardly anyone is living: In the dessert, in the mountains, or in the forest.
Most of the places that preppers are calling a Bug Out Location, however, do not provide unlimited shelter and at the same time unlimited food.
I have found somewhere quite different.
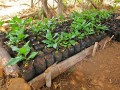
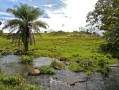
This bug out location is part of a huge farm, Finca Bayano in Panama, in a very sparsely populated area, you wont need to eat canned food, full of chemicals, that stays fresh until 2030.
Instead there are fresh papayas and fresh bananas. Even if others would steal all the food, you would still be able to survive, because fresh food is growing every day.


They don’t dig shelters that have no sunlight, and won’t built fortresses, that can be beleaguered.
Instead they keep good relations with our Panamanian neighbors. By assisting the villagers in a water project and some are working at Finca Bayano.
This is how they are preparing for an uncertain future.
No one can anticipate the day when major supply disruptions will occur, how long disorder might take, and of what degree the breakdown could be.
Some people believe, that after three months it’s back to normal, but it may take three years, or even more. The collapse, as we are expecting it, might not be over when food and water run out, or when there is no more wood for a fire.
It might take much longer, and maybe life won’t be the same it was before. What most people do not know, is that their land cannot produce enough food to survive without pesticides and chemical fertilizers.
Back to normal might not be impossible – but this place is different….
So why not prepare in a place which can provide food for everyone that lives there?
Take a look at their website and what they offer – it’s worth considering……

If you liked this article - Please Share It
Welcome to our FREE PRIZE DRAW for May – NOW ENDED
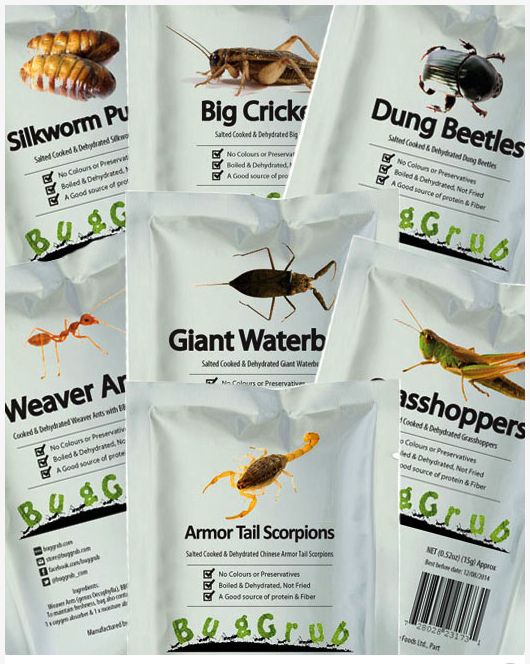
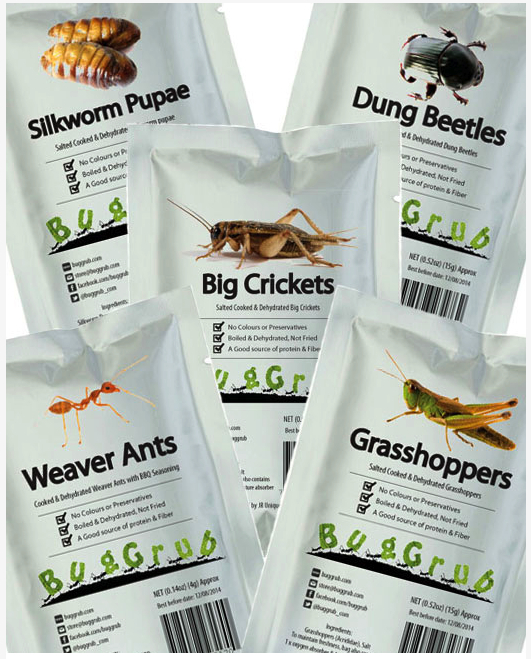
enter for a chance to win one of three top prizes of Bush Tucker Bug Banquets.
Kindly donated by our friends over at BugGrub.com
to see the all the bugs on offer – see my full edible bug review
The Bug Grub Contest has now finished - congratulations to prize draw winners:
- 1st prize: 7 piece Bush Tucker Banquet - Dave Howells
- 2nd prize: 5 piece Bush Tucker Banquet – Kev Bowser
- 3rd prize: 3 piece Bush Tucker Banquet - Carla Knight
A big thank you to all those who entered and watch out for our next free draw contest.
*Prizewinners will be notified by Email on 2nd June 2014 and receive their prize completely free of any charges.
Prizes: 1st place – 7 Piece Bush Tucker Banquet
Prizes: 2nd place – 5 Piece Bush Tucker Banquet |
|||
 |
|||
Prizes: 3rd place – 3 Piece Bush Tucker Banquet |
|||
 |
|||
If you liked this article - Please Share It
How to Preserve Food for Survival – making Meat Jerky

There will always be times during a year when food is in abundance. But, the most important thing, as preppers, is to know how to preserve that food for survival when times are hard.
Learning the basic survival skill of preserving food goes back to our ancestors – in fact we would probably not even be here now if it wasnt for the techniques they had to learn for their own long term survival.
Preserving food, in order that you can eat it later with no ill effects, is definitely a survival skill that all preppers should know.
Most, if not all, foods can be preserved in some way or another – at this very moment you are preserving your food at home by putting it in the fridge, for short term, and in the freezer for a much longer term.
But in a survival situation you probably won’t have the luxury of either.
General Preserving methods.
- Bottling – fruits & vegetables
- Dehydrating & Vacuum Sealing – fruits & vegetables
- Drying (meat) and in hot/humid countries, vegetables too.
In a survival situation where you would have none of the normal luxuries that are found in the kitchen, both bottling and dehydrating become a difficult procedure – they can be done, but not easily.
So I will be concentrating on preserving meat for survival as this is a basic survival skill we should all have.
Firstly a word of advice:
Meat and fish require special care – although not difficult - you must be very aware of the possible dangers that lurk in animals and fish.
 Both carry large amounts of micro-organisms, parasites and viruses that just hang around in their guts.
This is ok when alive, but as soon as the blood stops flowing, the immune and natural protection system of the animal also stops working and everything will start to decay quite quickly.
In order to ‘save’ the meat it is important to remove the guts as soon as you can – in fact, immediately, straight after it has been killed is ideal.
In the world of hunting this is know as ‘field dressing’ and is an essential survival skill of all hunters and fishermen who intend to eat their catch.
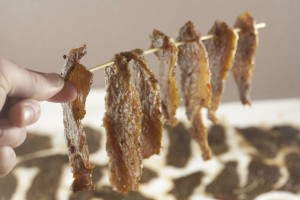
Dried Meat
Dried Meat is also more commonly known throughout the world as Jerky, although it is not a hugely popular food in the UK or widely available here in the UK, but it is still quite well known and available if you know where to look.
Dried meat for personal use was the forerunner of the more commercially produced Smoked Meat, and not so long ago it was a common sight to see a smoke house in many towns.
Dried Meat is probably the most used method of preserving meat in the wild, and, as in all survival situations, we find we can absolutely ignore what is currently the biggest pain in our lives here in the UK – the Health & Safety nutters who have become the biggest kill joys known to man – that being the case dried meat in a survival situation goes against most of the H&S, Food Handling and Safety regulations we are normally shackled to….. and about bloody time, that’s my personal opinion on that.!
Our forefathers dried and smoked all the meat they caught from their hunting and trapping in order to survive and you need to know this survival skill as well.
Procedure for preserving meat using the Drying Method – known as Jerky Meat.
- Preparation - Both meat and fish will make jerky, however, red meat is the ideal choice – but food is food and any mammal or fish will do, along with birds, reptiles or domesticated animals (cats or dogs)
- To add some flavour to your jerky some spices are nice. eg: sugar, salt, spice. But not absolutely necessary and especially in survival.
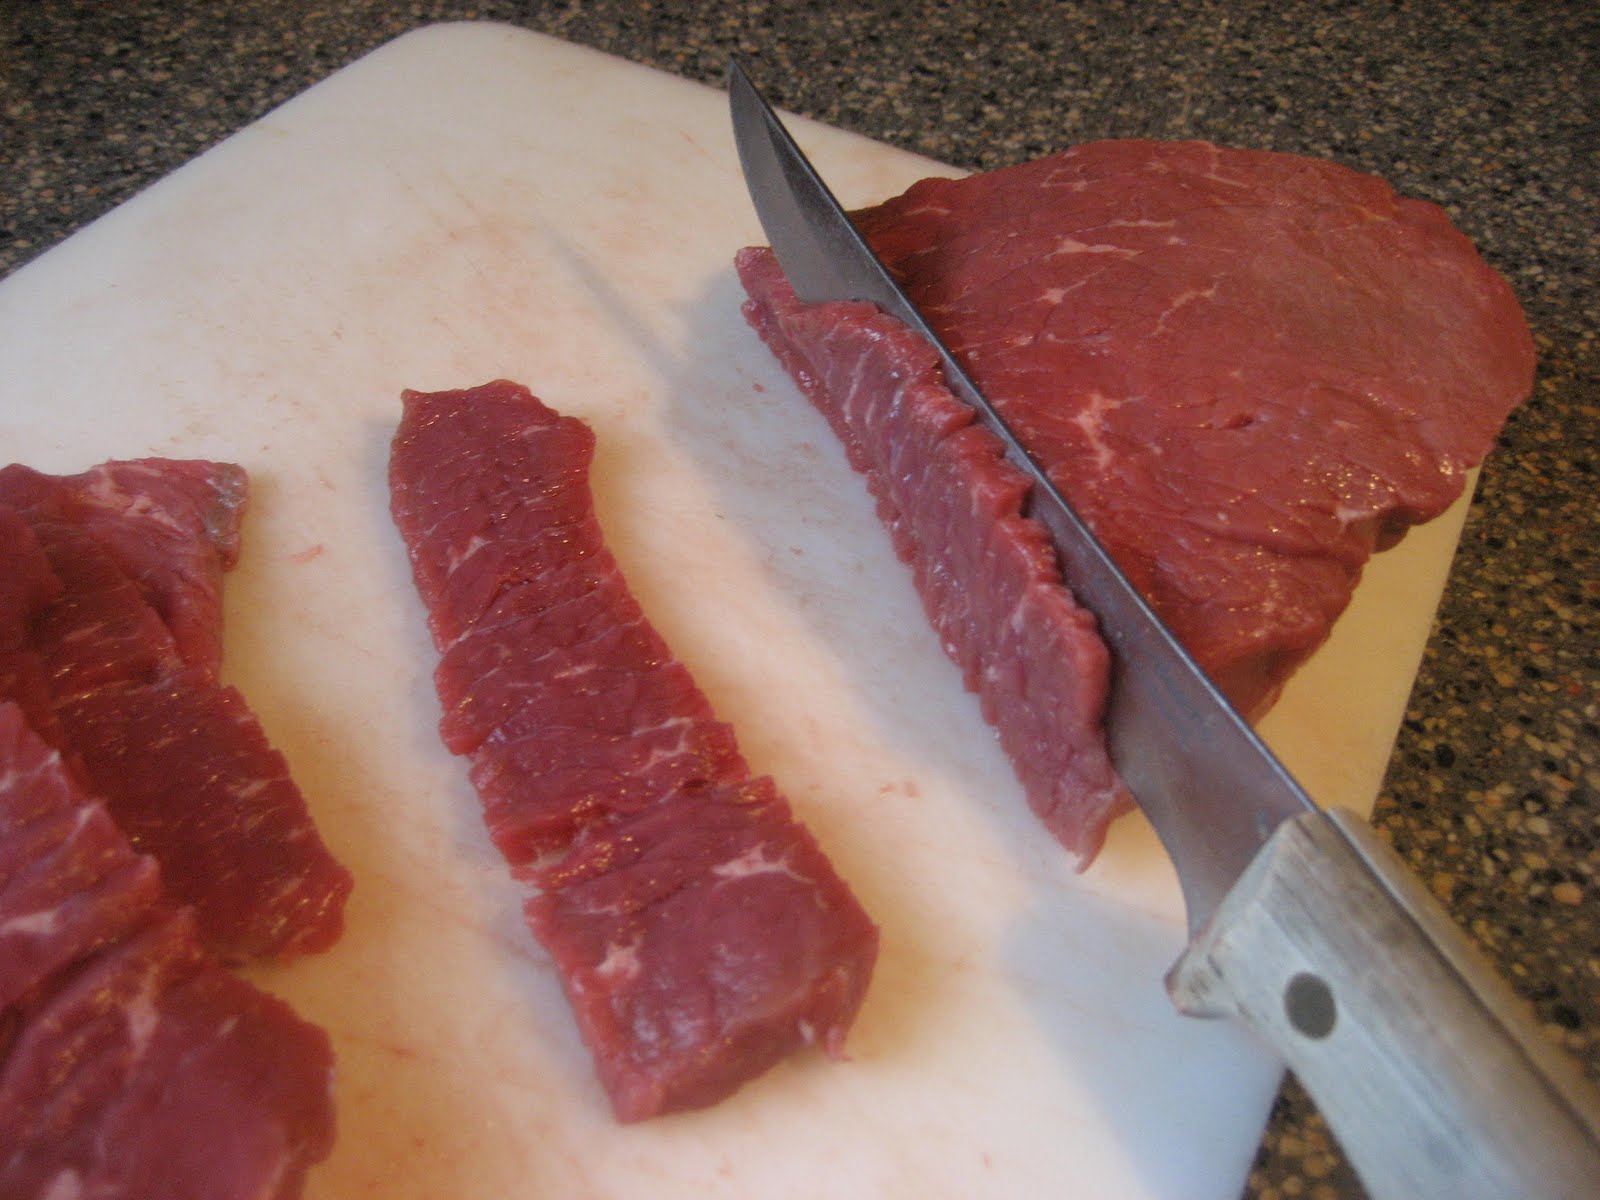
- You should start by cutting the meat into strips about 5mm thick (1/4″) – cut off any visible fat tissue – When you cut
 the meat, be sure to go against the grain. The grain, in meat, is made up up strands of muscle that will run along the meat, all in the same direction. Cut at 90deg to these strands. Generally, meat cut along the strands turns out quite a lot tougher than meat cut across it.
 - Now is the time to add any flavours to the meat – if you have any salt or pepper or even some spices, you can rub them into the meat – salt is the number one ingredient to add if you can, as salt has preservative properties of its own and will help reduce bacteria considerably. You can produce your own salt quite easily straight from sea water, although it is quite a slow process.
- The most essential part to a really tasty jerky is the flavouring and marinate that the meat is coated in during the drying process – we may not have the luxury of spices and flavouring in a survival situation – so make your jerky from this perspective and then try to improve on it – remember this is preserving food for survival, not a restaurant taste test…..
- Next is the drying process – the key word here is ‘drying’… make sure it is in a dry enough area to prevent any moisture from making the meat become damp.
- Heat is not required to dehydrate the meat, it is humidity that dries the meat out. Sunlight will help dry the meat but, don’t leave it out in the open if the air is moist or raining, especially at night, as the temperature will drop and the morning dew will coat the meat with moisture – exactly what you are trying to get rid of.
- The drying (dehydration) process reduces the water content of the meat and thus preserves the meat as bacteria need water (moisture) to survive.
- Drying can present its own problems as you have ‘raw’ meat just hanging around which will attract animals into your camp – be aware of this and ensure its in a safe animal proof area away from the your main camp. Once an animal knows theres a food source they will come back again and again to check things out and you definitely do not want them just wondering in uninvited.!
- To dry the meat requires a drying rack of some sorts – this can be as simple as an improvised rack made from a
 few sticks, to a series of racks within an enclosed water proof shelter, but the meat must be left to dry naturally – sometimes this will take a day, quite often it will be several days, during which time you should turn it over a few times – but the whole idea is to dry the meat out until it becomes slightly brittle and it will turn a brown and purple colour (like a bruise)
 - Different meats dry different colours – a white meat animal will dry to more of a pinkish, greyish colour.
- Take some jerky from your drying rack and test it by bending it – if the meat strip of jerky bends easily or feels juicy – then it is not ready for eating and needs more drying time. It is only when the fibres begin to tear and stretch apart that he meat is nearly dried out and ready to eat.
- One of the key elements to drying the meat properly is air flow – do not use a sealed box - airflow, warmth and humidity will dry the meat at a constant rate – do not overheat – if the warmth is coming from an open fire be very careful not to start cooking the meat.
- Keep an eye on your jerky – if there is insufficient air flow, it is very possible you will see some mould growing – this is the bacteria on the surface and should be just wiped off – you may even see a few worms, again dispose of these.
- The meat will be ready to eat after a few days if prepared as above – and will last for, at least, a few weeks in normal conditions and can last months in very hot conditions.
- Keep the meat in the same stored conditions and only remove when ready for eating.
- What you have now is, in fact, dehydrated meat that becomes tasty and regains its natural form once your start to
 chew and it and it gets moisture from your mouth.
 - Cooking the Jerky – some people will eat the jerky straight from the dryer.. I personally don’t do this – instead I like to simply toast the jerky over the fire – it will regain its flavours and taste and makes a delicious snack as well.
- You can also use it to make soups by grinding up into small pieces and adding to water and boiling.

This method of preserving food for survival has been in use from early man and is an age old survival skill that, as preppers, is well worth learning and practicing – it really doesn’t take much effort too.
Why not try it at home with a few strips of meat and see what you can produce – one thing I can assure you, it will taste good and fresh and far better than shop bought.
Making Meat Jerky at home:
If you do fancy making your own meat jerky, the easiest way is to start at home in your kitchen, you might want to  consider buying a jerky dryer like the one shown here.
It will certainly help give you the basics of producing your own from scratch. The good part is, everything is controllable, so any changes you make to your ‘special’ recipe are easily monitored.
Having the basic skills to produce consistent meat jerky at home will definitely help when it comes to doing the same in the wild.
I find that I can practice with different marinades – going from a very plain jerky, with next to no ingredients right up to my ‘secret’ recipes which involve leaving the meat to soak in a plastic bag over night.
These jerky dryers work very well and produce excellent quality food that will stay edible for several week and more.
The dryer shown here is Bella Casa Jerky Dehydrator / Dryer and costs around the £45 mark all in.
If you liked this article - Please Share It
Defensive Training for Preppers 
A big part of prepping and survival that is often neglected is personal fitness and the ability to defend yourself without the use of weapons.
The two go hand in hand and you will find that both fitness and defence skills increase as your ability to defend yourself improves.
There are also many different forms of self defence and martial arts that cater for the different requirements of the individual – some train in a very passive style, that requires the attacker to make the first move and instigate your defence, while others are designed to pre-empt an attack and to respond with maximum force and violence.
Your choice of defense is usually proportional to the threat of violence against you and to what level you respond usually determines the outcome.
But, lets get one thing quite clear here – doing nothing, does not and will not work…!
- This article is very specific to prepping and survival and IS NOT designed to help you be ‘spiritually’ one with the world or in tune with your inner self or various other claims that are bounded out within the martial arts world.
- In a worse case scenario you would need to deal with anyone who represents a threat to you and your preps and, quite simply, your survival.
Survival of the Fittest.
This phrase could never be more meaningful than when applied to us preppers and, if you are not the fittest and the more capable of defending yourself then you’re going to go down.. hard and fast and loose all that you have worked for over the years.
How to learn to defend yourself.
- You DO NOT need to join a martial arts club
- You DO NOT need to buy expensive combat clothing and shoes and stuff
- You DO NOT need to be a member of any society or governing body
Why not.?
Because we are talking about defending your preps and yourself – if you are confronted with a possible danger do you really want to say “hang on, I have just got to check my martial arts licence and get changed”.
No, of course you don’t – you just want to deal with the situation.
So what do you need then.?
My methods of self defence has always been to have a few very effective responses to a lot of different situations.
This is not hard to do and many of the “street fighting” styles of martial arts offer you good techniques to common attack situations.
Remember, you are not trying to be a black belt at any martial art – just gain the ability to have a few very effective responses to protect yourself against a threat of attack.
If you have never done any form of self defence or martial arts before then it’s time to learn some, and the sooner the better.
You will increase your fitness and your confidence as you progress, but, how can you do this if you don’t join a club or have an instructor standing there teaching you.?
Learning to defend yourself is really quite simple..
Remember – a few very effective defence/attack moves executed very well and with ‘violence of force’ will be all it takes to protect yourself and your family.
A couple of essential points to begin with:
- Find yourself a like minded person to train and learn with.
- Include the family in all your training sessions if possible
- Practice at least 3 times each week
- Choose a training course that is best suited to, and uses a fundamental style to ‘street fighting’
- Avoid anything fancy – you are not doing a test – stick to basics and if it works for you, keep doing it.
- Perfect a handful of defence and attack moves that work for you and throw out and ignore the ones that don’t.
- Practice your skills and then practice some more until they become second nature
- Once you a confident of your skill set the, and only then, move onto additional skills
I am writing this a a qualified martial arts instructor – not a layman – I have seen people come and go within martial arts and never really ‘get good’ at a technique due to being rushed into something else that they try and again never ‘get good’ at either.
The ones that consistently do well and win sparring and contests, are always the ones that are able to execute their ‘good moves’ with precision due to practice and are the ones who stick to the basics and practice a few skills until second nature and they can perform them fluently and with precision under different circumstances.
By different circumstances, I mean being able to react effectively, left handed and right handed, in both a confined and open space as well as being tired and physically ‘worn out’.
Remember, train when you’re tired and fatigued – and push yourself to improve your skill set. When SHTF you’re going to be tired then..!!
This is your goal – be very good at a few effective techniques – keep it simple and effective and don’t try to learn too many things at once – this WILL WORK and give you the confidence to be able to defend yourself if it is needed.
There are many courses out there that claim to turn you into a master of martial arts in weeks – these are pure BS – I suggest choosing a course that has it’s foundation firmly set in pure aggressive fighting techniques.
As simple as that really – Basic, effective fighting techniques that work and have been tried and tested to work efficiently over many years of combat.
Of all the various fighting methods I have studied over the years the most effective and appropriate self defence style for us preppers is Krav Maga ( krav magar ). This offers you the very best types of defence and attack combinations that are most suited to the type of situation you would find yourself in as a prepper.

This Krav Maga training course starts from the beginning and offers some of the very best and most effective defence techniques that work each and every time.
Not for the faint hearted, this course is designed to protect you from an attacker – exactly what we want..!

This Krav Maga course has been put together by Guy Dar, a famous instructor within the martial arts and Krav Maga world.
He is the founder and the chief instructor of a unique fighting division called Full Contact Krav Maga.
Full contact was developed from Krav Maga basics and the course he has developed have been delivered to special defence units, military and special forces around the world.
Guy has managed some of the most distinguished and highly respected Krav Maga dojos in Israel.
For more in depth information on this Krav maga defence course please click Here!
Self defence is. without doubt, an essential skill for preppers to learn – below are a few of the self defence techniques that this course will cover -
|
|
Approaches violently to attack you. |
|
|
Shoves you aggressively. |
|
|
Strangles you. |
|
|
Points a knife at you. |
|
|
Hits you with a stick. |
|
|
Punches you to the floor. |
|
|
Kicks you. |
|
|
and more… |
For a limited time only this course also has TWO FREE bonus Ebook offers
‘self defence strategy for women’ & ‘non violent self defence’


I have trained in Krav Maga and found it to be a very effective self defence method, using basic martial arts principles for many attacks, it has a real ‘feel’ for street fighting and combat style situations -
I like it immensely and still teach many of these techniques today.
It is one of the few self defence styles that lends itself to be practiced anywhere – so long as you have a training partner (which only needs to be a punch bag sometimes.!) you can practice wherever and whenever you want.
Remember your reasons for learning these skills in the first place – not for a trophy or a 1st prize pat on the back – but for having the skills to protect yourself in a REAL LIFE SITUATION.
Krav Maga WILL give you these skills and you WILL benefit physically with increased stamina, co-ordination, spacial awareness and confidence.
So, in conclusion, I highly recommend you consider taking up some form of self defence. It will give you added confidence and an ability to deal with any ‘would be’ threat to you and your prepping supplies.
- Happy Prepping Folks..
If you liked this article - Please Share It
Top 5 basic survival skills 
When SHTF and the choice of hunkering down or bugging out has to be made. If that choice is to bug out then it becomes a real survival situation, so every prepper should know the Top 5 Basic Survival Skills for staying alive.
Without these skills your chances of survival are greatly reduced, leaving your survival to trial and error.
So what are the Top 5 Basic Survival Skills
In order to understand the basic survival skills that a prepper must know it is even more important to know what the biggest threats are to your survival in the first place.
Understanding these threats are your biggest weapon to helping you survive and overcome them.
There are 3 main threats that will halt you in your tracks if your not prepared for them –
- Exposure
- Dehydration
- Starvation
And to combat these 3 threats there are 4 immediate responses to ensure survival –
- Shelter
- Water
- Fire
- Food
Remember this chilling fact -
- Extreme weather can kill you in a matter of just 3 minutes -
- A lack of water can kill you in 3 days -
- No food will kill you in only 3 weeks -
Therefore the importance of knowing the top 5 basic survival skills are paramount to any prepper
1. Know how to build a shelter and set up a camp
2. Know how to start a fire using foraged materials
3. Know how to find water and filter it or to distill water from the sun
4. Know how to set snares, traps, fishing and hunting skills and gathering food from the land
5. Know how to butcher and prepare fish and game
Most preppers will already have a basic knowledge of these skills. In fact you don’t even need to venture outside to learn how to do them – just go on-line – but nothing beats the actual experience of doing and practising these top 5 basic survival skills, outside, in the wild.
 * A Survival Shelter can be something as simple as a few logs and twigs propped up against the branch of a tree, with a few branches and leaves thrown on top. A few more leaves on the floor and your good to go – It’s enough to keep the wind or rain or snow from settling on you.
* Start a fire as soon as possible after the building your shelter – this is like Feng Shui for survival – many survival knives have built in fire starters that are excellent and work every time. Get yourself a good supply of wood stored under your shelter if possible and now you have a means to dry your clothes, cook and sterilise water.
* Collect your water – Ideally use a filter system or a filter straw that will give you an instant drink. Learn how to distil water from the sun using the various survival methods.
 *Set snares and traps and fishing lines and begin a campaign of hunting for your food –
Learn tracking methods how to set humane kill traps – ensure you have a means to get sufficient food and be able to start a store of food. This will also mean buying and using an air rifle or a hunting catapult and practising these skills until your confident
* Acquiring your dinner is one thing but you need to know how to skin and butcher your catch – you must learn skinning techniques and gutting as well as bush-craft skills on preserving your food. This will become essential in any long term survival situation –
Survival in the wild can be as easy or as difficult as you make it. Of course, once again, it all comes down to being prepared – and that’s what we’re all about – as a prepper learning these basic survival skills must be an essential part of your overall prepping plan - learning these skills is also fun and gives you a great sense of achievement and self worth, you can even practice some these in your garden!
The moral is learning the best top 5 survival skills will help any prepper to be ahead of the game should it ever be needed and that’s what we all strive for – Happy prepping folks
Emergency Preparedness – Parasites and Bacteria 
Keeping your body clean is the first line of defence and one of the better ways of keeping parasites and bacteria out of wounds.
Bacteria on the hands can enter the body through your eyes, nose and mouth.
Parasites can enter the body through the feet and open wounds, so never walk barefoot if it can be avoided because any cut or abrasion on the feet can allow parasites to enter.
Drinking contaminated water allows harmful bacteria and parasites into your body so it is important that you have the means to purify your water source either by traditional methods of boiling and chemical treatment or the more modern approach of water filtering bottle.
If you have iodine tablets you can also use the tablets and water to make a topical antiseptic to treat cuts, blister and other sores to kill any bacteria surrounding the area.
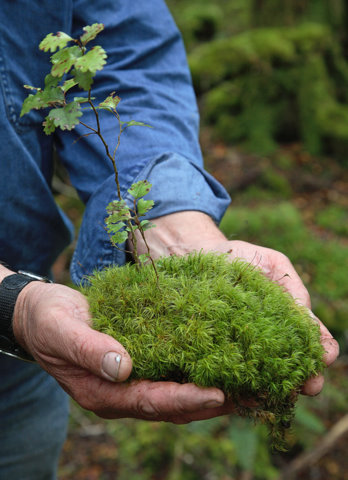
Sphagnum moss [ also known as natures bandage ] contains iodine and it can be used as a poultice to treat wounds as well. Wrap the moss in cloth and secure over the wound.
The cloth will absorb the iodine from the moss and transfer it to the area. Salt water will also kill bacteria as well as raw honey.
Parasites typical attach themselves to the intestinal walls. To remove them in a survival situation you have to change the environment in the intestines.
Note: The following information regarding the removal of intestinal parasites is for informational purposes only and for your emergency preparedness plan verify all information you come across. It should not be considered medical advice. While the practices described have been taught by militaries around the world you should do your own research before you find yourself in a survival situation and always consult with a medical professional before attempting any method.
Four tablespoons of salt in one litre of water can help remove parasites from the intestines. Once mixed consume the entire litre but never repeat this process. Excessive amounts of saltwater can be fatal unless you have adequate amounts of fresh clean water available to flush the sodium from your body.
Eating one or one and a half cigarettes can kill the parasites. The nicotine in the cigarettes is a toxin that can kill or stun the parasites and they will be released through a bowel movement.
Hot peppers make the intestines uninhabitable for parasites as well but for them to be effective they would need to have been a part of your normal diet. Eat them raw or cooked in with other foods. The Capsaicin in the peppers is also known to destroy certain bad bacteria in the stomach.
Begin now, by putting together an emergency preparedness plan.
You will need knowledge of certain ailments and will need to know how to treat those ailments.
It is incumbent upon everyone to conduct research and to ask the right questions of your medical professional.
Do not take what you read on the Internet as fact; verify all information before you find yourself in a survival situation.
If you liked this article - Please Share It
Emergency Preparedness – Insect Bites 

If you are not already, aware of any allergies to insect bites or bee stings you should consult a medical professional for testing straight away.
Because, finding out you are allergic to bees, for example, once you are stranded and in a survival situation can be fatal.
Anaphylactic shock is an allergic reaction to certain insect bites/stings such as scorpions, bees and even certain snakebites as well as a reaction to certain foods such as peanuts and tree nuts.
You must have medications to control the histamines that will be released by your body.
It is important that you always have the proper medicines with if you know you are allergic.
Know what your allergies are is an essential part of your emergency preparedness planning.
 If you get stung by a bee use a knife blade or fingernail to scrape the stinger out never squeeze because this will release more venom into your system.
If you have no medication available you can still use nature to help you.
If stung or bitten mix mud and wood ash together and dab on the area, or use cold compresses if available and if nothing else is available cover with a piece of cloth dipped in water.
Some have reported relief by crushing dandelion leaves or the flower stem and rubbing the sap on the area to soothe the sting or bite.

Ticks can be removed by covering the tick with petroleum jelly (Vaseline), with pine resin other tree sap or even with cooking or other heavy oils.
Pulling the tick out will leave the head attached, which can cause infections.
Depriving the tick of oxygen will force it to release itself.
Do not squeeze the tick and once removed wash the area and your hands well.
Spider bites and scorpion bites must be cleaned immediately to prevent bacteria from getting into the wound.
A scorpion or spider bite can cause anaphylactic shock in some cases though it is rare. Death is quite rare in most cases involving spiders and scorpions but it is possible if the victim has underlying medical conditions.
If you liked this article - Please Share It
Emergency Preparedness – Hypothermia

Prevention must be part of your emergency preparedness, however, in some cases you may not be able to prepare properly so it is important that you know how to protect yourself using what is available in your environment.
Preventing injuries, and being proactive in protecting yourself against things like hypothermia, hyperthermia (heat stroke), frostbite and dehydration can ensure your survival.
Knowing what the possibilities are can go a long way in preventing certain things from happening or developing.
Hypothermia
 Hypothermia is a very real concern and steps must be taken straight away if you find yourself stranded in a cold environment – you should always employ the Top 5 Survival Skills and ensure your emergency preparedness is fully ready for any situation to keep you safe and alive.
Hypothermia is a medical condition diagnosed when your core body temperature has dropped by three degrees. Wet clothing and exposure to wind will accelerate the process.
It is not a matter of days or even hours because in some cases, the onset of hypothermia can happen in a matter of minutes. This is why shelter in any climate, but in particular in a cold climate, is so critical.
Experts will tell you that shelter must be obtained within three hours but in frigid temperatures, it must be obtained as quickly as possible.
The Top 5 Survival Skills
1. Know how to build a shelter and set up a camp
2. Know how to start a fire using foraged materials
3. Know how to find water and filter it or to distill water from the sun
4. Know how to set snares, traps, fishing and hunting skills and gathering food from the land
5. Know how to butcher and prepare fish and game

Essential procedures for Hypothermia
- The body must be warmed if you suspect hypothermia.
- Wet clothing must be removed and you cannot be exposed to the air.
- If you treating another person you may have to use body to body contact to warm the person up.
- Failure to raise the core body temperature will result in death.
- Knowing what to do is essential and gaining knowledge and certain skill sets is a critical part of any emergency preparedness plan.
Along with the above procedures it is important to get heat back into the body – this can be done through a warm drink and warmth to the essential areas.
- Warm liquids that do not contain alcohol or caffeine can be administered
- Warm compresses in the groin area and stomach.
* Do not use hot water and do not place warm or hot objects on the arms or legs because this can force the chilled blood to rush to the heart shocking it.
*The heart is under stress and caution must be taken to handle the person gently and warm the body without shocking it.

I a survival situation that may result in hypothermia, part of your emergency preparedness must include an immediate source of heat – fortunately modern technology has the answer to this in the Survival Heat Pack.
This is a type of survival blanket but is only 9″x13″ and has a unique set of components that react to air when opened and create a hot mini blanket.
These will keep hot for upto 15 hours and are the perfect survival blanket for cold conditions.
Click here to find out more about the Hands Survival Heat Pack – 9″x13″
Always ensure that you keep up to date with survival equipment and your emergency preparedness is always checking and re checking for new and better equipment to may your prepping life easier….
If you liked this article - Please Share It
Emergency Preparedness – Heatstroke
Prevention must be part of your emergency preparedness, however, in some cases you may not be able to prepare properly so it is important that you know how to protect yourself using what is available in your environment.
Preventing injuries, and being proactive in protecting yourself against things like hypothermia, hyperthermia (heat stroke), frostbite and dehydration can ensure your survival.
Knowing what the possibilities are can go a long way in preventing certain things from happening or developing.
Heatstroke

Heatstroke and dehydration are not synonymous, as some may believe. Heatstroke is the failure of the body to regulate its coolingsystem because of exposure to high temperatures.
Dehydration is simply not enough fluids in the body for normal cell and organ function and it is fatal once the body loses 15 percent of its fluids.
You cannot go longer than 72-hours without adequate hydration. In some extreme cases, you may survive longer than three days but this would require that you do not move essentially. There have been reported cases where individuals have survived longer than five days without any liquids but the cases are extreme examples of survival and no one should ever expect the same results.
The body is cooled by the evaporative process. Sweat on the skin begins to evaporate cooling the skin and ultimately the blood in capillaries, veins and arteries that are close to the surface. Warm blood flows from the organs to the surface to be cooled and then travels back to the organs to cool them. You can help keep the body cool by wetting your clothing and keeping your head covered with a wet cloth.

If your body is unable to sweat because of a lack of fluids or some medical condition your body can overheat if you cannot cool it by other means.
You should conserve sweat and never attempt to ration water.
In hot climates to reduce sweating, and to conserve bodily fluids you should not exert yourself during the hottest parts of the day.
Staying in shaded areas can help slow the dehydration process and help prevent heatstroke.
Once your core body temperatures reaches 40.5ᵒC (105ᵒF) it must be cooled immediately or it is fatal.

If possible submerge in water. If not possible then cool the head with wet cloths as well as the rest of the body, give fluid, lie patient down and raise the feet..
An essential part of your emergency preparedness plan must include familiarisation with these conditions, as they can often lead to a fatal situation.
As a prepper you must ensure you have prepared for this scenario and cary the necessary equipment in your EDC or Bug Out Bag.
You must be knowledgeable of the Top 5 Survival Skills in order to ensure you are ready for such an emergency.
1. Know how to build a shelter and set up a camp
2. Know how to start a fire using foraged materials
3. Know how to find water and filter it or to distill water from the sun
4. Know how to set snares, traps, fishing and hunting skills and gathering food from the land
5. Know how to butcher and prepare fish and game
Typically, as a prepper and if there was a risk of heatstroke, you would ensure you had the correct equipment with you and planned your day in a fashion as to ensure you did not overwork yourself and thus overheat.
There are, in fact, several very easy, simple steps you can take to reduce the chances of heatstroke that run hand in hand with applying parts of the 5 golden survival rules.

Build a shelter -
This can be done in a basic form using branches etc and then clad over the top using a couple of survival blankets or a survival tent over the top to give a reflective surface to bounce the suns rays back and give a shaded area to rest under.
One of these will give you an 8′x10′ shelter for under £5 – click here to find out more info.
Know how to filter water
Water can be obtained from many sources, but it is essential to ensure it is safe to drink. If you have no water with you then it is essential you carry [as a minimum] a safe water filter straw in order to have safe drinking water from any source.
A survival drinking straw will eliminate the need for having a fire to boil water and is an instantly usable bit of kit. No faffing around – just find the water, dip it in and drink.
click here to find out more info.
Being ready with a good level of emergency preparedness will ensure that you do not become a victim in any survival situation. Having some simple equipment can mean the difference between surveying or not..!
If you liked this article - Please Share It
Survival Cooking using no Bushcraft Equipment 

In a survival situation that has suddenly happened or in an unforeseen circumstance, you will probably not have any Bushcraft Equipment with you so you will have to improvise, and use what you find around you and in your immediate environment.
Survival cooking, or, as some might even call it call it “primitive cooking” dates back to the beginning of man, because after all, your ancestors in many cases would have used the very methods that will be described here.
First, keep this in mind that all wild game, fish and insects should be cooked thoroughly before eating, so having a method of cooking is imperative.

Food must always be heated to an adequate internal temperature to destroy any parasites and bacteria that can cause illness or worse.
Never cook any game or fish with the entrails still in the body, all internal organs must be removed first and then thoroughly washed out, cleaned and checked before any cooking can start.
If either of the above cannot be achieved you are risking problems such as sickness and diarriah at a minimum and possibly worse.
Improvised plates
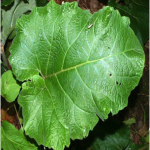
Burdock leaves make excellent wraps for your food and the roots are considered a delicacy in many cultures.
Do not wash or clean the roots until ready to prepare for eating.
You cannot use poisonous plant leaves for cooking wraps and obviously, you cannot eat them.
Make sure you have an up to date botany guide on edible plants as part of your Bushcraft Equipment or in your bug out bag. But also make very sure you have read the book before hand.


click any book image above for more information, pricing and reviews
Fire Pits
 A fire pit is the most field expedite way to cook because the fire is enclosed and the heat is concentrated upward. You can lay green saplings over the top of the pit to use as cooking racks and the high moisture content in the saplings can help cook the foods, this is similar to plank cooking.
The method involves digging a small depression in the ground using whatever Bushcraft Equipment you may have – if you have none, then this can still be done with your bear hands or a good stick.
Then lay flat rocks in the hole and build your fire on top. Let the fire burn down to coals and then scrap away the coals and lay your food that has been wrapped in leaves on top of the hot rocks.
Layer grasses on top of the wrapped food and allow the heat to create steam from the grasses and leaves and you can essentially poach your food.
If you have the tools, you can split cedar or oak saplings and lay the pieces cut side up over the pit to use the planks as a cooking surface.
This will also infuse the moisture and flavour in the wood into the food.
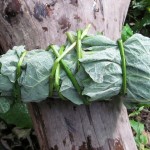
Food wraps
Wrapping foods in burdock leaves or cattail fronds also helps contain the heat and will tenderize the fish or game you are cooking and the leaves can be eaten along with the game or fish.
Cattail fronds can be also used for wraps and the roots and lower stems near the water make excellent eating
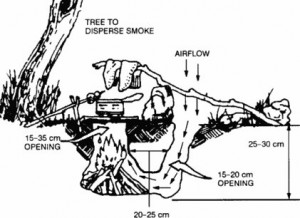
To make your fire pit more efficient you can build what is called a Dakota fire Hole – this requires no Bushcraft Equipment at all – just your hands and a good digging stick broken from a tree.
Dakota Fire Hole
 The illustration shows an air chamber, which provides oxygen to the fire pit making it extremely efficient and reduces the amount of fuel needed. Once the pit is constructed, you can use a spit method for cooking or lay flat rocks slightly over the edge to heat and use as a cooking surface or use green saplings or planks as a cooking surface.
To add flavour you can wrap your food with dandelion leaves and buds and the unopened buds from burdock and add daylilies roots or the roots of an arrowroot plant and steam to tenderness along with your game or fish.
You may find your Bushcraft Equipment merely consists of a plastic jug, a wooden bowl or possibly nothing more than a piece of plastic or canvas.
You can use anyone of these to boil water in to cook your food.
If using a plastic jug cut the top off so you have the room to drop hot rocks through the opening to heat the water. Build a fire and choose your rocks carefully because rocks with high moisture content will fragment under heat and they can splinter and fly out of the fire. Use granite or quartz and again make sure the rocks will fit into the container.
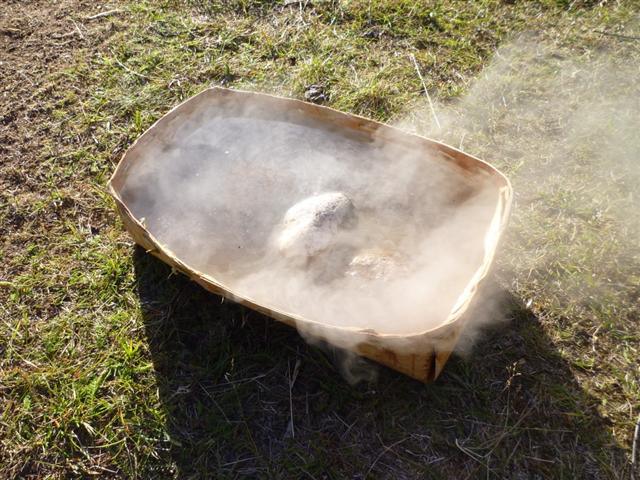
If all you have is canvas or plastic sheets did a shallow depression and line with the canvas or plastic, fill with water and place the hot rocks in the water.
Heat the rocks for at least an hour in the fire and then carefully place the hot rocks in the container of water along with whatever food you have.
Ideally, you may be fortunate to have some tools with. These will help make your survival so much easier and help with moving the hot rocks, as well as digging and finding fire making materials.

Tools such as a machete or camp axe like Gransfors Bruks Small Forest Axe shown here,
are perfect to slide the rocks on to so they can be moved works well.
Start with several rocks to first to get an idea of how many you will need to heat the water enough to cook your foods.
Have rocks as backup that can replace the ones you remove.
Essentially you can survive without any bushcraft equipment it just takes a bit longer and is much more harder work.
If you liked this article - Please Share It
How to Butcher and Prepare Fish and Game using Survival Skills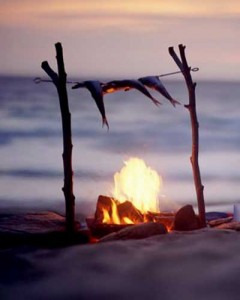

Now that you have been working on your wilderness survival skills you are to the point where you feel you can obtain food in the wild.
However, what do you do with that food once you have managed to trap, snare or have caught some fish.
Game and fish caught in the wild must be processed almost immediately in warm weather to prevent spoilage.
You only have a matter of hours before the meat is inedible.

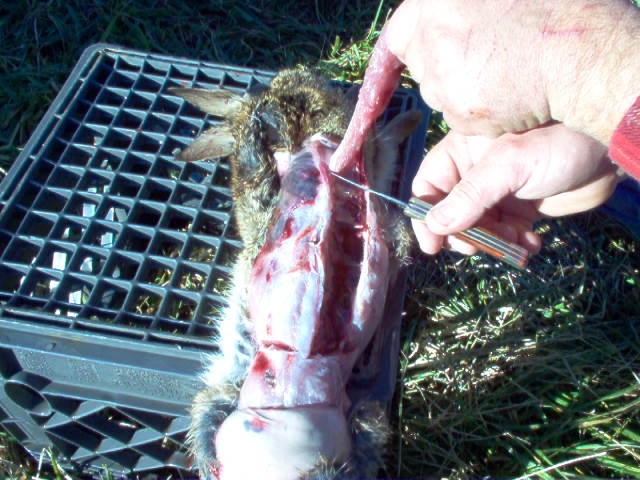
It is recommenced that you field dress the game on the spot.
Remove the entrails by starting at the tail/anus and make a cut in the belly up to the chest cavity.
Be careful as you slice into the belly that you do not puncture the entrails. Some skinning knives will have “gut hooks” expressly for these purposes they only penetrate far enough to cut open the layers of skin.
Bury the entrails immediately so you do not attract predators and insects.
- Leave the skin on until you are ready to process the meat for cooking.
- Cut the head and feet off and spread the cavity open and prop with a stick then wipe the cavity out.
- You want the meat to cool as quickly as possible so never leave the entrails in any longer than necessary.
Wilderness survival may require you to do things you are not accustomed to doing.
The only way to become proficient at processing wild game is to have hands on experience.
Once back at camp start a fire and make a spit by pushing two forked sticks into the ground on either side of the fire.
Use a slender sapling to skewer the animal and lay across the fire supported in the forks.
Then construct a small platform out of green saplings close to the heat but not over the flames to use as a curing/drying rack for any meat you cannot eat right away.
Hang the animal by the hind legs to make it easier to skin.
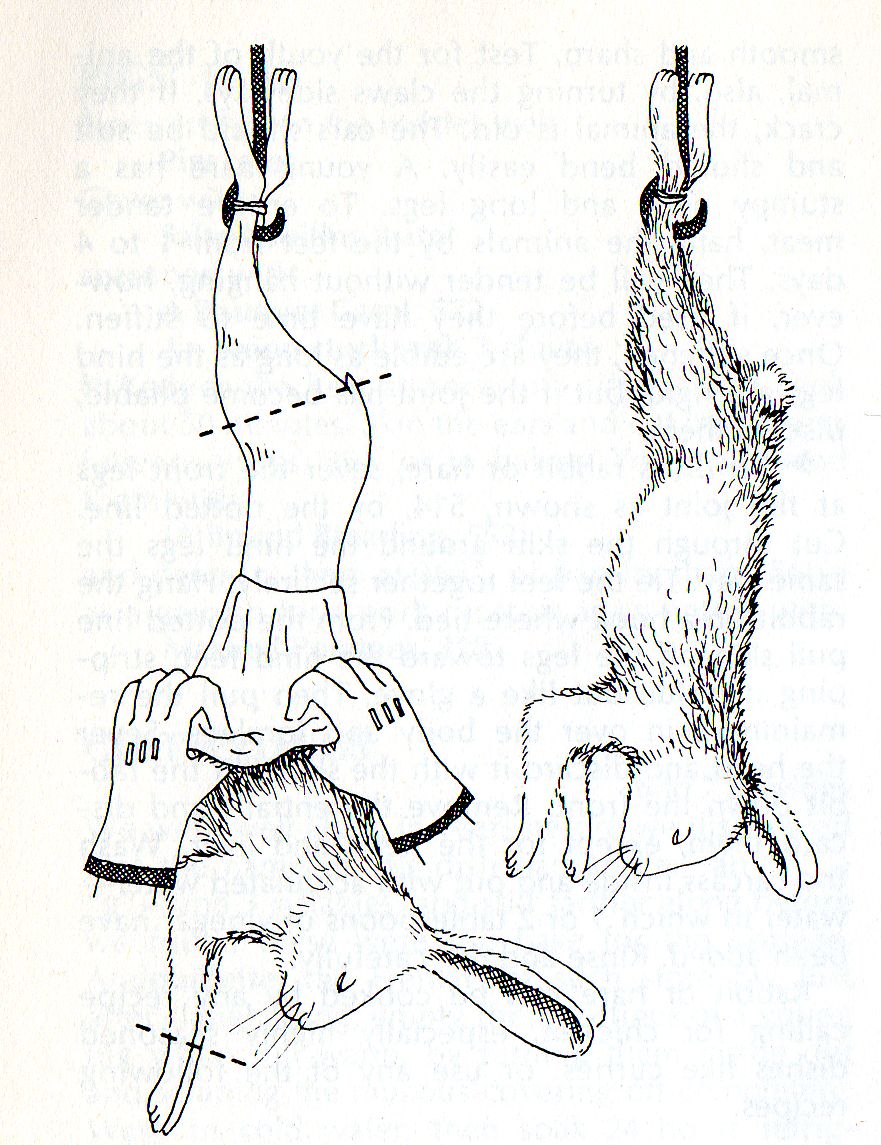 Slit the skin along the backside of the hind legs. Begin peeling the skin off starting at the hind legs and working forward, you will pull the skin inside out essentially.
You can save the skin for curing, if you know how, otherwise bury it as soon as possible.
Cut the limbs at the joints. On small game, the legs do not have much meat but they can be placed in water and boiled to produce a protein rich broth.
Cut down either side of the backbone through the ribs to free the breast meat if you plan to dry some of the meat otherwise skewer the animal and place over the heat.
Remove the meat if there is more than you can eat and lay across the drying rack. You must cure any extra meat to preserve it.
Having wilderness survival skills such as knowing how to process wild game is essential to prevent sickness and to make sure you eat well.
Curing Meat:
Meat must be dried with heat to remove all of the moisture. Meat not cured properly will turn rancid because of the high moisture content.
Meat dried for eight to ten hours using heat can last for days out of refrigeration
Preparing Fish for the Fire
There are several ways of processing fish for the grill, some like to remove the head and others like leaving it on. Before cooking however, you must remove the innards by slitting the belly and pushing a finger into the cavity and “pop” them out. Rinse the inside well. Do not cook and eat any fish until you have removed all entrails. Cooking fish with the entrails intact can ruin the meat and possibly make you ill.

For field expediency, you should cook the fish whole and then remove the skin after it is cooked.
This means you do not have to scale the fish first. If you planned to fillet the fish into portions then you would have to scale the fish.
Remove the gills and fins before cooking after you have cleaned the fish.
Knowing how to prepare fish properly is an important wilderness survival skill and one that should be practiced often.
 To keep the fish from falling apart as it cooks cook it on a flat rock near enough to the fire to
  maintain heat.
You can also lay several saplings over the fire and support with forked sticks and lay the fish on the saplings to cook.
You can also drape the fish over a single sapling over the fire but the flesh tends to fall off as it cooks. Having wilderness survival skills means you can eat well while in the wilderness and not become sick.
Things to make butchering and processing game and fish easier include a skinning knife with a gut hook and whetstone/sharpening stone. Small hack saw for cutting joints and latex/rubber gloves to reduce the spread of bacteria present in the animals. Carry clean cloths and net bags to carry game in that allows airflow to cool the game.
Once you find yourself in a wilderness survival situation you will need to know how to do certain things to survive. There are things you can do now to prepare yourself, so practice what skills you can in a controlled environment before you need to depend on those skills to save your life.
Additional Basic Survival Articles |

Essential reading for all outdoor survival |
|
If you liked this article - Please Share It

How use Survival Skills to Set Snares and Traps
Along With Fishing and Hunting
Having enough survival skills to obtain food in the wild is very important to any prepper – While you can survive for weeks without food, it is not recommended you try.
You can always obtain food if you have the skills needed to set snares, traps and by knowing how to easily fish and hunt in the wild.
Having this ability will ensure that you can obtain food for energy so you can complete your survival tasks and for psychological reasons as well.
Food is comfort and having it will boost morale, which can literally be a lifesaver.
Snares for hunting:

A spring snare is ideal because once the animal is snared it is secured out of the reach of any predators prowling the trails.
Look for signs of depression in the grass, which indicates an animal trail.
To construct a spring snare you will need cordage, survival knife or small axe, a slender sapling that can be bent, a peg to secure the sapling and a stake that is driven into the ground.
The small peg needs a notch or extended elbow so it can be secured to the stake driven into the ground.
Pull the sapling down so there is enough tension for it to spring back up when released. Tie a length of cordage to the sapling and the other end to the small peg and holding the sapling secure the peg to the driven stake so it holds the bent tree in place. Carefully tie another length of string to the peg.
Make a loop with some cordage and make sure you use a slipknot so when an animal’s head tries to force its way through the loop it tightens. Take the other end of the string that is attached to the peg and tie it to the loop.
Push some slender sticks into the ground and drape the loop over them so the loops’ shape is maintained. Once an animal walks into the snare it will pull the peg lose that is holding the tension on the sapling causing it to spring up with the animal snared.
It will take practicing your survival skills to where you can set a dozen or so snares in a relatively short period.
Making your snares overly complicated is time consuming.
You want to weigh your efforts against the results when hunting for food, there is no point in expending 1,000 calories only to net 300 calories. Your traps and snares must be such they can be set up in minutes so you can set about searching for other ways to obtain food.

A Simple Snare.
It is recommended that you use wire for a simple snare so it maintains it shape. Wire should be between “20 and 24 gauge” with a loose slipknot so the wire tightens easily once the animal tries to force its shoulders through the snare.
You have to size your snares for the type animal you expect to trap otherwise the loop will be either too big or small. A simple snare may not hold the animal long, so check often and to prevent predators from running off with your catch as well.
Keep in mind you are competing with other predators that have been honing their survival skills for years.

Place the snares along trails leading to and from water and along small game runs that lead to and from the animals den.
Animals will use more than one trail so always look for the so-called backdoor trail or bolt hole if you discover a den and want to set snares close by.
Dead Fall Traps
 Deadfall traps can be complicated and occasionally you can injure yourself setting one up.
A trap such as the one depicted can be used for smaller animals and they typically need to be baited because they are difficult to set up along game trails because larger animals along the trail will trip them.
You must bait them to draw the animal to a spot where they would not normally be. Use bait that is not unique to the area.
There is no point in baiting a trap with acorns when you are in a forest of oak trees because there is no reason for the animal to be attracted to the trap. Use peanut butter or rations from your pack.

There are numerous components to a deadfall trap making them more complicated to set up than a snare.

The more complicated something is the greater chance of a malfunction.
Use deadfalls traps to target specific animals you know are in the area and set them close to where you suspect they might be.
Fishing
Survival skills are important but you do not need to be a master to catch fish.
Fishing is one of the quickest ways to obtain food in the wild and it can be done with limited skills and materials. Essentially, all you need is line, hooks and bait, or you can catch them by hand or by using a spear.

 Line can be shoelaces, string, clothing torn into strips and braided or you can make cordage by stripping cattail stalks, for example, and twisting the fibres into line.
Hooks can be pieces of wire, paper clips, or bones and pieces of wood carved into hooks.
Use the pop tops off discarded soda cans or even use a broken button as a gorge hook.
A gorge hook is sharpened on both ends and is usually about five centimetres long.
Both ends are baited with the hopes the fish swallows the entire hook.
Having survival skills means you adapt to your surroundings and know how to use what you find there for your survival.
Fishing Spear

A fishing spear can also be used as a small animal spear. Fishing spears should be multi-pronged so the spear catches and holds the fish.
A single spear end even though sharpened may not secure the fish or even penetrate.
However, a fishing spear take a lot of practice to perfect as well as most of the time you may need to wade out into the water which can be both dangerous and mean having to dry your clothes.
Modern Survival Fishing – The YoYo Reel -
Traditional fishing methods can be time consuming and require effort that will burn up valuable calories. Therefore, as a prepper, it’s important to always carry some equipment to ensure you can have food.
The YoYo reel is ideal for preppers as several reels can easily be set up and left in a matter of minutes leaving you free to carry on  with other survival tasks and come back later to find a nice catch of fish.!

Once setup, the reel is left to work on its own – the mechanism is sensitive to a fish nibbling on the bait and does all the catching for you including the reeling into shore.
To some extent this is a “preppers survival fishing dream kit”. Saving a lot of work and effort.
//www.youtube.com/watch?v=P1FrAc8fgWU
link to > YO-YO Automatic Mechanical Fishing Reel
Start working on your survival skills now. Build up your knowledge of snares and trapping by reading survival books like the very good ‘Trapper’s Bible‘ on the left here.

So when you find yourself lost or stranded or even out for an adventure, you have the means and the knowledge to obtain food.
Having a YO-Yo reel will definitely help you get food and save you time and effort.
Happy Prepping Folks..
Additional Basic Survival Articles |
Essential reading for all outdoor survival |
|
If you liked this article - Please Share It
How to Find Water and Filter and Purify or Distill Using the Sun

Knowing how to purify water can literally save your life. You may think that because you are miles from civilisation that any water source would be safe to drink but this is not the case.
After obtaining shelter, water is your next priority and regardless of your current supply, you should begin immediately securing a source.
In most cases, you will have to filter and purify any surface water source you find in a wilderness environment.
Surface water sources are contaminated by animal faeces, birds, insects and animal carcases and by humans as well.
The water source will contain harmful bacteria, parasites and pathogens that will cause illness or worse. The water must be filtered and purified before it would be considered safe to drink.
Acceptable methods of emergency water purification include, chemical treatment using iodine or chlorine dioxide tablets, or sodium hypochlorite (liquid chlorine), by boiling the water or by using a portable water filtration system.
Basic Layer Filter
 Not only must you know how to purify water you must also learn how to filter it properly first.
Water must be filtered to remove waterborne cysts that can harbour and protect bacteria from chemical treatment or even boiling. The cysts can be described as micro sized seedpods that can withstand high temperatures. Filtering will remove these cysts along with pesticides, herbicides, sediment, insects and other debris.
Filtering mediums include charcoal, sand, gravel, cloth, cheesecloth and coffee filters. Layer the filtering mediums with the finer material as the bottom layer to filter out the microorganisms.
Use any food can with a hole in the bottom, plastic soda bottle or any suitable device that did not contain chemicals or other toxins.

Next, pour the water into a vessel for boiling or into your container for chemical treatment.
Allow the water to rapid boil for one minute if at sea level and if you suspect you are above sea level boil for three minutes. Water boils at a lower temperature at higher elevations because of the reduced air pressure thus, the extended boil time.
Boiling longer than the recommended times will cause you to lose water volume through evaporation; this can be problematic if you have a limited source.
For every 152 meters / 500 feet above sea level, water’s boiling point is reduced by one degree.
Before setting out on any outdoor adventure make sure, you know how to purify water before you find yourself in a survival situation.
Finding Water
You now know how to purify water but before you can get started, you have to find water first. You may not always have a river, stream, lake or pond next to your campsite in fact you may have to dig for it or collect it using other methods that will be described but first how to dig for water -
 Dry wash or shallow gullies can be a source of water, particularly if there is green vegetation along the sides. These washes usually have water flowing at various times. In the dryer seasons, the flow diminishes or stops completely but there can be water just below the surface.

Note the green vegetation in this arid environment. The plant life could not survive on the rock outcropping unless there was a water source just below the surface. You may find a natural spring is seeping through a fissure in the rocks and is filling up a small cistern. In years past people constructed cisterns to collect spring water, pooled water made is easier to collect. Any water collected from a cistern must be purified; animals will use the source as well and will have contaminated it.
Solar Water Distillation and Transpiration


Transpiration simply means to lose water vapour.
Plants lose water vapour through their epidermal pores or their stomata located on their leaves. Technically this a gas exchange in plants.
Plants absorb carbon dioxide and through transpiration exchange that gas for oxygen, which is present in the vapour they lose through their stomata.

Plastic bags a weight (small stone) for the bag and some string are needed to collect water using this method.
The vapour given off by the leaves will condense on the sides of the bag and drip toward the weight placed in the bag.
Clear plastic is ideal because it allows the sun’s rays to strike the leaves.
This is a way to collect moisture from the soil using a solar water distiller. Materials needing are a digging tool, collection cup, sheet of clear plastic and a small rock for a weight.
Evaporated water is purified so you do not need to know how to purify water collected with this method.
Dig out a small depression and make sure the plastic can cover it with plenty of overlap on the sides. Once excavated place a collection cup in the centre of the depression and fill the hole in with green vegetation.
Place the plastic over the top and secure along the sides with the excavated soil or rocks.
Place the small rock over the collection cup that is under the plastic and put a small hole in the plastic over the cup. The weight creates a depression to allow water to flow toward the hole.
The sun will essentially “sweat” the moisture from the soil and vegetation. As the moisture evaporates, it will condense on the top side of the plastic and begin to flow toward the hole and begin dripping into the collection cup.
Portable Water Filtration
If you are able to prepare for a situation that requires raw untreated water to be filtered and left safe and sterile for drinking, then it is always advisable to carry a portable water filter in your backpack. In fact you can also get a water filter drinking straw which will give you safe drinking water direct from a water source. [not sea water].
These other ‘instant safe drinking water filters’ offer safe, clean, drinkable water but without the hassle of all of the above methods.
There are two very good filter systems you can use for this type of filter:

Personal WaterStraw 700 litre pure water filter -
Click to see more info and pricing for DrinkStraw 700 here
 Personal WaterBottle 4000 litre pure water filter -
Click to see more info and pricing of LIFESAVER® 4000

Learning how to purify water is not complicated and the methods described are relatively easy to accomplish. In some cases, you will have to be prepared by having certain materials with you or have the ability to find those materials in your environment. Foraging can result in you finding what you need, such as discarded metal cans or other vessels to boil water in and discarded plastic shopping bags that can used to collect water from green vegetation
Additional Basic Survival Articles |
Essential reading for all outdoor survival |
|
If you liked this article - Please Share It
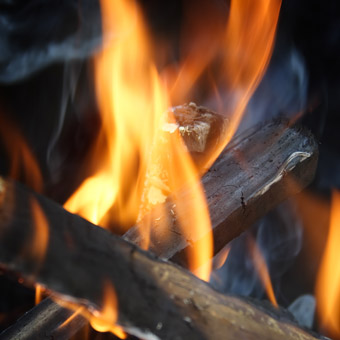
How to be an expert Fire Starter Using
Foraged Materials Found In Your Environment
There are literally hundreds of ways to start a fire if you have the time and resources. However, once you find yourself miles from home needing a fire your fire starter material must be readily available and your methods uncomplicated.
Hikers, hunters and others have literally been left out in the cold because they have found that the matches they had carried all day in their pockets were no good, they would not light.
Matches carried in pockets next to your body will absorb perspiration, making them damp. Matches in backpacks exposed to humidity will become useless as well.
You are miles from home; it is cold and will be dark soon. Will you suffer or do you have the skills to make a fire with what you can forage from your surroundings.
Fire starter or combustibles are everywhere – lint in your pocket, thread from your clothing and of course dry tinder made from wood.
However, you still need an ignition source:

A bow and drill has been used for hundreds if not thousands of years to create a fire using friction.
This fire starter method may have various designs and materials but the basic concept is the same, create enough friction to cause heat to make an ember.
Use shoelaces, cordage from your pack or rope discarded by others that you could forage from the area.
The concept, of course, is to spin the drill fast enough and long enough to create an ember in the fireboard.
The diagram accurately depicts the materials you will need and all materials other than the rope/string can be found on the forest floor.

Make sure you have dry tinder available so once you have an ember you can move the fireboard to combine the tinder and ember. Some experts may describe catching the ember under the notch in the fireboard using a leaf or piece of bark. Then they describe moving the hot coal on the piece of bark or leaf to the tinder. Moving the ember can cause it to extinguish, you can drop it or the wind blow it away.
Move the board away and bring the tinder to the ember.

The wood file.
A less complicated technique than the bow and drill but this method requires more effort and both pieces of wood must be extremely dry for this procedure to work.
However, the wood file method has been field tested thousands of times and will work with some patience and attention to detail.
Easy, additional fuel source. 
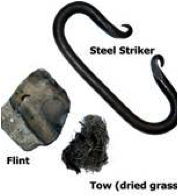
Preppers will always carry alcohol wipes or hand sanitizer in their kit. These contains alcohol which is ideal as a fire starter along with a piece of steel and flint.
Squeeze an alcohol wipe over dry tinder or place some sanitizer on the tinder.
Then take a piece of steel and strike it against flint to create a spark to ignite the alcohol.
A knife blade and flint or a hard stone and steel can be used to create a spark. Actual natural forming flint is the best material to use with steel.
Alternative fire starter ignition sources
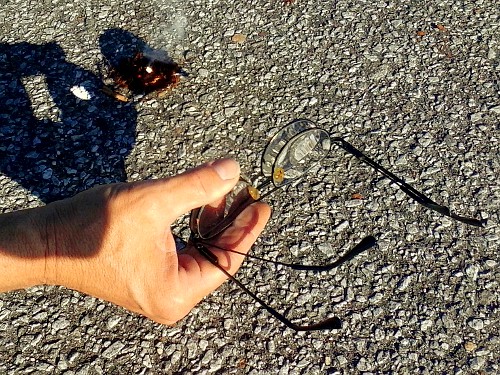 Piece of broken glass or even a pair of glasses can be used to magnify and focus sunlight to ignite dry tinder.
For best results, the sun should be directly overhead but this method will work anytime the sun is shining, you simply have to position yourself correctly. You can use pieces of headlamp glass, eyeglasses and any clear glass you can find
You may have been on a bicycle tour and had a mechanical breakdown the bike is ruined and you are miles from home.
 Use the headlamp as a fire starter. The glass can be used to magnify sunlight as can the reflective lamp casing. The casing on the right can be placed in direct sunlight with dry tinder placed where the bulb would normally be.
The reflective nature of the casing will direct the sunlight onto the tinder in the centre and will ignite it.
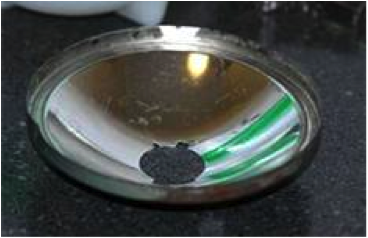
Many people have had success using a soda can bottom as a reflective material to magnify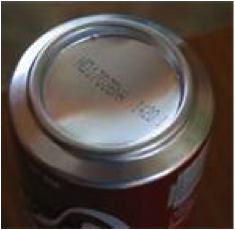 and direct sunlight to create a fire in dry tinder. The soda can bottom must be polished to a high reflective nature. You cannot use an abrasive material because scratches in the can will reduce the effectiveness. Most people find that chocolate is ideal as a polishing agent.
Use any piece of soft cloth to buff the metal to a high shine.
Then place dry tinder on the ground and move the can until sunlight is reflecting off the can onto the tinder. This method will take patience and a steady hand but will work.
You may have a tool kit on your bicycle or in your car that may contain some still wool.
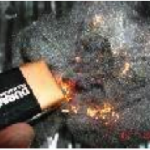
Because steel wool is, metal it conducts electricity well and the wool is made up of thin metal strands that will ignite with a small electrical charge because each strand is thin so any electrical charge will over load the metal causing a fire.
Any small battery will work as long as you can tough both battery posts at the same time with the steel wool. Make sure you have placed the dry tinder on the steel wool before connecting to both battery posts.
Be prepared -

Of course the ultimate answer to survival is being prepared for any situation with enough equipment to make lighting a fire an easy job for you.
If you are going out on a bug out exercise you will have prepped for lighting a fire with essential fire starter equipment and only need the basic materials found around your camp in order to keep it alight. Included in your kit must be a survival knife. Nowadays quite a lot of survival knives have a good quality Ferro Rod fire starters that works every time and makes life so much easier.
Click to view more info and prices for the Bear Grylls Ultimate with ferro rod shown here >
For any knife that does not have a ferro rod you can always buy one separately or even invest in a fire lighting survival kit that contains all the essentials to make lighting a fire very easy – typically a kit like the Steel of Fire – Outdoor Firelighting Kit comes with a good quality ferro rod and striker plus hexamine fire starter blocks and several pieces of cotton wool – and it’s not expensive.!!

Fire starter material is everywhere - as are other materials and methods that can be used as an ignition source; you just have to know what you are looking for. Practice your fire starting methods in a controlled environment to gain the skill and self-confidence needed to create fire in any environment.
Additional Basic Survival Articles |
Essential reading for all outdoor survival |
|
 Build a Survival Shelter and Set Up Camp
A survival shelter is a priority once you find yourself lost or stranded or you simply realise you cannot make it back home before dark.
The rule of three for survival state you will need a shelter within three hours. However, if in a cold climate, you will need a shelter almost immediately to prevent hypothermia.
A shelter protects you from the elements, predators, and insects and provides comfort. Essentially, you need it as much for your mental well-being as you do for your physical well-being.
Shelter Materials
Ideally, you will have shelter material in you pack along with tools and materials such as quality cordage, knife, small axe, wood saw or machete.
Otherwise, you can use materials found in your environment and you can take advantage of natural features.
Poncho, tarps, thermal blankets, snow and local vegetation can be used as survival shelter materials. Once you realise you are lost, you must have a shelter constructed before dark. It is always recommended that you shelter in place and begin setting up camp immediately. Always stop for a minute and evaluate your surroundings for material.

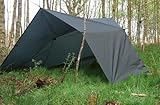
Secure your tarp to the top of the downed tree and slant to the ground on the north side in cold weather. Secure with wooden stakes or rocks. It is always worth carrying an emergency tarp like this Tough Tarp/ Basha shown here – it will get you out of lots of situations…
When it comes to tarps, do not buy cheap. You will definitely regret it and when you do it will be in the middle of the night when it’s windy and raining..!!!
 A quality tarp will ensure a dry nights sleep and stay put if theres any wind as well. Even a compact tarp like this Aqua-Quest Ultra Lightweight Tarp will help to protect from th eelements.
Quite often it’s a good idea to use short Bungee Straps to secure your tarp rather than rope or paracord. This will ensure a bit of movement in windy condition and prevent any extra force on your tarp.
If you do not have a tarp, you can slant saplings or a thermal blanket and vegetation to create a windbreak and to provide overhead cover. Build your fire so the heat is reflected into the makeshift shelter. Fill in with vegetation to leave just enough room to enter. If the log is flat to the ground, excavate the soil to provide a depression that will fit your body.

A survival shelter constructed without using tools
A live tree is used as the centre support.
Find a tree that is bent slightly or can be pulled closer to the ground and secured to use as a support pole.
Lean vegetation and other forest debris along the sides.
Poncho Shelter

Use cordage or find a low limb to put the poncho over to make a quick shelter. This type of shelter as depicted may not be suitable in cold weather unless you fill in the ends and sides with insulation, such as leaves, snow and other vegetation.

< Waterpoof Poncho Woodland Camouflage
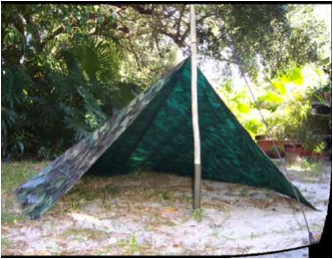 An ordinary Tarp is ideal for emergency survival shelters and can be set up in a matter of minutes using what you find in your environment.
Once constructed use whatever is available to provide additional insulation.
If you carry tarps in your pack, ensure they have grommets so you can secure with rope or combine tarps together to make a larger shelter.
Thermal Blanket Shelter
A survival shelter can also be constructed using thermal blankets.
 Foil Survival Emergency Blankets
 are easily packed and you should always have at least six in your pack. You can use them as ground insulation, as well.
You have to use caution with a fire near the thermal blankets yet you want the heat to reflect inside the structure.
Build a fire at the opening and set up a reflector behind the fire so the heat is directed toward the opening.
You can put a series of stakes in the ground and pile up green vegetation to direct the heat toward the opening.
A snow cave survival shelter
This is constructed using snow, sticks and leaves.
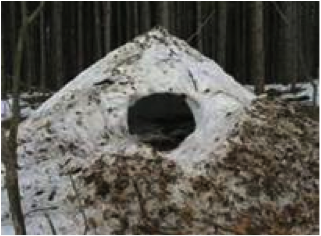
You should not burrow into deep snowdrifts because the snow can collapse. Build a standalone shelter from snow so if the structure does collapse you can extract yourself otherwise you may suffocate.
Built the cave big enough so your body is not touching the sides of the shelter, your body in contact with a cold surface will drain the heat from your body.
Make sure you have insulation between you and the ground, such as pine bough, thermal blankets, and pine needles, leaves and so on.
Take advantage of your surroundings.

Excavate the snow under a tree down to the bare ground and pile the snow along the sides.
Then place pine boughs,tarps or ponchos over the top for overhead cover.
Build you fire inside the shelter being sure to leave room for the smoke to escape.
Building a survival shelter is the most important thing you can do if you find yourself stranded in the wilderness. A shelter will make the difference between surviving and not and you will find you can survive extremely harsh conditions if you have protection from the elements. Wandering around looking for help will only slow down rescue personnel. Stay in place, and set up camp and wait for rescue.
Additional Basic Survival Articles |
Essential reading for all outdoor survival |
|
If you liked this article - Please Share It
Basic Survival Skills – Grow Your Own Food 
There are many reasons to grow your own food other than for pure survival and living of the grid. Cost is the main reason people will farm a portion of their gardens to produce fresh fruit and vegetable for free.
Just about anyone can have a crop of vegetable regardless of whether you live in an urban area or out in the countryside – you can grow something.
If you are an urban dweller you can use containers on the balcony or window cill or even inside in a spare room – it’s all possible and will give you a new survival skill as well as save you money
Whether it’s growing tomatoes out on the porch or cucumbers on the windowsill, potatoes at the end of the balcony or some runner beans climbing up the south wall, we are finding the amount of people producing their own, home grown food is dramatically increasing.
Growing your own food, as ‘survival food’, gardening or just a hobby, is most definitely a prepping skill you need to learn.
In real life, growing your own food will be beneficial to your family, and help you survive the current economic situation we are all in, as well as giving you added survival knowledge and the ability to increase your chances of long term survival when the SHTF.
How To Grow Your Own Food
- Climate. In some countries there is only a short growing season, typically Northern Europe and Africa. This means adapting to your environment and growing the quicker producing vegetable varieties. Ones that can be easily harvested and then stored for the winter. In many other areas there are true growing seasons allowing plenty of time for planting and harvesting
- Soil. You may not be blessed with good, nutrient rich soil – the type that will give you excellent yields of crops – So, depending on your particular soil it may be necessary to just plant essential crops and do without the more luxurious foods until you have fertilised and worked the areas.
- Rainfall. Plants will simply not grow and thrive with low levels of rainfall – most food crops will need substantial amounts of water. You must certainly consider the amounts of normal rainfall in your area. From there you can decide if you will be needing added irrigation from your stored water.
- Crop Area. The amount of crops you can grow in your home or garden will always be limited to the planting area available to you. In a bug out situation you may well have a lot more room for your crops.
Different types of food crops. – it is unlikely you will be able to grow all of these, and a lot of the time it won’t be possible due to soil conditions, climate and time. However, You can pick what suits your circumstances the best and work from there.
- Vegetables. This will includes leafy vegetables, root vegetables, legumes, corn and vining vegetables like cucumbers, melons, squash, and pumpkins.
These vegetables will give you many of the essential nutrients and vitamins you need to survive, and include:
- Proteins. Legumes are an extremely good and a high source of your protein.
- Carbohydrates. Potatoes and beets contain complex carbohydrates, a good source of energy as well as minerals.
- Vitamins and minerals. Most of the leafy vegetables, like lettuce or cabbage, as well as the vining vegetables like cucumbers and squash, provide an excellent means of obtaining the essential vitamins and minerals your body will require for added assimilation of the proteins, plus general good health
- Fruits. Easily eaten and requiring little preparation or cooking, fruit is an excellent source of vitamin C. It is also a great survival food as it can be canned or dehydrated for future use.
- Grains. Of all the foods you can grow yourself, grains are probably the most important - however, grains are the staple food of most of the worlds diet. Very rich in energy giving carbohydrates and fibre they can be mixed with most other foods to give a substantial meal. Grains have the added advantage of the fact that they can be easily stored for long amounts of time, making them an ideal prepping food.
This category of food crops includes:
- Corn. Often eaten as a vegetable with meals, corn is also a versatile grain that can be stored whole, unshucked, shelled (removed from the cob, with whole kernels), or ground into meal for use in making breads or mush dishes like grits. Corn is probably the easiest grain to grow for the home subsistence farmer. Freezing is the easiest way to preserve it for winter use.
- Wheat. Most people are familiar with wheat, from which we get most of our flour for baking everything from breads to cakes and pastries. Wheat stores well after harvest, but harvesting itself is more laborious than it is for corn, since the whole plant is usually cut down, sheaved (placed in piles), gathered and threshed (beaten to free the seeds), and ground into fine powder (flour).
- Oats. Another grain, oats for human consumption are processed more than wheat or corn, and the labor involved in harvest is equal to wheat. Still, it may be considered an option in some areas where it is easily grown.
- Rice. For wet areas, areas subject to flooding, or which can be flooded, rice is the obvious choice. Rice is commonly grown in shallowly submerged soil, and is harvested much as wheat is.
- Other grains include barley and rye, which are similar to wheat and oats.
Select the crop varieties that are suitable to your growing region.
- Beans, peas, and other legumes.
These are planted after the threat of frost, and require 75 to 90 days to produce fruit, which can continue producing as long as the plants are cared for until autumn frost.
- Gourds.
This group of plants includes squash, melons, and pumpkins, and is planted after the last expected frost, and takes between 45 days (cucumbers) to 130 days for pumpkins, to produce harvestable fruit.
- Tomatoes.

- Grains.
There is a great difference in growing seasons with grains, as well as summer and winter varieties of many of these. Generally speaking, summer grains, such as corn and summer wheat, are planted near the end of winter when freezing temperatures are not expected to continue for more than a few weeks, and they take about 110 days to mature, then another 30-60 days to dry sufficiently to harvest for storing as seed.
- Orchard fruits.
Apples, pears, plums, and peaches are regarded as orchard fruits in most places, and do not require annual planting. The trees that bear these fruits require pruning and maintenance and usually take 2-3 years before producing their first, modest crop. When the trees begin producing fruit, the yield should increase yearly, and after they become mature and established, a single tree can produce bushels of fruit each year.
Develop a “farm plan” on the land you intend to use for your food production.
- List all of the possible crops you will attempt to cultivate on your land. You should try to have as diverse a selection
 as possible to meet nutrition requirements mentioned earlier. You may be able to estimate a total yield per crop item by researching the growing success of others in your area, or by using information from the source you purchase your seed from. Using the list, and the planting plan you began earlier, you will need to calculate the amount of seed you will need. If you have lots of room, plant an excess to allow for poor performance until you have a firm grasp of what you are doing.
- Plan to use your land as effectively as possible if you are limited in space. Except in very cold regions, you may expect to be able to grow and harvest summer, fall, winter, and spring crops. This will allow you to enjoy some fresh produce year around. Beets, carrots, cauliflower, snow peas, cabbage, onions, turnips, collards, mustard greens, and many other vegetables actually prefer growing in cold weather if the ground does not freeze. Winter crops are also much less subject to insect problems. If you are very tight on space, consider your alternatives
Plan on your storage method

- Drying (or dehydration). This is a useful method for storing fruits and some vegetables. It can be done without high-tech gadgets in most fairly dry, warm climates.
- Canning This requires containers (which are reusable with the exception of lids, which may deteriorate over time) but does require proper preparation, cooking equipment, and skill. Pickling is considered in this article as a “canning” process, although it does not have to be so.
- Freezing. This, again, requires some cooking preparation, as well as a freezer and proper containers.
- Bedding. Not previously mentioned, this is a method for storing root crops such as potatoes, rutabagas, beets, and other root crops. It is accomplished by layering the product in a dry, cool, location in a straw bed.
- In Ground Storage: Many root crops and cole crops can be overwintered in the garden. In most cases it is important to prevent the ground from freezing. Milder winter climates may only need a frost blanket. But colder climates may need mulch of up to a foot and a plastic covering. This type of storage is an effective way to save space and keep your produce fresh.
Break the ground
 For cultivated land, this is simply the process of loosening the soil, and “turning under”, or covering, the plants or plant residue from a previous crop. It may also be referred to as “tilling”, and is done with a plow or tiller pulled by a draft animal or tractor, or on a small scale, with a self-propelled machine called a “rototiller”.
On a small plot of land and due to financial constraints, you may have to revert to the use of pick, shovel and hoe. This can be accomplished collectively. You should clear away any large stones, roots and limbs, heavy accumulation of vegetation, and other debris before tilling.
Lay off rows
With modern farm equipment, this process depends on the type of crop being planted, and “no till” planting actually skips this and the previous step. Here, we are considering the general method that would be used by someone who does not have this type of equipment and expertise. Mark out the area you intend to plant, and with a hoe or plow, create a slightly raised bed in the loose soil in a line across the length of the plot. Next, make your furrow (a shallow groove cut in the soil) with your chosen implement.
Place your seeds in the furrow at the depth required for the particular crop you are planting
This may vary according to your choice of plants. As a rule, succulent plants like legumes (beans and peas)and melons, squash, cucumbers are planted between 3/4 and 1 inch (2 – 2.5 cm) deep, where corn and potatoes may be planted 2 1/2 to 3 1/2 inches (6.3 – 9 cm) deep. After placing the seed in the furrow, cover them and tamp (gently pack down) the soil lightly so the seed bed (the covered furrow) does not dry out as quickly. Continue this process until you have the number of rows you planned on planting.
Alternatively, you can “start” seeds indoors (such as in a greenhouse) and transplant them later.
Cultivate your crops when the ground becomes packed by rainfall, or weeds become a problem
Because you are planting this crop in rows, you will be able to walk the center area between rows (the middles) to accomplish this, if you are doing this by hand. You will want to keep the soil around the roots loosened without damaging the roots themselves. You may apply mulch to reduce, if not eliminate “weed”/unwanted growth by undesirable plants.
Watch for insects and animals which may damage your plants
If you see leaves which have been eaten, you will have to determine what is causing the damage. Many animals find tender young plants in a garden more appetizing than native growth, so you will have to protect the plants from these, but insects are a much more prevalent problem with growing food. You may find you are able to keep insect damage to a minimum by simply removing and killing them as you find them, but for serious problems, you may have to resort to chemical or biological control ( use of surrounding bug repellent plants ).
Harvest
You will have to educate yourself to some degree on when to harvest your crop. Many common garden vegetables are harvested as they become ripe, and continue to produce throughout the growing season with proper care. Grains, on the other hand, are most often harvested when they are fully ripened and dry on the plant. Harvesting is a labor intensive operation, and as you become experienced in growing, you will find that you need to reduce the production of some plants so that harvesting can be managed.
Preserve
For common vegetables, you have several choices for storing them through the non-growing season. Carrots, turnips and other root vegetables can be stored well into the winter months in the refrigerator or a root cellar. Drying produce is one option for long term preservation of meats, fruits, and vegetables, and for seed type crops like legumes, this will give excellent results. For succulents and fruits, you may want to consider canning or freezing your harvest. A vacuum sealer will give better results in freezing vegetables for long-term use.
Associated articles:
Equipment for preserving and storing food
Article provided by: wikiHow and edited to suit.
Basic Survival Skills – Signalling and Communication 

In a disaster situation where you actually WANT to be rescued, your signalling and communication skills need to be much higher up on your list of survival priorities.
In fact these skills rank around number 4, even before food, as a means of being rescued needs to be set up very quickly.
However, for preparing for actual survival of a doomsday scenario, they rank much lower down the list of basic survival skills that you need to learn.
When the SHFT one of the main survival elements is to lay low and ride out the aftereffects un-noticed.
Going unnoticed is one of the key prepping objectives in the early stages of a major disaster, especially if the situation has required you to effect a permanent bug out, away from the looting and unrest and potentially highly dangerous people who need food and water at all costs.
For a prepper your signalling and communication skills will generally be restricted to your family and close prepper network friends.
Pre arranged signalling between family is needed to ensure your safety and communication between other preppers is a means of knowing the bigger picture and exchanging notes on the state of the disaster you are all in.
As usual, these must be prepared way in advance – practiced and understood between all parties, and any equipment needed must be stored away in the bug out bags.
Basic methods of signalling.
- Hand signals
- Whistle
- Flags
Signalling over a distance
- Mirror
- Fire
- Flares
- Glow Sticks
You can also break down signalling methods into manageable pieces, for example, Some signalling requires you physically do something, like make a hand gesture – this is generally known as ACTIVE SIGNALLING.
While other methods like forming an SOS sign on a beach or with rocks is considered to be STATIC SIGNALLING.
Remember, we are dealing with a preppers method to signalling here – requiring a more covert approach over the usual ‘look everyone, I’m over her’, ‘come and get me scenario.
Hand signals are by far the most effective methods of signalling as they are noiseless and relatively simple. There downside is both parties have to be within eyesight of each other and know what each signal means.
But you really only need to know a few hand signals to get by. They can be the same as the textbooks or even make your own up - but get something done so you can communicate silently with your family if you are in danger.
A Whistle is a good item to carry in any outdoor situation as it is very light and compact, has next to no moving parts
that can go wrong. The loud shrill is also more than enough to get attention if needed.

You can also control the volume of a whistle quite easily with a little practice making this a good way of communicating.
One of the good things about a whistle is they are cheap to buy – the one shown here is less than £5 all in. It also give out 100 decibels volume. More info here: Mountain Whistle
Flags are another excellent preppers signalling method. They don’t need to be a huge flag either – just a small bit of  cloth will do – At their basic level, red would equal danger.
You can also use material of different shapes to indicate different messages. eg: a square white could mean ‘left’ and a triangle white equal ‘right’ .
They can be used to guide you back to camp – or for complete signalling theres always the internationally recognised signalling method of Semaphore.
More info here: Historical Signals and Semaphores
Mirror signalling is good for short and long distance communication and require relatively little sunlight to produce good results. Again the beauty to us preppers, of a mirror for signalling, is size and weight. Easily fitting in you bug out equipment or even in your pocket.

At worse any old reflective surface will do (the end of a can, some broken glass) the inside of your Survival Tin is also a very
good makeshift signalling mirror.
You can also get highly polished reflective survival signalling mirrors that incorporate all the modern features you would ever need for this type of signalling.
Specific signalling mirrors come with a targeting device in the center making them perfect for pinpoint signal accuracy. They are also very tough and some even float.!

For a good quality signalling mirror (like the one shown here on the left) you can expect to pay up to £20 – but this is top of the range stuff.
More info here: Emergency Signalling Mirror
Again you do not need to know the whole signalling codes, but a few will definitely help you to communicate better.
Fires and Flares and Glow Sticks are a lot less covert than the other methods mentioned here so far, but need to be included for pure positioning and location reasons.
A fire can be a bad idea if you are trying to stay concealed and requires a lot of skill to hide the smoke it gives off. Smoke can be seen for miles and will lead anyone straight to your camp along with the use of glow sticks, these should be avoided if you want to stay unnoticed.
Flares only really serve one purpose – to indicate a position of an emergency or pick up point – in a rescue situation they are ok, but not really for preppers.
If you liked this article - Please Share It