How To Choose The Best Hunting Catapults For Survival
One of the oldest weapons used for hunting has got to be the catapult and a very good bit of survival kit to have in your bug out bag. But what are the best, value for money, hunting catapults for survival that you, as a prepper, should consider buying.?
Hunting Catapults can be made from very basic materials and with practice can be very effective - Today's Hunting Catapults are considered a much more lethal and accurate weapon than ever before. Made from high-tec materials and design giving you a serious weapon.
In a survival situation they would become an essential food hunting tool.
Firstly, let's look at the pros and cons of adding a hunting catapult to your survival kit - Along with your survival knife and a multi tool knife, a hunting catapult is quite low-tec in it's principle design and operation, relying more on your own skill than the actual catapult itself.

See full range of catapults here:
Hunting Catapults
Essentials to consider when choosing the Best Hunting Catapults For Survival
Pros of Hunting Catapults:
- Accurate and deadly
- Very quiet operation
- Easy to load and reload
- Fast reload [with practice]
- Simple operation
- Compact
- Light weight
- Main working parts are easily changes or repaired
- Low initial cost
- Unlimited supply of ammunition if needed [ eg – stones]
A starter level catapult, like this FNK Hunting Catapult Set (shown below) need not not be expensive too.
This kit sells for only £14.99 and just right for beginners.

Cons of a Hunting Catapults:
- Practice required to build up accuracy
- Ammunition can be bulky and weighty [ 200x 8mm ball bearings would weigh about 1.5lb ]
- A supply of replacement catapult bands is required
Highly Polished 6mm Steel Shot is also readily available.
This tin of 250 sells for £5.15

Essentially the hunting catapult has only three components, making it ideal as a low maintenance and easily repairable bit of kit.
The frame, firing bands and pouch - it is also very easy to make your own for forage materials: wooden frame from a tree branch, leather pouch from an old shoe and firing bands for strips of an old cycle inner tube tyre.

Choosing The Best Hunting Catapult
Anybody who has used a catapult before will tell you how invaluable it can be in survival situations.
Like any good hunting weapons, not every catapult is made equal. There are a few different features that you should think about which will enable you to choose the right hunting catapult for you
1. Frame Material
There are three main frame materials, namely: plastic, wood and metal. Having different materials to choose from will offer you equally different advantages and disadvantages.
If you know the differences around what each one can offer, there's a much better chance you choosing the best hunting catapult for you.

– Most economical to manufacture and this reflects in the cost.
– Various plastic sub-types available. Offering different advantages in grip and feel as well.
– Glass-filled nylon also offers excellent frame material if you’re looking for a lighter catapult.

– Wooden catapults are the oldest types there is.
– Generally mimicking the 'Y' of a tree branch, but can be formed into many different shapes through laser cutting or hand shaping
-- They tend to offer a good 'feel', and you can make them yourself relatively easily.

– These catapults can offer a light and strong body.
– However, they are generally the most expensive of the three.
-- They are the most robust and longest-lasting frame material you can get.
– Choosing steel or aluminium frame catapults that have an ergonomic handle with added foam, rubber or cord wrapping also offers comfort to the mix.
2. FIRING BAND TYPES:

There are essentially two main band types in use within the market today- the flat rubber type and the tubular band type.
Each band type has a more specific use and will depend on what you intend to use the catapult for.
The rubber tubing type is better known for being durable, as opposed to a catapult with the flat rubber bands generally provide a a more accurate shot and are better in hunting scenarios.


- Flat Bands
– Catapults fitted with the flat bands tend to have a more faster shot and are more accurate, this is due to their rapid “snapback speed” feature ( *The rate at which your projectile moves forward ).
– Flat bands produce a higher 'feet per second' projectile speed with the added advantage of being easier to draw. If you’re firing for accuracy such as hunting, then flat bands are the best choice.
- Rubber Tubing
– Rubber tube band will outlast flat bans. It’s the best set to choose when surviving for longer periods of time.
– Rubber tube bands can offer you a specific draw weight. Choose the type that feels right for your draw strength and the best shooting action/feel.
* The best things is: Firing bands are relatively cheap and easy to get a hold of. Therefore you should test each one out and see which suit you the best.
See a selection of firing bands here;
3: AMMUNITION POUCH:

This may seam like a unnecessary consideration, but the ammo pouch can play it's part in a good catapult. Especially for it's comfort and grip.
Always get a catapult with the pouch made from leather, it will naturally mould to the type and size of the ammo that you use.
Being leather, it's natural properties allow it to remain supple at all times, giving you a feel for the ammo at all times.

4: Other Considerations:
There are many different types o catapults to choose from. Many them come with added features to entice to buyer.
Some of these features can actually add benefits to the product which make it a good purchase.
a) Grip Type:
It is essential that your catapult feels comfortable and has a good grip.
Hunting catapults that provides a good grip do a lot more than just stopping blisters. - It will allow you to practice for longer without hand or wrist fatigue, and give you more shots with better accuracy.
Ergonomic or contoured slingshot handles will fit perfectly in your hand, like this High Velocity Handmade Wooden Catapult shown below:

b) Target Sighting
Having a sight and a point of reference will greatly improves your accuracy of shot.
It's a great addition to a hunting catapult as it will give you a feel for distance and shooting accuracy.
Sights are key to hunting accuracy and will give you a accuracy advantage especially with smaller game.
A lot of the top catapults will be fitted with an adjustable sighting systems attached, like this hunting catapult shown below:

c) Hollow Handle
A catapult with a hollow handle is worth considering, they are lighter but, being hollow, a lot less stronger.
However, they offer a space to store spare ammo and other survival gear like spare bands, a fire starter, matches, compass and son on.are great for storing additional ammunition or spare bands. These usually come with a screw-on cap at the base of the handle for access.
So a hunting catapult can be as low-tec as you want. Of course there are others, much more specific, high-tec catapults available like this calibrated hunting catapult shown here: ( *sells for £35.00)


Wrist Support:
Choosing a hunting catapult with a wrist support can help reduce fatigue and muscle stress, especially when practising and taking lots of shots.
But the main purpose of a wrist support is stability. It will aid you to keep the wrist locked in place in order to line a shot more accurately.
Personally, I don't use them, but if you have weaker wrists or for use with a child they are very good.


Overall the pros far outweighs the cons making Hunting Catapults a very good survival weapon for preppers.
Remember you will also need a good supply of ammo [ball bearings seem to work best] and also some replacement bands - [the elastic rubber with replacement pouch.]
That said, there are some excellent hunting catapults around today that work really well and all hover around the same price bracket of between £25 - £100 - Replacement bands will cost anything upto £5 to renew and ball bearing ammo [8mm] is around £5 for 200.
ENTRY LEVEL
Kotila UK Powerful New Slingshot Catapult Steel Handle Sling Shot Outdoor Game Hunting (Camouflage)

£7.99
outdoor hunting
Outdoor Hunting Trumark Catapult heavy duty +2PCS Rubber Bands Replacement Animals Heavy Pull+50PCS 7mm Ball Ammo

£14.99
CATAPULT KITS
Powerful Catapult Set, with Ball Bearing / Flat Rubber Bands / Storage Bag / Magnetic Ring

£28.99
- Folding slingshot slingshot set: hunting catapult slingshot made of steel,
- Ball bag: makes loading the slingshot professional for hunting very easy and great fun.
- Magnetic Ring of the Twins Slingshot:
- 100 pcs. Steel round balls 8 mm stainless steel

A catapult is a uniquely stealth hunting tool, and with relatively little practice will offer a very effective method of hunting for small game.
There are cheap yet robust tools with the advantage of few moving parts and ammo that can be found on the ground!
I think all preppers should own at least one.....
Steve Hart - UK Preppers Guide

Eating Insects For Survival
Crickets, Grasshoppers, Maggots & Earthworms
Eating Insects For Survival
Crickets, Grasshoppers, Maggots & Earthworms

Catch em, Dry em, Roast em and Eat em
One thing I will say straight away about how to eat insects is: Whenever possible, roast them first. Yes you can eat pick them up and eat them from the ground, but you never know what nasties have taken up residence on them.
So from a pure 'keeping yourself safe' point of view, do as much as you can to prepare them first.

Crickets and Grasshoppers Are Great Insects To Eat.
* And there easy to catch!
Take a glass jar, like a Mason Jar and lay it on the ground with a little bait.
Use a slice of apple, some old oats, small bits of bread, an old carrot, lettuce, a bit of stale beer.
Anything that you feel is 'on the turn' and cannot be eaten by yourself.
If you can eat it, then do so.!
But when it gets a bit rancid is the time to use it as bait.
Grasshoppers and crickets inhabit pretty much the same types of terrain as each other, are equally as easy to catch and the preparation and cooking are the same as well

Your average cricket or grasshopper is incredibly easy to catch. In fact they actually come to you.!
One of the few food sources that require very little stalking and precious little skills on your part.
Simply cut a plastic bottle 1/4 the way down from the top and invert the cut piece into the bottle.
Sprinkle a layer of sugar into the bottle as bait and leave over night - when you return you should find a nice collection of crickets or grasshopper ready for you.


picture courtesy of WikiHow
They are best left to dry out a bit before roasting or pan frying and can even be fully dried out for extended storage times before cooking.
Some people will spend time removing the legs before cooking as the legs tend to be a bit irritating and will get stuck between your teeth. A downfall of eating insects I suppose....
HOW TO EAT EARTHWORMS
The humble earthworm is a good source of food in a survival situation and highly nutritious.
You can gather a good plate of fresh worms very easily, especially when it is raining, as the worms will come up to the surface to escape from drowning.
You can even entice them out by digging a hole and pouring water all around the area and into the hole - they will soon appear.

Remember - earthworms live underground in the soil and don't mind eating dirt, which make them very crunchy to taste if eaten raw. [but you know my opinion on that - always try to cook them first]
So, in order to reduce the dirt and crunchiness, try to purge them first by giving them all a good soaking in water for a day and then, holding one end of the worm, simply squeeze along the body and remove the dirt out of their body.
They have a distinct bitter taste - not overly bitter and certainly palatable, but bitter nevertheless.

A combination of purging, drying and frying them until crispy makes a very nice snack food or you can add them to other dishes or stews for more nutrition and bulk.
Now you can eat earthworms raw - just pick one up and give it a clean, but they just taste very unpleasant, with a slimy, squishy texture that is very unpalatable.!
So why would you do that when, with a little care and preparation, you can simply pan fry and have a delicious, crunchy snack.

HOW TO EAT MAGGOTS
Maggots are one of the super foods available to us. But they are also, possibly one of the most revolting things to eat as well.
In some cultures, people leave out meat to go rotten and breed and harvest their our supply of fresh maggots.
These maggots are eaten raw..!
Maggots, in their own little way are capable of transforming the lean meat they feast on, into fat - in fact the maggot is very high in fat and essential amino acids which makes them, to some degree, even more valuable then lean meat.
However, always remember that the maggot is a result of a fly laying eggs on the meat in the first place - that egg grows into the maggot and feeds from the meat or whatever food source it has been laid on.
That food source will have profound change on the actual flavour of the maggot itself.
In a full on survival situation a maggot represents food, and cooking, especially frying gives them a nutty, crispy taste and well as killing off any bacteria at the same time.

With the maggot being high in fat it will taste better than most insects and is easily palatable. So don't be put off by the fact that it has been living off dead meat.!
Fancy trying some edible insects, then take a look at my taste test video of some edible insects.
Don't be too grossed out by the idea of eating these types of bugs - eat them safely.
* DISCLAIMER:
I am not a doctor or nutritionist or insect specialist, or in any other way qualified on how to eat insects. I have gained my knowledge though experience and research.
So, if you have concerns, I suggest doing your own research on the eating insects before you go ahead and try some.
How To Filter Dirty Water
Lifesaver Liberty Portable Water Filter Bottle

Water procurement, or more precisely, clean, safe to drink, water procurement must be ranked as the number one priority for survival. Especially after a disaster or SHTF event.
It has been proven that without this basic water filtering of contaminated water you run the risk of dangerous illness within hours. It therefore makes sense that you must know how to filter dirty water and make it safe for drinking.
This is my video review and test of the latest Lifesaver Liberty portable water filter. A compact and lightweight water filter system that will give you clean, safe drinking water from potentially contaminated water sources. (*excluding salt water sources*)
feature of the lifesaver liberty filter.

The Liberty is packed full of features, firstly it's a fully portable filter with a capacity to filter some 2000 litres of contaminated water.
It uses a replaceable filter cartridge within a 400ml filter bottle. Additionally it can be used to provide instant clean water, it can be filled using the scavenger pump to give a supply on the go, or the scavenger pump can fill a bottle for larger amounts to store.
What contaminants will it remove?

The Lifesaver Liberty is capable of removing 99.999% of viruses, 99.9999% of bacteria and 99.99% of cysts. It also has a replaceable activated carbon filter (as a pre-filter) Which will remove chlorine, taste and colour.
This filter has been independently tested and was found to exceed the standards laid down for safe drinking water, it meets NSF/ANSI P231 and WHO2011which is the ‘highly protective tier’ of drinking water standards.
The filter can be replaced and the old one will stop working via a FlowSafe Valve Control which stops the flow of water when the filter membrane is full and become blocked.
During my test I found the flow rate to be about 1.0 litres per minute which is perfectly acceptable to me.
Along with the FailSafe System, activated carbon filter and main filter is an addition of the Lifesaver’s SteriTouch antimicrobial treatment.
This involves a treatment to the surfaces of a ionic silver, which is and inhibitor of bacteria and mould growth. Again independent testing has shown it to provide a 99.99% reduction in both MRSA and E.Coli growth.
Below is my full video test & review:
I hope this article on How To Filter Dirty Water useful and informative, the Lifesaver Liberty Portable Water Filter Bottle is a superb piece of preppers and survival kit. Great ergonomic design, light and compact enough to fit into my day sack, easily.
It works really well and is a 'no fuss' water filter priced at around the £90 mark complete. The replacement filters are around £40.
This means you get clean, safe drinking water for a mere 4.5 pence per litre and once you've got the bottle the replacement filter is even better at 2 pence per litre...!
So it's a real cost effective bit of kit.
Steve Hart - UK Preppers Guide
How To Make Simple DIY Fire starters

Features of these very simple DIY homemade fire starters:
Why do we need fire starters anyway?

When your out backpacking or camping or when wild camping, a fire is essential for many survival tasks.
Being able to light that fire both quickly and efficiently is essential especially if your fuel (wood) is damp or wet.
A fire starter will give you the edge over the elements and make things a lot easier and simpler, allowing you to focus on the jobs in hand.
Spending unnecessary time and effort to get a simple fire going is poor prepping management, but having firestarters, whether homemade or shop bought will ease that pressure right from the off.
In this article: I cover how you make your own 'custom' fire starters using very basic materials. These materials you already have in your home and within no time you will produce dozens of functional fire starters to store and use when out in the wild camping.
How To Make Simple DIY Fire Starters - Materials & Equipment
You only need two components and a melting can:
Firstly, get yourself some wax, I use Clear Wax Blocks that I bought for Ebay.
But you could also use any old wax.
You can even use wax crayons, that way you'll have pretty snazzy fire starters at the end.

Clear Wax Blocks
Secondly, you can use an old mop from the cupboard or go out and buy yourself a nice new one.

Old Mop Head
I used an old, used mop and it works fine.
Cut off strips to the size you want - I cut mine at 2" long, just the right size to fit in my fire starting container,

Fire Starter Storage
To see the full, start to finish process, take a look at the video below:
One thing I must mention:
I used a tin can directly on my ceramic hob to melt the wax. Although it worked well, I've been told there is a chance of the wax overheating and possibly catching fire!
I now melt the wax by putting the tin can in a bowl of boiler hot water instead.
It's a lot slower, but in hindsight probably the better way, especially if you don't pay attention or get distracted!
I hope this article on how to make simple DIY fire starters was helpful:
These DIY Fire Starters were easy to make and worked very well.
I now have yet another means to successfully light a fire when out in the woods or backpacking.
Steve Hart - UK Preppers Guide
how to make a dakota fire pit

Clear an area of any grass or debris.
Find yourself a suitable area and clear all debris, plants and grass.
Select your ground.
The area where you choose to dig your pit should be free of stones or big tree roots.
Use a stick, small shovel or entrenching tool.
Dig a hole 300-400mm deep and diameter where you want the fire hole to be positioned.
Dig the air intake hole.
300-400mm DOWN WIND dig the air hole, same depth as the fire hole.
Leave a bridge of earth between each hole.
Do not disturb the earth between the holes this will act as the roof of the air tunnel.
Carefully dig through between the two holes.
Form the air tunnel by boring out and digging between to fire pit and air intake holes.
An essential Bushcraft Skill all Preppers should learn and practice
There are many Bushcraft and Survival Skills that are essential to learn, without doubt, the Dakota Fire Pit is one of them.
It can be a lot of work, initially, but the benefits if this type of fire are different to a conventional camp fire.
The Dakota Fire Pit is a fire making method originally started by the Dakota Indians and is a very good method of building an 'underground' cooking fire.
It is relatively straightforward process to construct and is very efficient method when it comes to conserving and burning fuel. The fire will actually burn hotter with a reduced demand on fuel (wood) than a conventional fire method.
In a survival/SHTF situation can be very stealthy and even mean the difference between life and death.
The basis of this fire pit is to dig two holes, a fire chamber and an air intake tunnel, which will allow oxygen to reach the base of the fire directly.
This is an extremely efficient fire making method.
Advantages of the dakota fire pit

- Because the air feed goes direct to the base of the fire it will burn very hot.
- For the same output as a conventional fire, you use less firewood.
- Far easier to manage if it is very windy compared to conventional fire.
- Food cooks faster and water will boil faster.
- You can use natural pot stand across the hole: green sticks.
- With the base of the fire being air fed, the efficiency of the burn will create less smoke.
- As the fire is below ground level, flames are shielded from being seen, especially at night.
- This is very covert, no fire scar as you fill the hole in and cover over, leaving no trace.
In the video below I go out for a wild camping with some fellow bushcrafters for a very wild and windy two nights. The perfect conditions for an underground fire.
So as you can see in my video the Dakota Fire Pit worked well just like it should.
The windy conditions were a challenge, but the fire coped with it.
So the next time you are out in the wilds , why not give it a go.
Steve Hart - UK Preppers Guide
The 10th Bushcraft Magazine May Day Holiday Meet

A Bushcraft Show Not To Missed....
On the weekend of the first May Bank Holiday, this year falling on 3rd May - 6th May 2019, the Bushcraft Magazine is holding its tenth annual gathering in Egerton, near Ashford in Kent.
The May Meet is a great opportunity to book in for a long weekend of courses and a chance for bushcrafters and adventurous families to share skills and swap stories in a friendly, chilled atmosphere.
You can camp overnight from Friday for a full programme of activities over the weekend and Bank Holiday Monday; events, tutorials and demonstrations for all the family and for all levels of skill.

Cast your own design necklace

Pitch a tent or a tarp and hammock in the woods.
The May Meet is a totally family-friendly occasion with activities for everyone, including younger children.
We have a team of experienced and friendly instructors who are ever willing to freely share their knowledge and it is all included in the cost of the weekend (with the exception of a few optional extras).
There is also quality kit on sale if you are looking for equipment from ferro-rod, custom knives and fire steels to outdoor clothing. There is plenty to keep you busy during the day and after supper there is music, drumming , storytelling and, weather permitting, star-gazing.
In addition there will be stands selling both introductory and essential kit
for novice and advanced bushcrafter alike.


Visit their website

Follow & join the community.

Latest information & Tweets

See our videos

This is first big bushcraft show of the year folks and a definite must go for all preppers and bushcraft enthusiasts alike.
There are many survival and bushcraft events happening throughout the days, making this event the place to be where you can learn genuine skills.
This is not just one of those Mickey Mouse 'survival shows' wrapped up in a bushcraft label, designed to fleece you of all your money.
This is the real deal - real bushcraft, by real genuine instructors who have a passion for their skill and are always willing to pass on their knowledge.
If you miss this, you miss one of the very best events of 2019
I hope I see you all there.
Steve
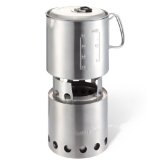
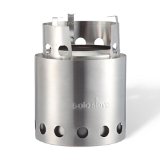
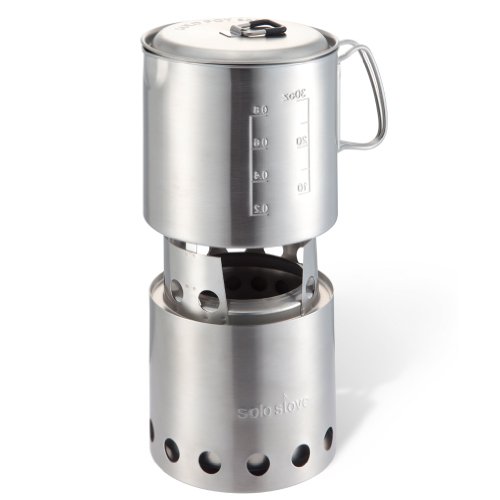
Solo Stove Lite Wood Burning Stove For Camping Or Bushcraft
There are so many cooking systems to choose from these days, and the choice of fuel source is slowly increasing, but do you really need to have a stove that needs you to carry additional fuel..?
In this review I shall be testing out the Solo Stove Lite with the additional 900ml cook pot. These wood burning stoves are a complete cook system that can use wood and many fuel sources and are ideal for camping or bushcraft.


Pressurised gas canisters, gels and various liquids are very common and most work well. So we have a good choice to suit our needs and situation.
In prepping we try to eliminate as many of the 'what ifs' as possible, so having to carry a stock of fuel, that will potentially run out, can present us with a problem.
For those of you who have been out in the wilds for more than a week, it becomes obvious that carrying fuel is a real problem - just how much do you need?
Along with the quantity of fuel you need to carry, there's the issue of added weight in you rucksack - as always 'less is more' so eliminating the need to carry ANY fuel has got to be a big plus, in any situation.

The answer to this fuel problem is pretty straightforward and the easy solution is using the fuel source that's all around you, i.e: use natural materials, wood, cones, furns etc.
All these natural fuels will create heat to boil your water and enough heat to cook your food.
Of course, as always there are plenty of wood burning stoves to choose from, and if you go right back they were very simple tin boxes with a hole to feed in some twigs.
But wood burning stoves design has moved on:
In this article I want to run through the new designs that make the new cooking stoves so much more efficient and better than before.
The stove I am using here is the Solo Stove Lite: Ultra Light Weight Backpacking Stove

Here’s the principle behind the super efficient, smokeless Solo Stove:
As the hot air rises, it pulls air through the venting holes in the bottom the the stove.
This is helped by the absence of oxygen that has been created by the actual combustion process.
This introduction of new air not only fuels the fire at the base, but provides an extra boost of 'pre-heated' air through vent holes at the top of the burn chamber.
This type of stove design also has a double wall and makes the Solo Stove Lite a natural convection, inverted, down-gas, gasifier stove....!
To be honest, I don't know quite what all that means, but I do know it certainly works..
The extra burst of preheated oxygen that feeds back into the actual firebox area through the small holes at the top part of the stove cause a secondary combustion.
This secondary combustion phase now allows the fire to burn more fully and is the reason why there is very little smoke during full burn phase.
Whether your out practicing bushcraft skills, wild camping or practising some stealth camping for bug out, the very last thing you want is to be giving away exactly where you are.
Having a camp fire and not being able to control the smoke plume means you will be sending up smoke signals to everyone around for miles away.!
Look at me - I'm over here...!!!

The advantage to this secondary smokeless burn means a far more efficient burn cycle, which in turn means you'll be using a lot less wood compared to an open camp fire.
In effect these type of wood burning stoves don't just burn wood you feed into it - It actually cooks the smoke out of the wood and then burns the smoke not once, but twice.!

Referring to the diagram, you can also see the the cooking ring on the top - the angled lip also increases the stoves overall efficiency as it directs the heat towards your cooking pot, again this results in minimal heat loss.
Having the raised cooking ring also has the advantage of providing a windshield, but still allows oxygen to flow inward.
This system is one of the most efficient types of wood burning stoves you'll ever own.
Previously I have tested out the older styled camp cook stove, so I thought it about time I reviewed a newer, more fuel efficient cook system.
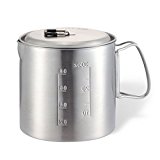
This particular Solo Stove I tested also comes with a 900 ml, stainless steel stove pot:
prices & details here:
Solo Stove Lite & Solo Pot 900 Combo:
This setup is very good as the stove will fit very nicely inside the pot, making the whole lot nice and compact.
Plus that combo only weighs 17oz.....[ 0.48kg ]
Video Review:
Solo Stove Lite & Solo Pot 900ml for camping or bushcraft
Solo Stove lite Prices & Availability:
Citizen Survivor's Handbook
"a preppers guide with a difference"

"Post Apocalyptic Humour At Its Best"
The Citizen Survivor's Handbook' is primarily a work of fiction. However, the book is quite influenced by the propaganda that was published in Britain during the 1940s.
During this time and more specifically after the British evacuation of Dunkirk, there was a very real, plausible and imminent threat of Nazi invasion as part of their Operation Sea Lion.
The British citizens would always be on the alert for the ominous drone of the air-raid sirens as they went about their daily chores and work.
The fact that not only could your home be destroyed in a Blitzkrieg, a terrifying mass attack of aerial bombardment, at any moment, but it was in equally plausible that the Wehrmacht could goose-step through the roads of your very own town.

You have enemies? Good.
That means you've stood up for something, sometime in your life.
Winston Churchill
That terrible situation is incredibly hard to try and understand and relate to. But for those of us born in the 50s and 60s we can remember the streets of London littered with bomb sites and wreckage.
'The Citizen Survivor's Handbook' is a tongue-in-cheek survival guide.
I would describe the book as:
"Post Apocalyptic Humour At Its Best".
It's all wrapped up in the paranoia, suspicion, courage and resolve of those who experienced the Second World War, a tribute to an age few of us alive today know first-hand.
It reminds us that though time is a healer, those thoughts and messages we now have the liberty to find amusing, were once a very real and serious message for a country who believed their world could turn upside down at any moment.
Over 260 pages with illustrations and a real survival messages written in a funny and amusing manner that rolls along with the main character, a certain Mr Jack Jones.
Jack is a likeable, crafty cockney type, making his own way out of a sticky situation, only to find that he has to draw on his own survival skills with every unsavoury character he meets.
A definite good read for any prepper or anyone interested in survival.
foreword by cody lundin

Cody Lundin
To add even more kudos to an already good book and from a prepping and survival viewpoint, the book has been read, vetted and endorsed by one of the worlds foremost survival experts, Cody Lundin.
Cody is an internationally recognised professional survival instructor with more than 29 years of hands-on teaching experience.
He has consulted for National Geographic, the Federal Emergency Management Agency, the United States Forest Service, and the British Broadcasting Corporation (BBC), among others.
Published by BLKDOG Publishing, you can buy it here: Citizen Survivor's Handbook
My Thoughts:
There's plenty to keep you amused and entertained in this book.
But it does have an underlying message on survival, with prepping being the message that carries it through.
It teaches you things you must know and do in order to survive.
Steve Hart - UK Preppers Guide
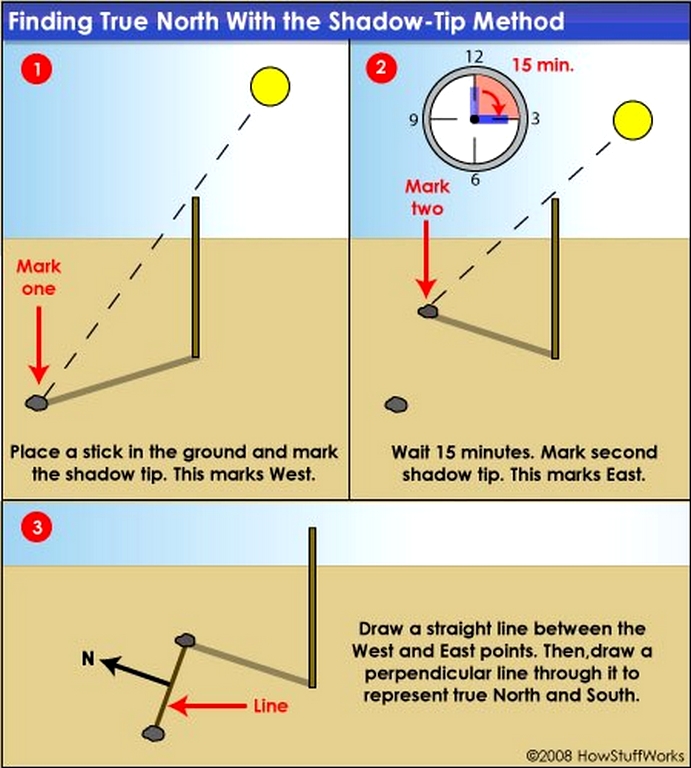
how to use a compass for land navigation

You'd be amazed at the number of bushcrafters and explorers who get lost, even though they have gone prepared with a compass in their pack.! They simply do not, or have not bothered to find out How To Use A Compass For Land Navigation
Most of the time they get lost simply because they think they know where they are going. Maybe they have been there before, but going a few metres off your trail is unknown territory.
People tend to assume that if they do not actually know which way they should go, then a map or compass are of no use to them. This is totally wrong, of course.
You have a map and compass in your pack because every survival manual you’ve ever read say to carry one.
That, in a nutshell, is the problem. There is a big difference between actually having all the right tools with you and knowing just how to use them properly.
The Silva Compass Expedition 4-360, shown here, is probably one of the best survival tools to own and by most accounts the easiest to understand and use.

You must be able to focus on an object and walk toward it to maintain a straight course.

This is why people who do become lost just a few miles from camp or their home and then cannot manage to find their way back.
Lost hikers can literally walk for days and never get anywhere.
Your compass is a very simple tool to use. The needle [normally coated red], will always point towards north, 0 degrees.
Using this basic knowledge, every other angle is the direction you want as a heading.
All you need to do is find that heading with the help of your topographical map.
This video shows the basic way to set and use your Silva Compass Expedition 4-360, for survival navigation.
The needle always points to magnetic north, which is not true north on your map so you have to align the two if you have a destination plotted on the map.
Lay the compass on the map and turn the map until north lines up with north on the compass needle. If you know, your current position on the map then draw a straight line using a protractor from your destination back to your current location.
Line the compass up along the line, mark where the line falls on the degree lines, and make note of the degrees, it may be 270 degrees west for example.
Now all you have to do is raise the compass and maintain a course of 270 degrees this is the visual aid needed.
You now can walk too your destination without having to see it to maintain course.
You may lose sight of it because of terrain and so forth but you can raise the compass and align yourself with the 270 degrees.
*Finding your current location using a topographical map is called triangulation.
In order to plot a course to your final destination using your map, you must first determine your actual position and make it on your map as follows:

Take a good look all around you and try to find at least three distinct landmarks that are in the same general direction you are heading..
Having identified your chosen landmarks on your map, you can then use your compass to determine the actual 'bearing' from the landmark to you by lining up your compass, simply mark the degrees and draw a line from the landmark along the degree line back from the landmark.
Continue to do this with the other two and where the lines intersect is your present location.
Using a protractor can make this a bit easier to plot your course on your map.
Make sure, however, that the needle on the compass is pointed in the direction of travel, as you draw the lines otherwise you will be walking in the complete opposite direction.
Lost Without a Compass or Map
We all know that the suns rises in the east and sets in the west: so a point of reference can always be found at dusk and dawn.
But, if you are simply unable to walk in a straight line you cannot make your way back to civilisation.
Of course, if you can actually manage to walk in a straight line for enough miles you will obviously come upon civilisation.
This is definitely not something you count on though - In theory because of the UK's population density of some 65 million people, walking in a straight line or in a relatively straight line for only 30 miles would probably bring you to somewhere, but that does not necessarily mean civilisation.
With a reasonably sunny day you can use the sun to create a shadow which will give you a Northern bearing and a point of reference to start from.
Another straight line walking method is to ensure the sun is always on one shoulder, and keep it there to maintain course.
You can also pick out and focus on a prominent landmark in the near distance, walk to it, and then do the same again with another landmark.
Use the sun to stay moving east or west. [via the sun on shoulder method]. then, once you know east or west, you know that North is on your left if facing east and of course south is on your right.
Always make a note a the main landmark in the direction of your travel before it gets dark.
That way, when it is daylight again you know your direction of travel even if the sun is obscured because of heavy cloud cover.
If you find a river then walk down stream to find civilisation.
Most original settlements and cities began around major waterways and most of the towns and cities are still there today.
The river or stream will never just run in a straight line, but you can cut across areas where possible and avoid having to follow every twist and turn.
Just make sure as you can keep the river on either your right or left side.

Finally – owning a good compass is an essential part of your survival kit when venturing out and must be part of any bug out bag.
The Silva Compass Expedition 4-360 is definitely one of the best and most tested navigation compass used by hikers and survival experts.
By learning map navigation skills and compass reading you are gaining a survival skill that can literally save your life and get you out of danger and safely home.

Surviving is all about thinking on your feet and adapting to the situation.
Prepping is all about being ready for that situation before it happens.
Don't get caught out - get prepared first.
Steve Hart - UK Preppers Guide
bahco laplander folding saw

full test, demo and video review of the Bahco Laplander
In this review I will be testing the Bahco Folding Saw Laplander - a well designed lightweight folding saw.
It is made in Sweden and, of course, uses a good quality steel with a super sharp edge and from many of the other write-ups I have seen, is considered to be right up there at the top of the class for folding saws.
First impressions of the Bahco Laplander Folding Saw are its weight – at only 6.4oz you barely know you have it in your hands – I like this a lot as I find having to fight with a heavy saw just doubles the effort.

The cut and design of the teeth literally double the cutting stroke each pass, as the teeth will cut using both the pushing and pulling stroke, combined with a very aggressive tooth design it made cutting timber a very easy job, requiring very little effort.

The actual cutting teeth are super sharp and as they face both ways so you have to be very careful when cleaning the blade off.
You cannot simply run your hand down the blade like a normal saw to clear it.
All the teeth are hardened and coated to help reduce friction and prevent corrosion - so another nice touch.
In the closed position the Bahco measures 9 inches and when full open is 16 inches, with the actual cutting blade measuring 8 inches - which I found to be a very nice, comfortable size. [7 tpi]


I quite like the feel of the handle - it's like a rubbery plastic called 'Stanoprene' over a solid plastic frame which give a nice feel and lots of traction- even with wet hands I found it quite hard to slip off.

With such a sharp blade Bahco have added a safety lock to ensure it can't be accidentally opened and keeps the blade tucked away nicely - good idea I think...
- High-quality Sandvik steel blade. Blade Length: 190 mm
- Non-stick clade coating helps blade glide thorough even the most difficult materials
- Bahco XT toothing cuts in both directions
- Blade locks safely in both the open and closed positions
Conclusions:
As you will see in my video review, the Bahco makes cutting timber into nice, usable pieces a very easy job - in fact, I think this saw is a lot faster than most other methods and gives you a cleaner cut.
For more in information, reviews and prices please click here for the Bahco Laplander Folding Saw 396LAP
This saw has got to be up there as one of the best folding saws in its class and performed every task I asked of it with minimum effort, every time.
The Laplander is now a permanent part of my bug out kit and will certainly be coming with me on every camp trip and, to be honest, it is only really restricted by the length of the blade.
Steve Hart - UK Preppers Guide
Do you know the five c's of survival?

Finding yourself caught out in a dangerous situation is going to pose several different survival scenarios, all unique but nothing that can't be overcome with the correct gear in your pack.
Having any one, or a combination of the five C's of survival will give you a greater chance of making a bad situation better and more comfortable until you get out of trouble or help arrives.
Whether it's bushcraft, Survival or Prepping, these basic rules apply.

The more knowledge you have on a subject, the easier it will become.
This applies 100% to surviving.
So although we are covering the five C's of survival, essentially they would rendered useless without any knowledge of bushcraft and prepping in the first place. Learn as much as you can and apply the 5 C's........
the five c's of survival
* Each 'C' also overlaps other survival tasks and priorities.
e.g: poncho or tarp
- First-Aid or Self-Aid – protecting body temperature
- Shelter – gives cover from elements, helps protect body temperature
- Signalling – bright colours attract rescuers
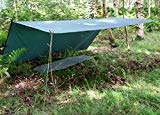
Although there are many companies offering tarps for less money, I have several DD Tarps and I would highly recommend over their competitors.
They are very good quality and offer a great range of sizes and colours.
The 4×4 is enormous with tie point at every corner and across the tarp, making every configuration possible.
They are also light and one thing I especially like about the DD Tarpis that they give you a decently sized stuff sack for each tarp size.
I can’t stand fighting with a tiny little stuff sack to put my gear away!
e.g: knife or axe
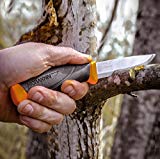
Your knife doesn't have to be an expensive, custom, hand made one either:
Just a simple, straightforward knife like this Mora Outdoor Companion would be enough to do most tasks.
There the right size to tackle most jobs and tough as nails!
See my other article where I do a complete rundown on the types and quality of the Mora Knife here: Mora Knife Review
e.g: lighter or fero rod
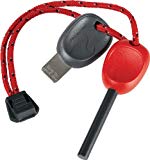
Again the Ferro Rod you buy does not need to be one of those super rods on the market.
I have found the Light My Fire ferro rod to be a very reliable tool when it comes to producing a shower of excellent sparks.
I would highly recommend it…
e.g: paracord or bankline
- First-Aid or Self-Aid – makeshift slings, tornaqui or assisting a pressure wraps, and bandaging
- Shelter – guide ropes, ridge lines, lashings and securing knots
- Food – animal snares, fishing line/nets, hanging food away animals etc.
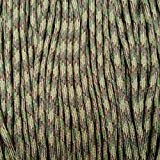
Not all paracord is equal.
The most reliable is paracord that has the MilSpec standard. Namely the 550 standard, which means it has been tested to withstand a minimum of 550lb breaking strain.
The Wild Elk American 550 Paracord, shown here has that standard.
I use this brand all the time and have never had any problems.
e.g: s/s water bottle or billy can
- First-Aid or Self-Aid – infusions: herbal teas and drinks
- Water – boiling up to make safe, storing and transporting water
- Fire – use metal water container to prepare char cloth for fire transportation
- Food – collect wild edibles and cooking
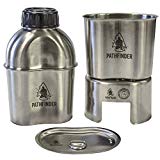
Your container is something I would recommend spending money on.
Quality definitely overrides price here. I use and highly recommend you look at using something like the Pathfinder PTH003 kit.
It’s a bombproof piece of kit, well-made and versatile – you can’t go far wrong here….
So there you go folks, the five C's of survival.
Cover, Cutting, Combustion, Cordage and Container.
Always have these five items to hand and your half way there to surviving.
Of course don't forget, never stop learning about Bushcraft, Prepping or Survival, because this lot wont help you at all if you don't know what to do with it..!!
Steve Hart - UK Preppers Guide
this is how to build a basic survival shelter Easily

- Don't go out unprepared.
Always carry a temporary emergency shelter with at all times, along with the right footwear and clothing. - Pick the right spot.
Choose an area that will give as much natural cover even before you have put up a shelter. - make use of natural surroundings.
A fallen tree will make great cover and protection, make use of it. - Keep it small and compact.
Don't make a massive mansion! Your shelter must be just big enough for you to crawl in, this will make heating up sounding air space more efficient. - insulate the ground.
Use natural material to layer the ground and form a insulated layer. The thicker the better,
Every prepper or bushcrafter should be prepared for an emergency. You should have the necessary kit in your rucksack to enable yourself to take shelter from the elements. With this kit you can then build a basic survival shelter.
This is the easiest and most straightforward method. After all if you going out in the wild you would at the very least have a day sack with you.
A survival shelter is a priority once you find yourself lost or stranded or you simply realise you cannot make it back home before dark.
The rule of three for survival states you will need a shelter within three hours. However, if in a cold climate, you will need to build a survival shelter almost immediately to prevent hypothermia.
So time is important and the more time you spend exposed to the elements the worse things get.
Getting yourself out of those conditions and building a cover that protects you from the elements, predators, and insects and provides comfort is paramount.
Essentially, you need it as much for your mental well-being as you do for your physical well-being.
In this article I show the simplest gear to carry in your rucksack,
gear that will enable you to easily build a survival shelter.

Survival Shelter materials
Ideally, you will have shelter material in you pack along with tools and materials such as quality cordage, knife, axe and wood saw.
Otherwise, you can use materials found in your environment and you can take advantage of natural features.
everyone carries a tarp
It is always worth carrying an emergency tarp like this DD 3m x 3m Tarp (Multicam Tarp/Basha) shown below – it will get you out of lots of situations…
Secure your tarp to the top of the downed tree and slant to the ground on the north side in cold weather. Secure with wooden stakes or rocks. Peg out to form a cover shelter, as you see below, or any combination to suit conditions.
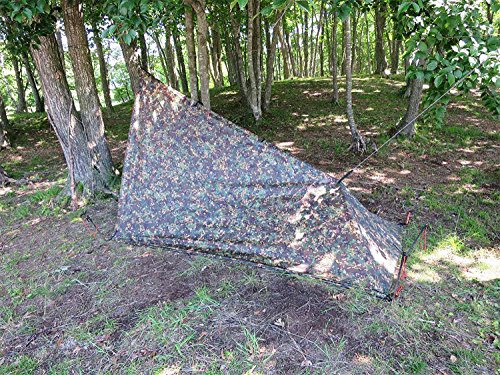
You can also use a poncho, tarps, thermal blankets, local vegetation and woodland. All these can be used also as survival shelter materials.
But once you realise you are lost, you must have a shelter constructed before dark.
It is always recommended that you shelter in place and begin setting up camp immediately.
Always stop for a minute and evaluate your surroundings for material.
When it comes to tarps, do not buy cheap. You will definitely regret it and when you do it will be in the middle of the night when it's windy and raining..!!!
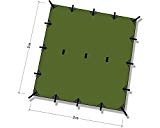
The tarp is one of the most versatile bits of kit you can have with you.
It is light, compact and can be formed to many different configurations to suit the conditions. Below are just some of the different layouts you can use:


See all the different tarp sizes and colours here: DD Tarp systems
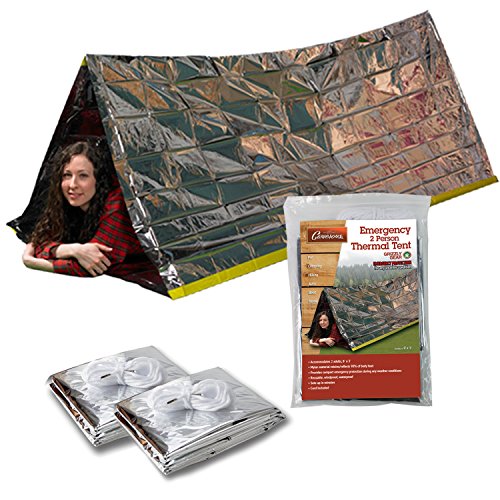
Another system well worth considering is the pre-made emergency thermal tent:
It’s even possible to build yourself a basic survival shelter from Reflective Mylar, this will give you, in effect, an emergency thermal tent, being both warm and waterproof.
I particularly like this idea as it is very light and compact.
Quite often it’s a good idea to use short Bungee Cords to secure your tarp rather than rope or paracord. This will ensure a bit of movement in windy condition and prevent any extra force on your tarp.
I often carry bungees and without a doubt find them very useful to have with me.
Take advantage of your natural surroundings
The most simplest type of shelter is simply to get under a tree, sheltering under a low hanging branches if possible. It will prevent any rain getting to you and if you use the limps to block the side, will give protection for the wind.
However, if you have time and available daylight think about making yourself a quick, low level 'lean too' survival shelter. But being prepared with a tarp or mylar blanket is probably the quickest and easiest method to build a basic survival shelter.
Building a survival shelter is the most important thing you can do if you find yourself stranded in the wilderness.
A shelter will make the difference between surviving and not and you will find you can survive extremely harsh conditions if you have protection from the elements.
Wandering around looking for help will only slow down rescue personnel.
Stay in place, and set up camp and wait for rescue.
Steve Hart. (UK Preppers Guide)